
Products List Management (Products & Inventory)
OctopusPro’s Products List Management lets you create and maintain a product catalog that can be added to quotes, bookings, and invoices. This is ideal for businesses that sell or use consumables, spare parts, materials, accessories, or packaged add-ons alongside services (e.g., sealants, filters, replacement parts, cleaning chemicals, hardware items, etc.).
By defining each product’s unit cost, markup, sale price, tax rate, unit label, and availability, you standardize pricing, reduce admin work, and ensure consistent billing across your team.

Real-time inventory tracking is fully supported in OctopusPro. When Stock Management is enabled, you can monitor product quantities in real time, use storage strategies (FIFO/FEFO/LIFO), configure suppliers and minimum stock thresholds, and maintain accurate stock availability for smoother purchasing and sales operations.
On this page
- Where products appear and how they’re used
- Products List Management settings
- Create or edit a product
- Import and export products
- Cost, markup, and sale price
- Tax rate and unit label
- Item code + QR/Barcode scan
- Enable Stock Management (real-time inventory)
- Storage strategy (FIFO / FEFO / LIFO)
- Default supplier and minimum stock amount
- Description, visibility, specifications, images, and attachments
- Assign products to services + default quantities
- Auto-add to services, serial numbers, and expiry dates
- Use products in quotes, bookings, invoices, and PDFs
- Accounting integrations (Xero & QuickBooks)
- Add and use products from the mobile apps
- Role-based permissions for products and stock management
- Best practices
Where products appear and how they’re used
- Quotes: Add products as line items alongside services to provide a clear materials breakdown.
- Bookings/Jobs: Track products used during the job (office users and/or fieldworkers/technicians).
- Invoices: Bill products as separate line items for transparent pricing.
- Apps, emails, and attachments: Optionally display products on the mobile apps and in customer communications (see settings below).
Products List Management settings
To manage product behavior across your account, go to:
Settings > Products List Management
On this page, you’ll typically find account-level controls such as:
- Display Products in App (Google Play, App Store), Emails & Attachments: When enabled, products can appear in the fieldworker/technician apps and be included where applicable in customer emails and attachments (depending on your templates and settings).
- Require Product Selection to Complete a Job: Forces fieldworkers/technicians to select/add the products used before marking a job as completed—helping ensure accurate stock usage and invoicing.
- Change “Supplied By” Default for All Products: Sets the default “Supplied By” option applied when creating new products (you can still override per product).
- Enable Stock Management: Turns on the inventory system and real-time stock tracking features for your company.
Tip: The products list may also include quick actions like search, add (+), and export/import tools (depending on your configuration).
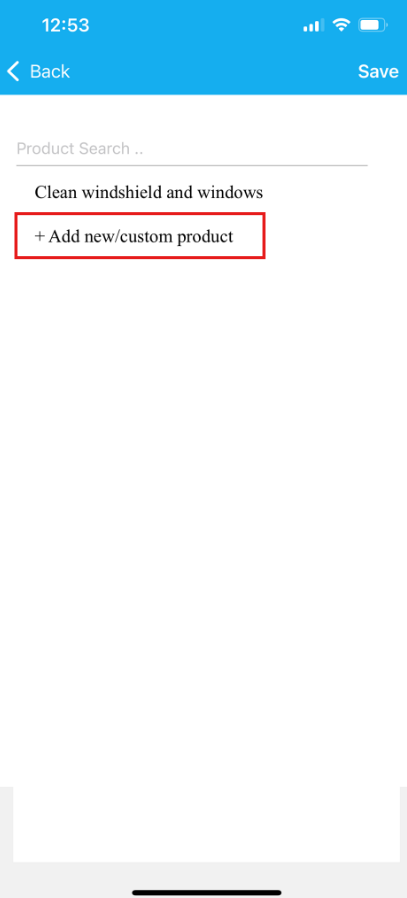
Create or edit a product
From Settings > Products List Management:
- Click Add (+) to create a new product, or select an existing product and choose Edit.
- Complete the product fields (name, pricing, tax, unit label, etc.).
- If Stock Management is enabled, configure inventory-related fields such as storage strategy, supplier, and minimum stock threshold.
- Optionally add description, specifications, images, and attachments.
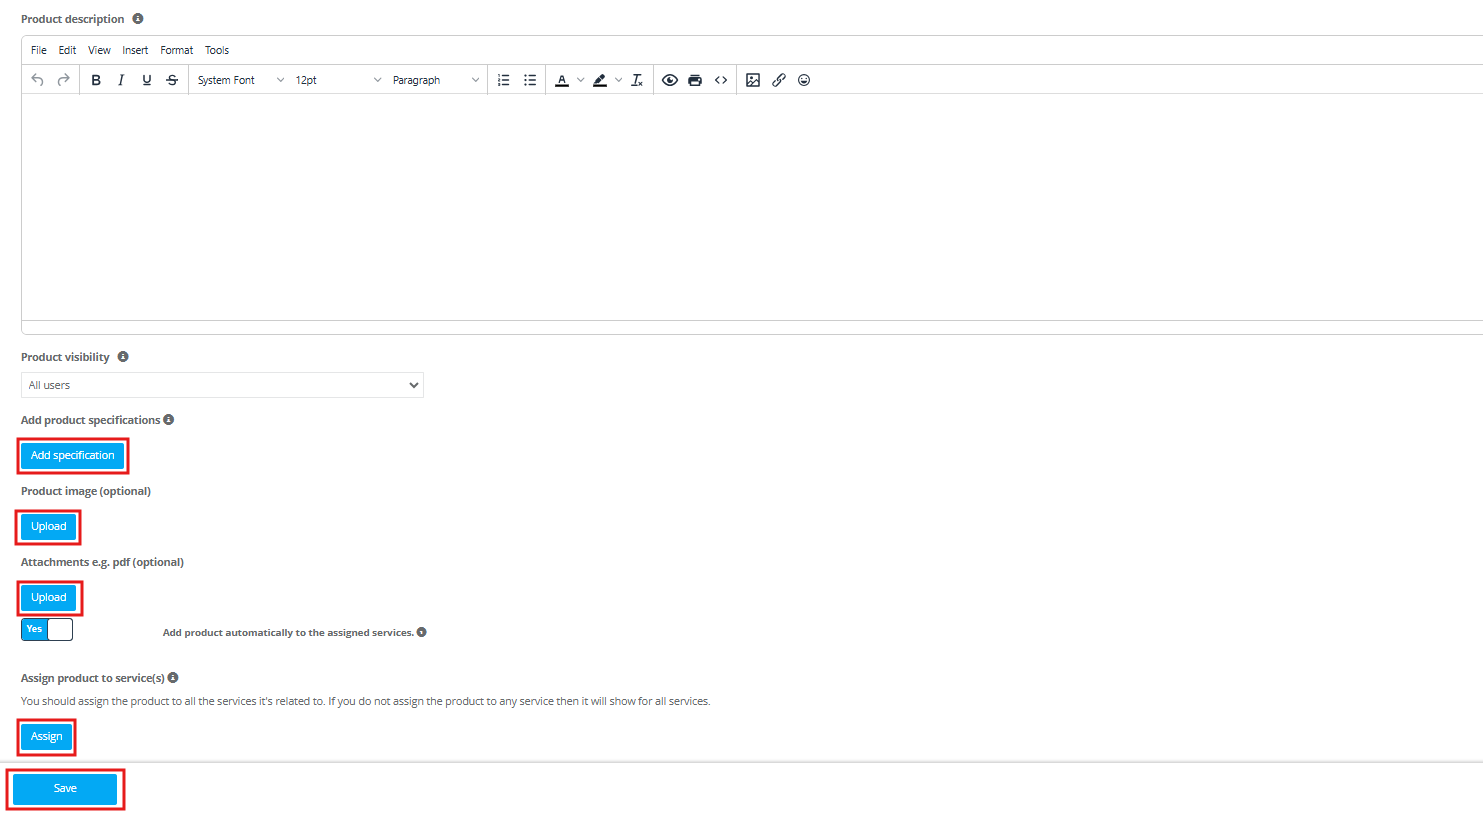
- Assign the product to specific services if you want to control where it’s available (or auto-added).
- Save your changes.

Importing & exporting products
If you need to add products in bulk, update pricing across a large catalog, or keep an offline copy for auditing, OctopusPro supports both CSV-based import/export and (for eligible accounts) accounting sync workflows with Xero or QuickBooks.
Why import/export?
- Bulk setup & updates: Create or update many products at once (pricing, tax, unit labels, descriptions, etc.).
- Backups & auditing: Export your catalog anytime for review, sharing, or record keeping.
- Inter-system transfers: Move product data between OctopusPro and other tools when a direct integration isn’t available.
Option 1: Manual import/export (CSV)
Access the Products page
- Log in as an admin user (or a fieldworker with the required permissions).
- Go to Settings > Services Settings.
- Select Products from the left-side menu.
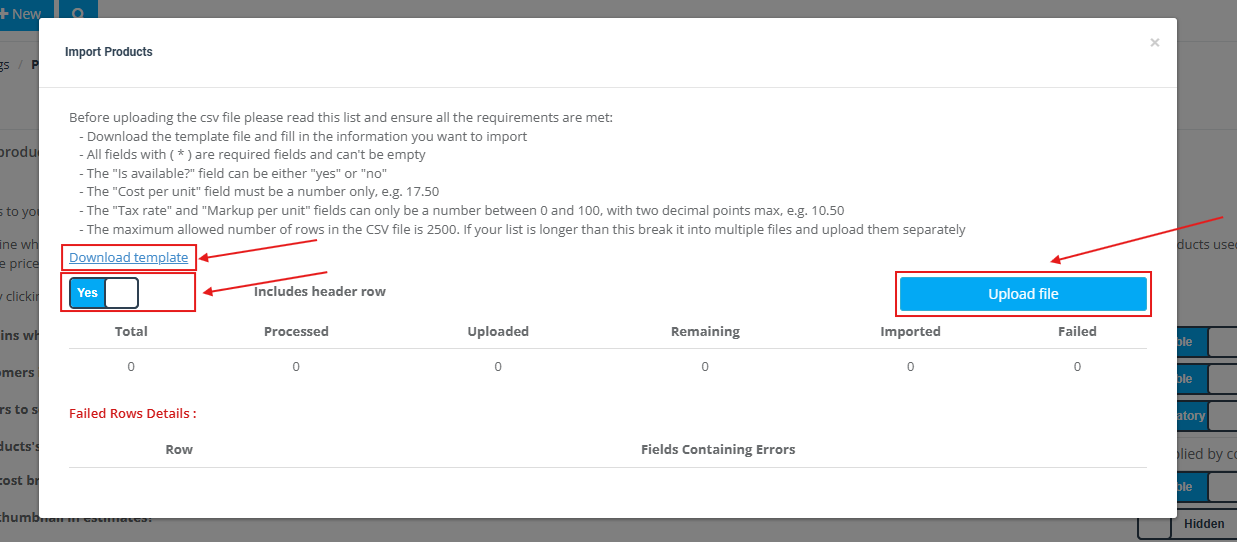
Import products (CSV)
- Click Import Products.
- A pop-up window will appear with instructions. Click Download Template to get the CSV format.
- Open the template and add your product data. Typical fields may include (depending on your enabled features):
- Product Name
- Item Code / SKU
- Unit Label (e.g., each, box, L, m, kg)
- Cost per Unit
- Markup and Markup Type (e.g., % or fixed amount, if supported)
- Sale Price
- Tax Rate
- Product Description
- Stock fields (only if Stock Management is enabled), such as minimum stock thresholds or other inventory attributes
- Save the file as .CSV.
- Back in OctopusPro, choose whether your file includes a header row.
- Click Upload File and select your CSV.
- OctopusPro will process the file and display a success/error summary (for example: how many products were created, updated, or failed validation).
Tips for a clean import
- Use unique identifiers: If available in your template, an Item Code/SKU helps avoid duplicates and improves mapping (especially for accounting and inventory workflows).
- Match tax formatting: Ensure tax rates are entered in the expected format and align with your accounting/tax setup.
- Validate numbers: Use consistent decimals and avoid currency symbols in numeric columns unless the template explicitly expects them.
- Start small: Run a test import with a few products first to confirm formatting and mapping.
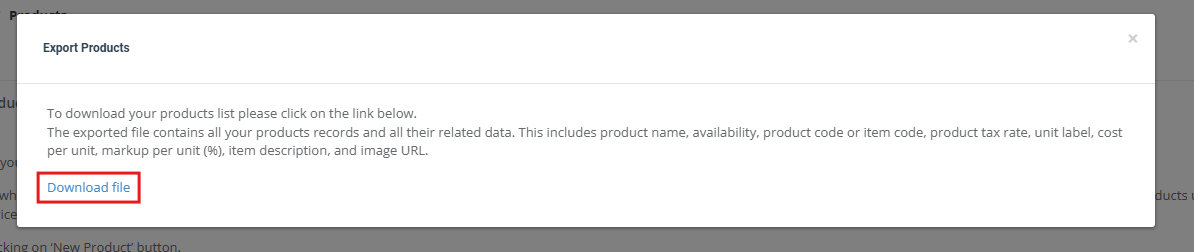
Export products (CSV)
- From the Products page, click Export Products.
- Download the exported CSV file containing your current product list and associated data (such as product name, pricing, tax rate, unit label, description, and any enabled inventory fields).
Option 2: Xero / QuickBooks workflows (when enabled)
For users who prefer seamless accounting workflows, OctopusPro can work alongside Xero or QuickBooks (availability depends on your plan and configuration). In most setups, products appear on invoices as line items and are included as part of the invoice sync process to your accounting platform.
- Best practice: Standardize Item Codes/SKUs, names, and tax rates to keep invoice exports/syncs consistent and reduce duplicates.
- Recommended step: After configuring your integration, sync a test invoice to verify item naming, codes, and tax mapping behavior.
If you want to maintain products primarily in an external accounting system and mirror them into OctopusPro, use the CSV approach above (or your integration setup rules) to keep both systems aligned.
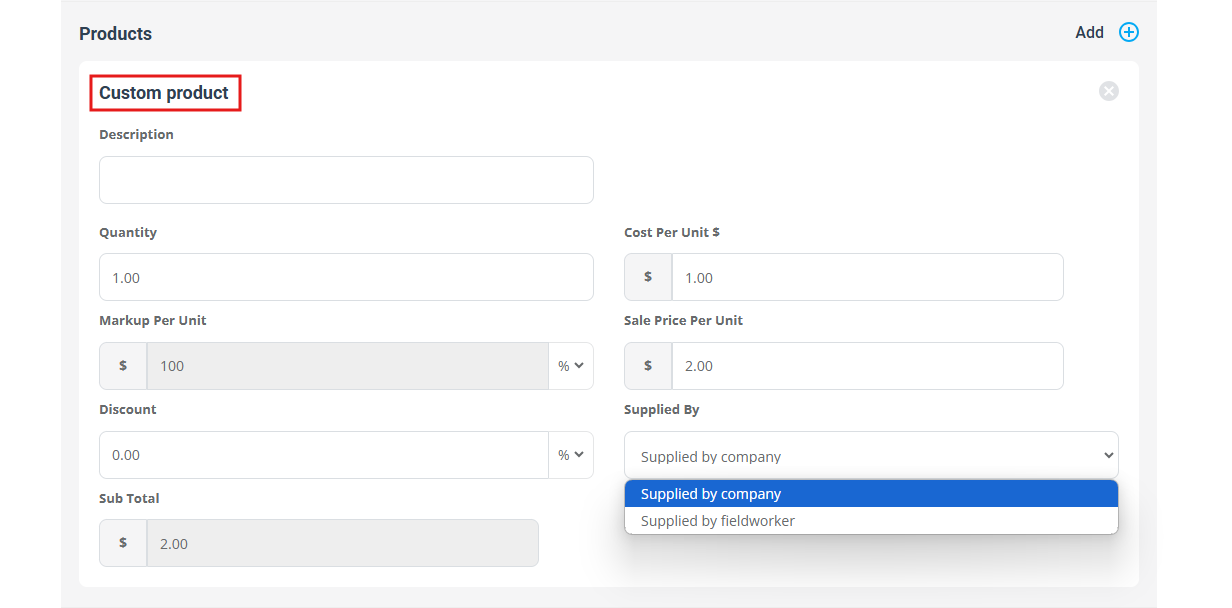
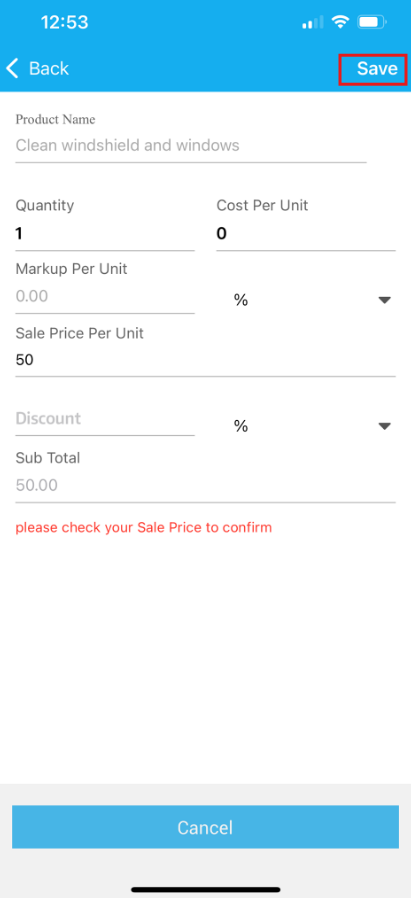
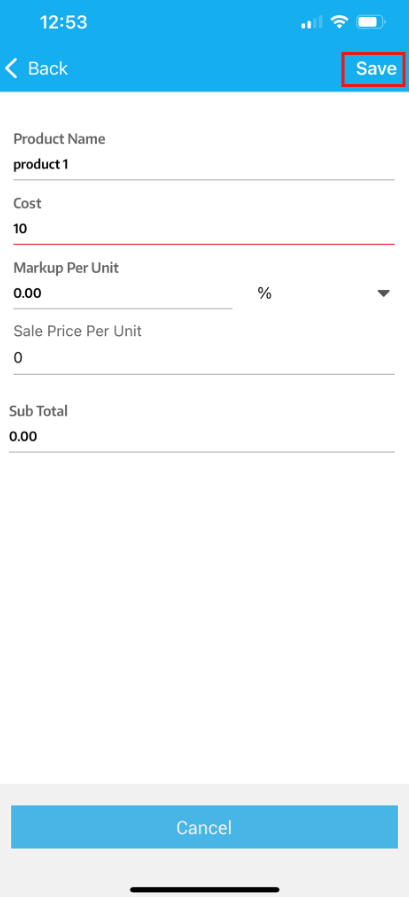
Cost, markup, and sale price
Products support detailed pricing so you can control margins and keep pricing consistent.
- Cost Per Unit ($): Your internal cost price for a single unit of the product.
- Markup Per Unit: The markup value applied to the cost (based on the Markup Type).
- Markup Type: Choose how markup is applied (for example, % markup). Your configuration may also include other types (e.g., fixed amount), depending on your setup.
- Sale Price: The final selling price charged to the customer for one unit.
Example: If Cost Per Unit is $50 and Markup Type is % with Markup Per Unit set to 20, the Sale Price would be $60 (depending on your pricing rules and rounding settings).
Tax rate and unit label
- Tax Rate: Select the applicable tax rate for the product (e.g., Tax Exempt / Without tax, GST/VAT rate, etc.). This helps keep invoices accurate and compliant.
- Unit Label: Define how the unit appears (e.g., each, pcs, box, L, m, kg). This makes line items clearer for staff and customers.
Item code + QR/Barcode scan
Use Item Code to store a product identifier such as a SKU, barcode value, or internal code. This is especially useful if you scan products during job completion, inventory receiving, or warehouse/van stock operations.
Next to the Item Code field, click Scan to open the Scan QR Code window. You can typically choose between:
- Camera Scan: Use your device camera to scan a QR code/barcode.
- Upload Image: Upload an image containing a QR code/barcode for decoding.
Common scanning tips include:
- Ensure the code is well-lit and in focus.
- Hold your device steady while scanning.
- Keep the code inside the scanning box.
- If camera scan fails, upload an image instead.
Enable Stock Management (real-time inventory)
The Enable Stock Management toggle activates OctopusPro’s inventory system for your company.
When enabled, Stock Management provides the tools and capabilities required to efficiently track and manage inventory levels. You can monitor product stock in real time, ensuring you always have accurate information about stock availability. This helps you optimize inventory management, avoid stockouts, streamline purchasing and sales processes, reduce waste, and maintain smooth operations across your supply chain.
Once Stock Management is enabled, you’ll see additional inventory-related fields on product setup screens, such as:
- Total Quantity in Inventory (your current on-hand quantity)
- Storage Strategy (FIFO/FEFO/LIFO)
- Default Supplier
- Minimum Stock Amount (low-stock threshold)
- Optional tracking features like serial numbers and expiry dates (per product)
Storage strategy (FIFO / FEFO / LIFO)
Storage Strategy controls which stock is consumed/issued first when the product is used or sold.
- FIFO (First In, First Out): Oldest stock is used or sold first. Ideal for products with a long shelf life or items prone to obsolescence.
- FEFO (First Expired, First Out): Stock with the earliest expiration date is used or sold first. Essential for perishable or time-sensitive goods.
- LIFO (Last In, First Out): Newest stock is used or sold first. Often used in industries with stable goods or fluctuating prices (e.g., construction materials).
Default supplier and minimum stock amount
- Default Supplier: Select the default supplier for your company’s stock management operations. This helps streamline reordering and purchasing workflows by standardizing where the product is sourced from by default.
- Minimum Stock Amount: Set the minimum stock amount for your inventory. Alerts can be triggered when stock falls below this value, helping you reorder on time and prevent stockouts.
Description, visibility, specifications, images, and attachments
- Product Description: Add a detailed description using the rich text editor (useful for staff notes, customer-facing detail, and consistent quoting).
- Product Visibility: Control who can see the product (for example, office users only, or office users plus the fieldworker who created it—options may vary by account settings).
- Product Specifications: Use Add Specification to store structured details (e.g., size, color, brand, model, finish, compatibility, safety info). This is helpful for internal reference and consistent documentation.
- Product Image (Optional): Upload an image for easier identification in apps and product pickers.
- Attachments (e.g., PDF) (Optional): Attach documents such as spec sheets, manuals, safety data sheets (SDS), warranty docs, or installation guides.
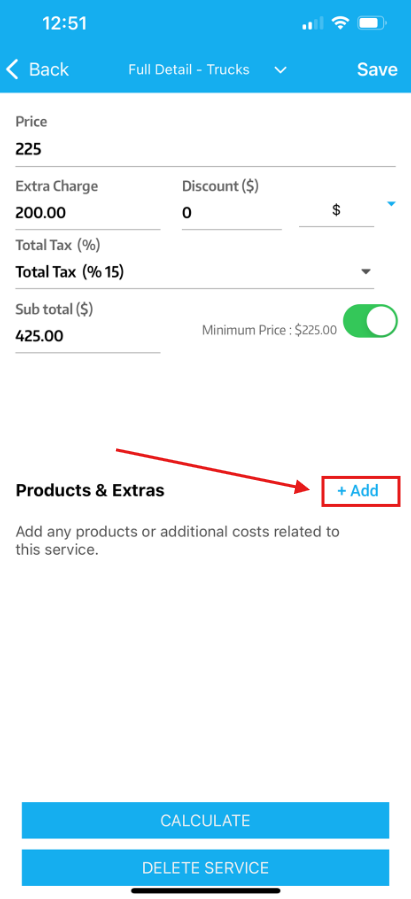
Assign products to services + default quantities
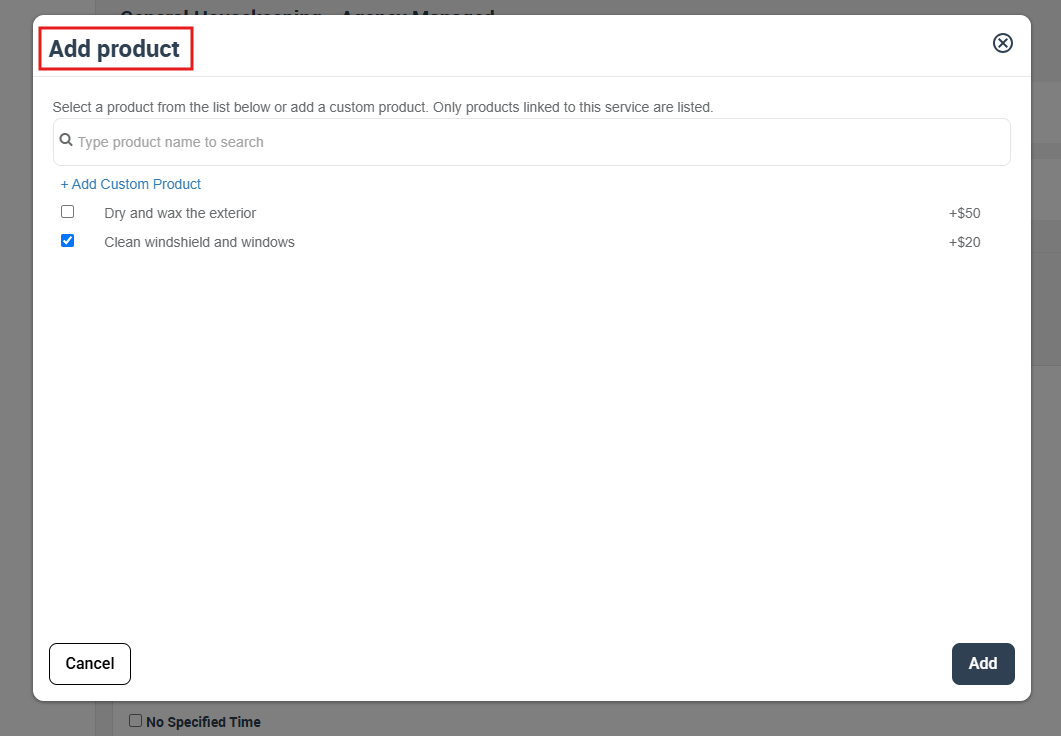
Use Assign Product To Service(s) to control where a product is available and to optionally set default usage quantities.
- If you do not assign the product to any service, it will typically be available for all services (depending on your configuration).
- If you assign it to specific services, the product will be shown/available when working with those services (and can be hidden from unrelated services).
When assigning to services, you can also set a Default Quantity per service. This is useful when a service normally uses a predictable amount of a product (e.g., “2 units of sealant per job” or “1 replacement filter per visit”).

Auto-add to services, serial numbers, and expiry dates
- Auto-Add Product to Assigned Services: When enabled, the product can be automatically added when a matching service is selected (using the configured Default Quantity). This reduces manual entry and improves consistency.
- Enable serial numbers for this product: Track unique serial numbers for each unit—ideal for high-value items, equipment, or warranty/traceability needs.
- Enable expiry dates for this product: Track expiration dates—ideal for perishable items or products with shelf-life requirements. Works especially well with FEFO.
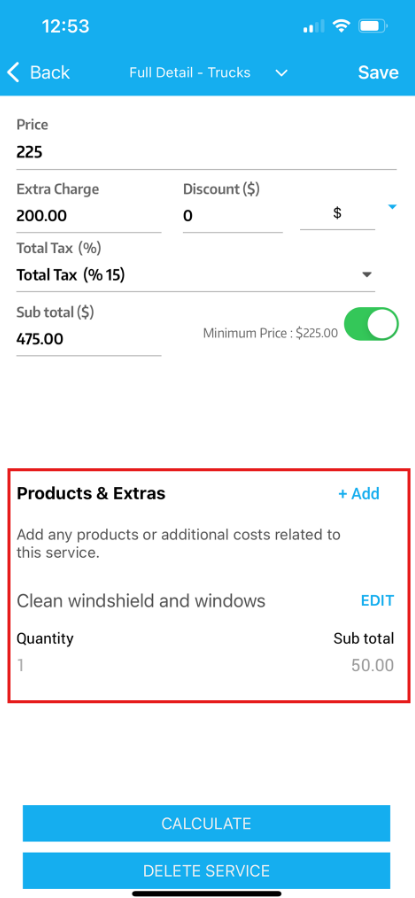
Use products in quotes, bookings, invoices, and PDFs
Add products when creating a booking
You can add products at the time you create a booking/job, so materials are pre-defined before the appointment takes place.
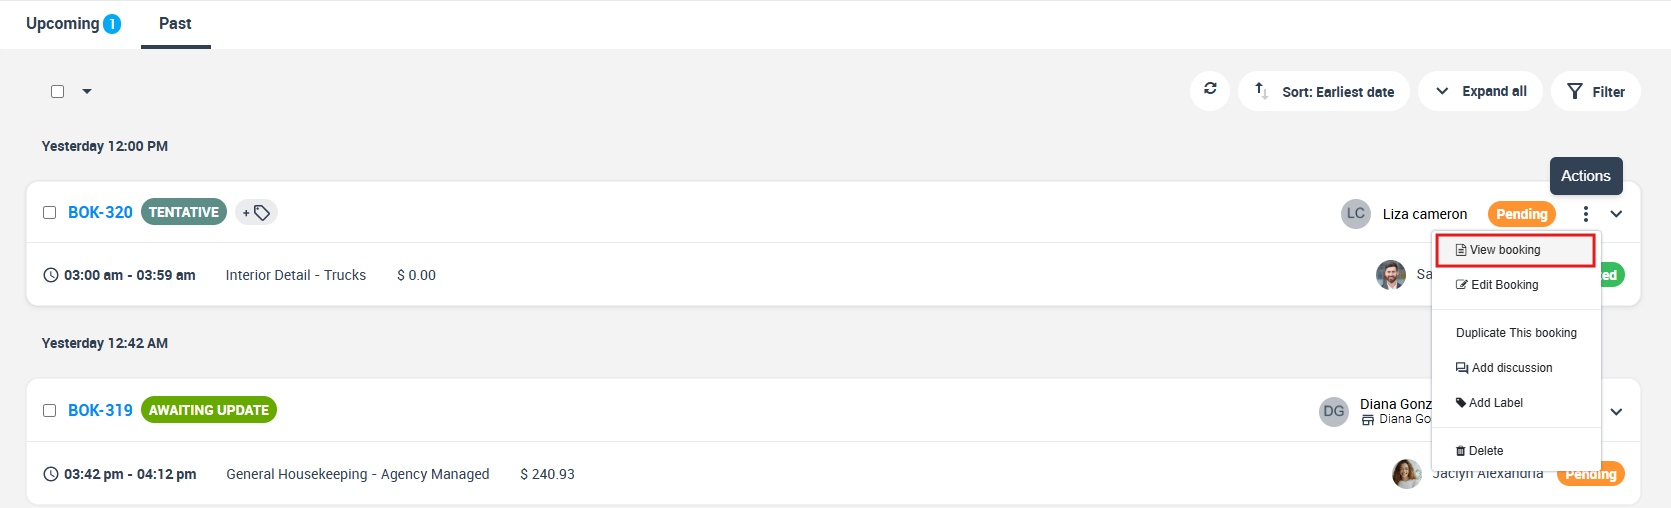
Add products from a booking (office users)
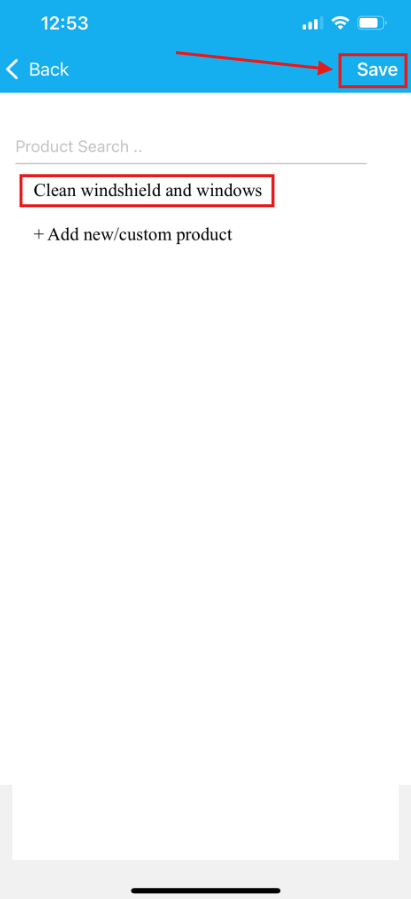
From the booking details page, you can add products and custom products (if enabled) as line items.

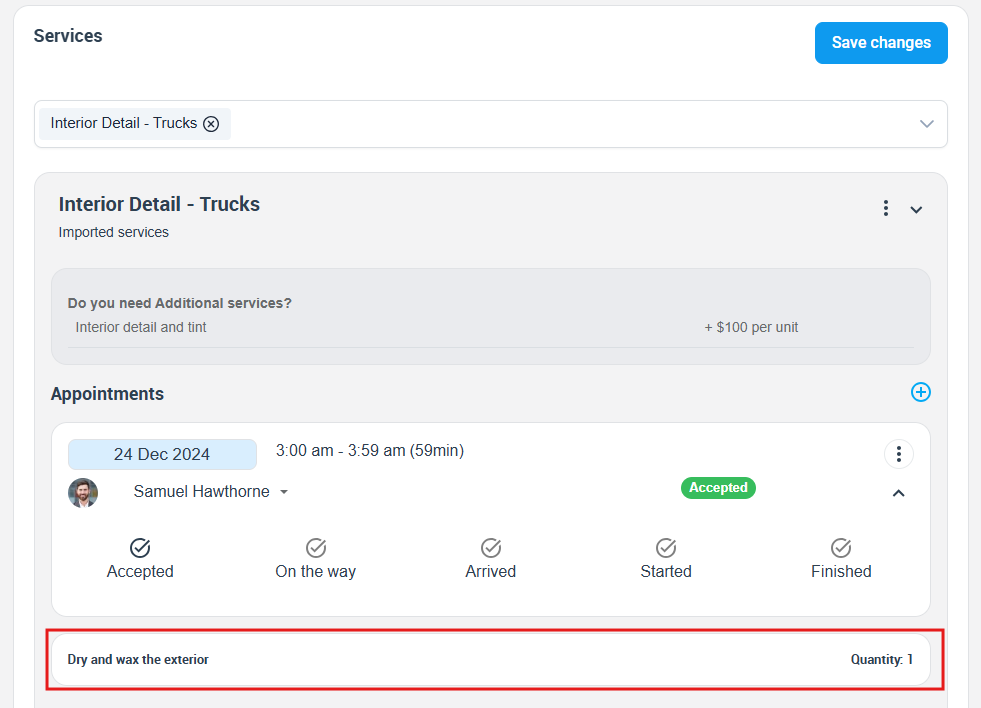
When printing or generating booking PDFs, included products can appear as line items (depending on your document/template settings).

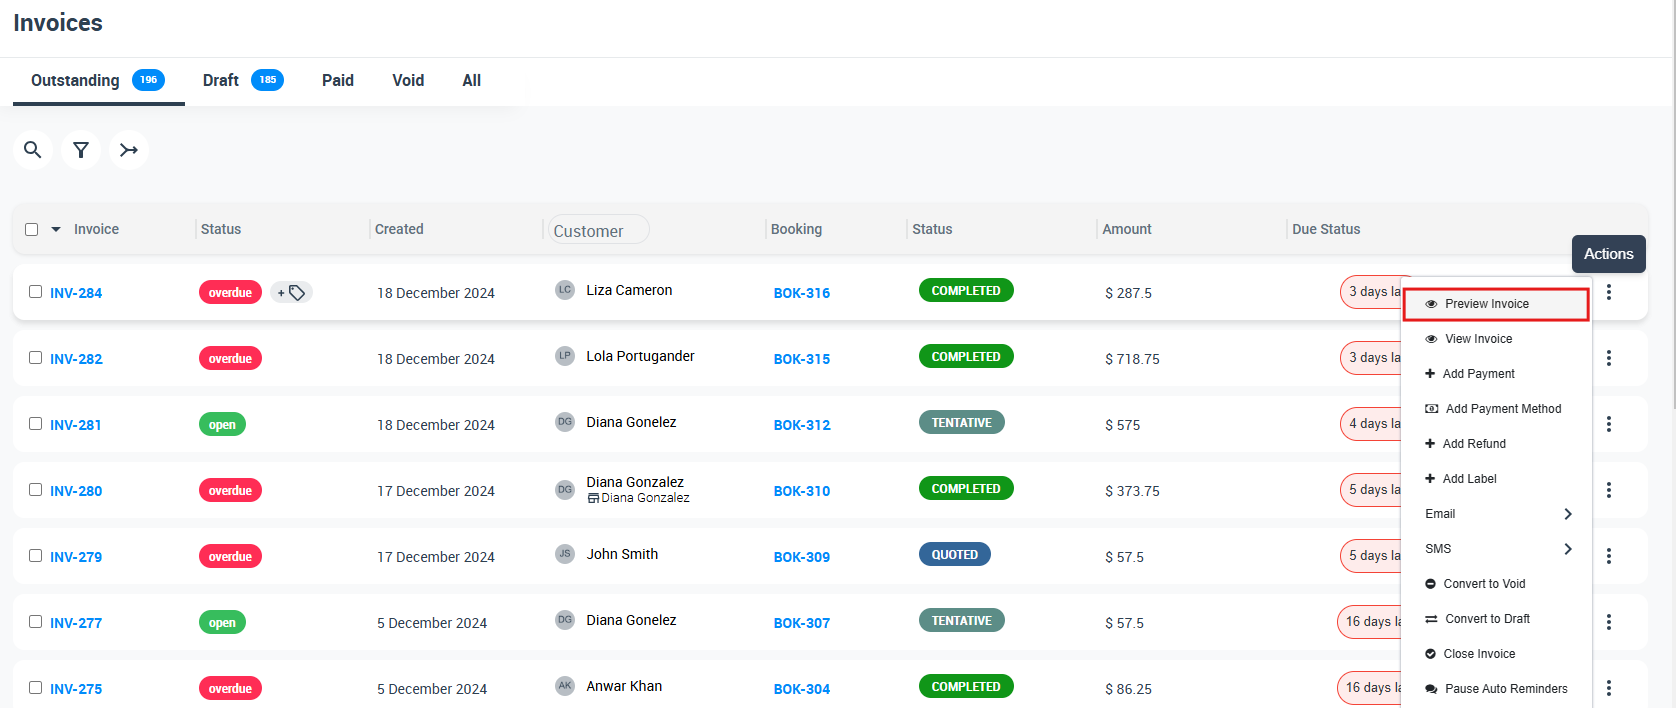
Show products in invoice previews and PDFs
Products added to a booking or invoice can be shown in invoice previews and invoice PDF outputs.
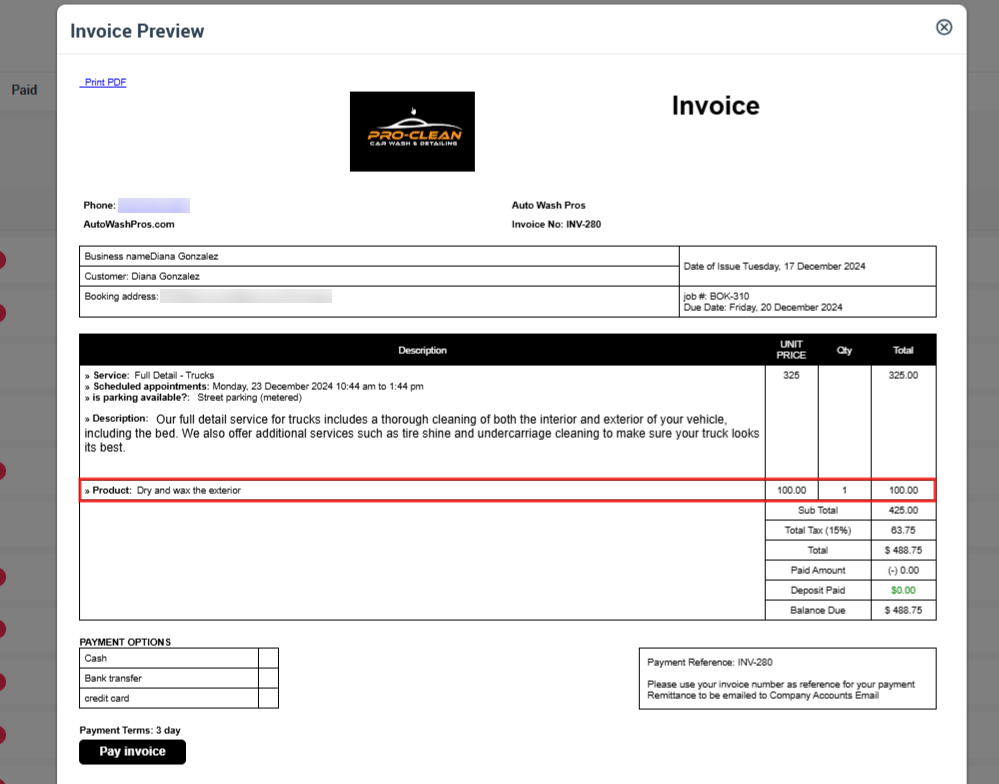
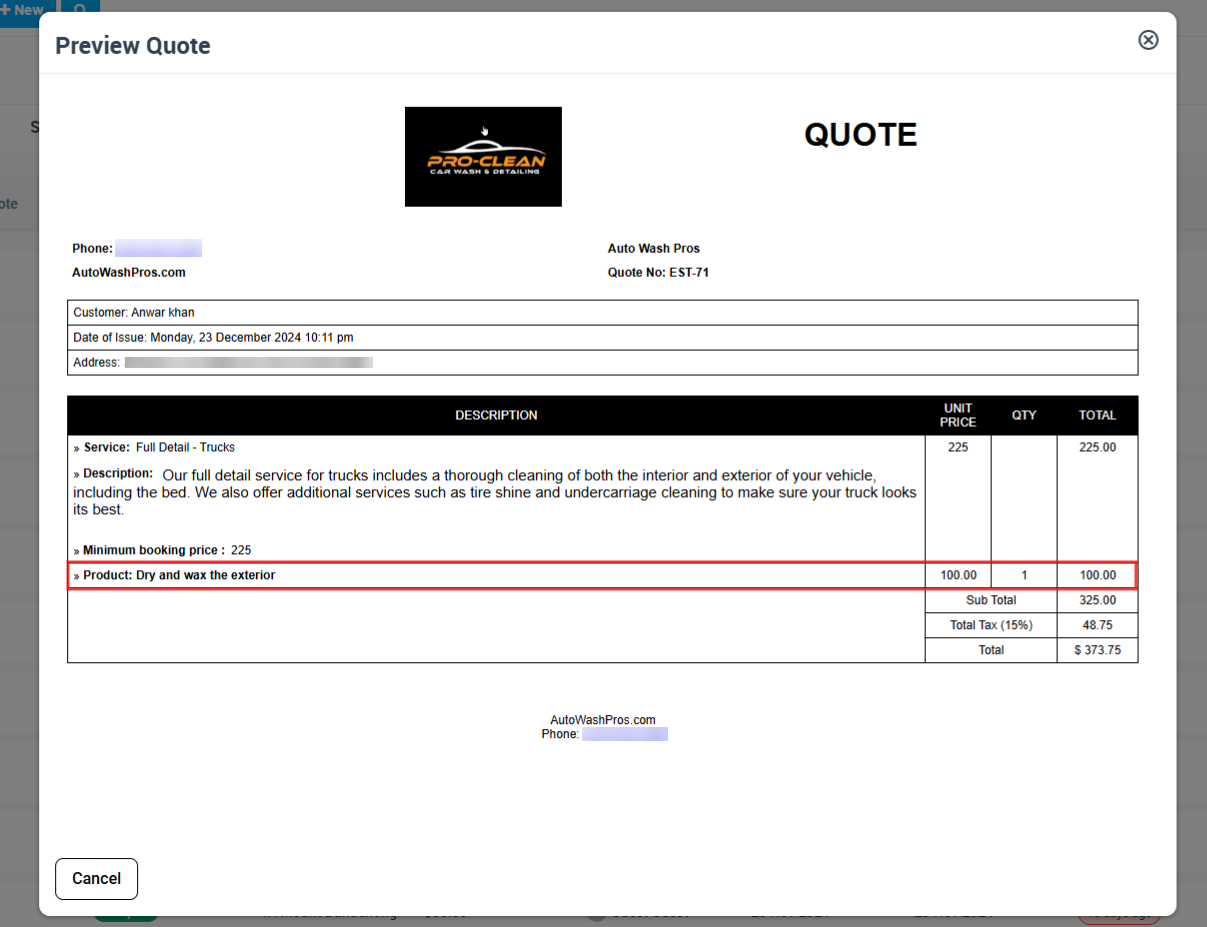
Show products in quote previews and PDFs
Products can also appear in quote previews and PDF outputs, helping customers understand material costs before accepting.
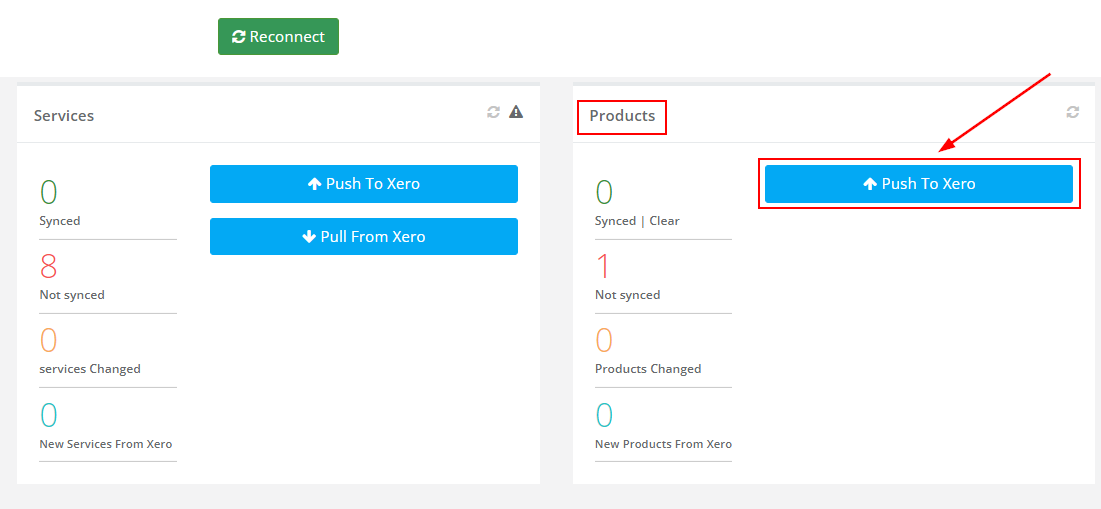
Accounting integrations (Xero & QuickBooks)
If you use Xero or QuickBooks integration, your Products List helps keep your accounting records consistent by using standardized product details (names, codes, tax rates, unit pricing, and line items) when syncing invoices (and related transactions) to your accounting system.
Why this matters
- Cleaner accounting data: Consistent product names/codes and tax settings reduce reconciliation issues.
- Accurate tax treatment: Product tax rates help ensure invoices sync with the correct tax configuration.
- Faster invoicing: Standard product items speed up quoting and invoicing and reduce manual entry.
- Better reporting: Product line items can improve revenue and cost reporting (depending on how you track items in Xero/QuickBooks).
How products typically sync (high-level)
Depending on your configuration and integration behavior, OctopusPro can send invoice line items (including products) to Xero/QuickBooks as part of the invoice sync. This generally uses key product fields such as:
- Product Name (line item description/title)
- Item Code / SKU (recommended for consistent mapping)
- Unit Cost (internal reference) and Sale Price (customer billing)
- Tax Rate (tax mapping depends on your accounting settings)
- Unit Label (may be shown as unit/quantity context depending on platform)
Tip: To avoid duplicates in Xero/QuickBooks, keep item codes consistent and avoid creating near-identical products with different names/codes.
Recommended setup for Xero / QuickBooks users
- Always use Item Code for stock items or commonly used products (e.g., SKU or barcode value).
- Standardize tax rates (e.g., GST/VAT vs tax-exempt) to match your accounting system’s tax rules.
- Use clear unit labels (each, box, L, m, kg) so quantities make sense on exported invoices.
- Lock pricing rules internally: Define cost + markup/sale price so staff produce consistent invoice line items.
- Validate mapping: After enabling integration, sync a test invoice to confirm item naming/codes and tax behavior.
Notes and common troubleshooting
- Duplicate items in accounting: Usually caused by inconsistent item codes or creating similar products with different codes.
- Tax mismatches: Confirm the product tax rate in OctopusPro matches your tax setup in Xero/QuickBooks.
- Rounding differences: Small rounding differences can happen depending on tax calculation settings and how unit prices/discounts are applied.
- Inventory vs accounting stock: OctopusPro’s Stock Management tracks inventory in OctopusPro. Xero/QuickBooks may have their own “Items/Products” tracking—how they align depends on your workflow and accounting configuration.
If you need help configuring the integration itself, refer to your accounting integration setup guide and ensure your invoice templates and tax mappings are configured correctly.
Add and use products from the mobile apps
If you enable Display Products in App, fieldworkers/technicians can view and add products while working on jobs (depending on your permissions and configuration).
If custom products are supported for your account, fieldworkers/technicians can also add new custom products from within the app.
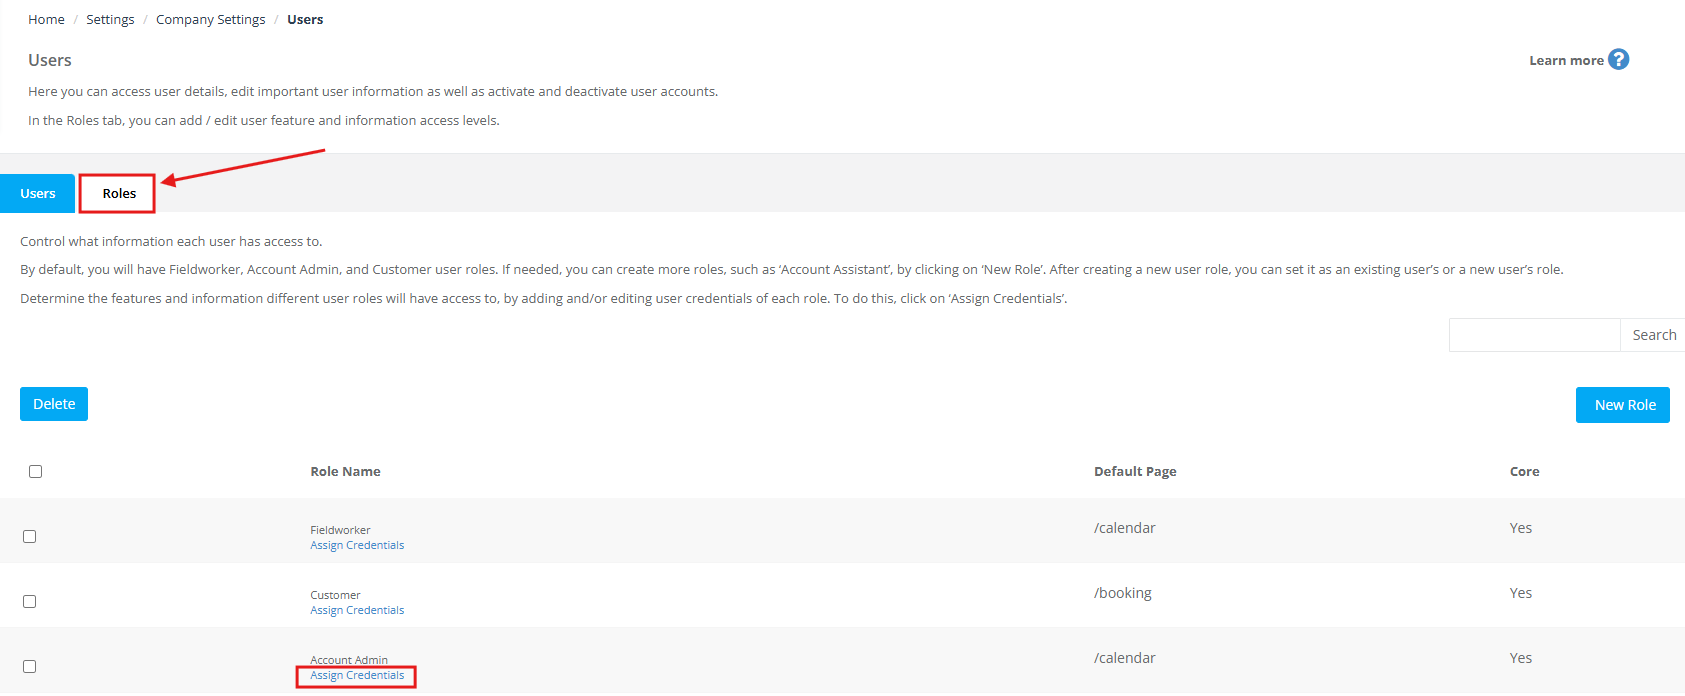
Role-based permissions for products and stock management
If you use Role-Based Access Control (RBAC), you can control which users can access and manage products and inventory workflows (e.g., inventories, inventory transactions, purchase orders, goods receive notes, stock adjustments, suppliers, product edits, and audit approvals).
To learn more about configuring permissions, see: Role-Based Access Control (User Permissions)
Best practices
- Standardize naming: Use clear product names that match invoices and customer language (e.g., “Grout Sealer – 1L”).
- Use Unit Labels: Avoid confusion (pcs vs box vs litre) when staff add products to quotes/invoices.
- Set minimum stock thresholds: Prevent stockouts by triggering alerts before products run out.
- Assign to services: Keep product pickers clean by showing only relevant items for each service.
- Use Auto-Add + Default Quantity: For predictable consumption, reduce human error and speed up job completion.
- Enable serial/expiry tracking when needed: Improves traceability, compliance, and stock rotation accuracy.
To stay updated, please subscribe to our YouTube channel.