Service Packages & Bundles – Sell Multiple Bookings Together
Customers often need the same job done again and again—weekly pool cleaning, a five-session dog-training plan, twelve-session tutoring plans, or multi-lesson driving courses. Service Packages in OctopusPro let you bundle those repeat bookings—or a curated mix of related offerings—into one prepaid or pay-as-you-go deal, complete with its own price, validity period, and scheduling rules.
What are Service Packages?
In OctopusPro, a package is a pre-paid bundle of repeated bookings for the same service (or the same add-on) delivered on a schedule you define—weekly, fortnightly, monthly, or ad-hoc. Think of it as a punch-card: one purchase reserves a block of future appointments at a preferential rate and locks those time-slots into your calendar.
Example – A mobile dog-grooming business sells a “Fresh-Coat 3-Pack.” When a customer buys the package, OctopusPro automatically creates three grooming bookings—one every four weeks—so the pet owner doesn’t have to re-enter details each time and the business secures three visits up-front.
Packages streamline repeat work for you, spare customers the hassle of re-booking, and unlock volume-based pricing incentives without requiring complex promo codes or manual scheduling.
What you can do
Create a service package – pick any service(s), set how many bookings are included, choose whether they recur on a timetable (recurring intervals), and define how long the credits stay valid (package validity).
Flexible pricing & discounts – charge a lump-sum, per-booking rate, or apply a built-in package discount to make the bundle more attractive than one-off bookings.
Sell anywhere – packages appear in the Customer Portal, branded app, quotes, and invoices. Customers or staff can schedule individual bookings until the credit balance hits zero.
Streamlined Invoicing: The Service Bundling feature also simplifies invoicing. When customers book a package, all services within the bundle are automatically included in the invoice, ensuring transparency and accuracy.
Automatic tracking & billing – OctopusPro deducts each completed booking, shows remaining credits to staff and customers, and rolls usages into combined or per-booking invoices—your choice.
Package Invoicing Rules
After you set the price and number of bookings, decide how OctopusPro should bill the customer.
Don’t generate any invoices when bookings are created
No invoice until you raise it manually later.
Contract work where billing is done at project close.
If you choose individual invoices you’ll also see When would you like the invoices to be created?
All invoices at once – create every invoice immediately so the client can pre-pay the full bundle.
First booking invoice only – generate only the first invoice now; future ones are issued automatically as each booking comes due.
Example Weekly Lawn-Care Package (12 visits) – generate all invoices at once so the client can pay up-front and receive a discount. Weekly Music Lesson Package (10 lessons) – generate only the first invoice now; each subsequent invoice is released the week of the lesson.
Add-on & Variant Packages (Option-Level)
Need to sell blocks of an optional extra—for example, four premium wax treatments inside a car-wash plan?
Settings ▶ Service Settings ▶ Services → Manage Custom Fields
Find the option (e.g. “Premium Wax”) → Edit → open the Package tab.
Configure bookings, price, and invoicing rules just like a normal service package.
The option-level package is tracked separately and can be billed together with—or independently from—the main service bundle.
Industry snapshots — how real businesses package services
Mobile Vehicle Care Fleet Service 4-Pack – Schedule four quarterly maintenance bookings per van (inspection + oil change). One upfront invoice, individual work orders generated each quarter so technicians and fleet managers see every upcoming visit.
Lawn & Garden Maintenance Season Pass (10 cuts) – Lock-in five months of fortnightly mowing at a discounted per-visit rate. OctopusPro auto-creates the recurring bookings and issues a single prepaid invoice, reducing no-shows and cash-flow gaps.
Tutoring & Test Prep Math Mastery Bundle – Sell five weekly online lessons plus an optional “Exam-Week Revision” add-on package (two extra sessions). The add-on is configured on the custom-field option, so only families that tick “Exam Boost” are charged for the extra hours.
Mobile Beauty & Bridal Bridal Countdown Package – Combine three hair trials, two facials, and one on-site wedding-day styling into a single bundle. Separate fieldworkers (hair stylist vs. esthetician) are assigned to each booking, while the bride receives one clear invoice and a consolidated schedule in her portal.
Pet Grooming Vans Six-Wash Pup Pass – Pre-sell six mobile grooms valid for 12 months. Owners choose dates later in the portal; invoices for each wash are auto-generated only when an appointment is confirmed, keeping revenue recognised at service time.
These snapshots show how packages, add-on option bundles, and flexible invoicing work together to drive repeat bookings, simplify scheduling, and give clients clear value for money.
Why sell service packages? — measurable wins for you and your clients
Business advantages
Up-front revenue & stronger cash-flow
Collect the package fee (or first instalment) today while OctopusPro drips the individual bookings into the calendar over weeks or months.
Higher average order value
Bundles combine complementary jobs (e.g. tune-up + filter change), lifting the ticket size compared with one-off bookings.
Automatic capacity planning
Recurring bookings are generated on your chosen rhythm, so staff and resources are reserved well in advance—no spreadsheet juggling.
Built-in upsell path
Add optional package extras at the custom-field-option level (e.g. “VIP interior detail” on a car-wash bundle) to capture incremental revenue without hard-selling.
Stickier customer relationships
Clients who pre-pay for multiple appointments are far more likely to stay loyal and resist competitors.
Customer advantages
Transparent savings
Side-by-side price comparison shows the bundle cost versus paying per appointment, so value is obvious.
One-step scheduling
A single checkout books every future session (or lets the customer pick dates later in their portal), eliminating repetitive forms and calls.
Budget certainty
Flat-rate packages (with optional instalments) help customers plan expenses—especially attractive for property managers or parents arranging tutoring blocks.
Flexible frequency – Choose the bundle size (3, 5, 10 sessions) that matches your schedule and budget.
Tailored experience
Packages can mix service types, locations (storefront, on-site, or virtual), and add-on options, giving customers a personalised plan instead of a generic “one size fits all.”
Bottom line – Service packages turn sporadic buyers into predictable, long-term revenue while delivering clear convenience and value for clients.
Setting up Packages in OctopusPro
Packages let you pre-sell a fixed number of future bookings for one service—perfect for maintenance plans, class passes, or seasonal care. You can publish them as:
Package style
When to use it
Where to build it
Standalone package
You only sell the service as a bundle (e.g. “10-Cut Lawn Plan”).
Create a new service record that represents the package.
Package option inside an existing service
Let customers choose one-offor buy a multi-booking pass for the same service (e.g. “Single Massage” vs. “5-Massage Pack”).
Add the package to the original service in Edit Service.
A. Creating a Standalone package
Settings ▸ Service Settings ▸ Services ▸ + Create New
Service Name – call it something recognisable, e.g. Fleet Oil-Change – 4-Pack.
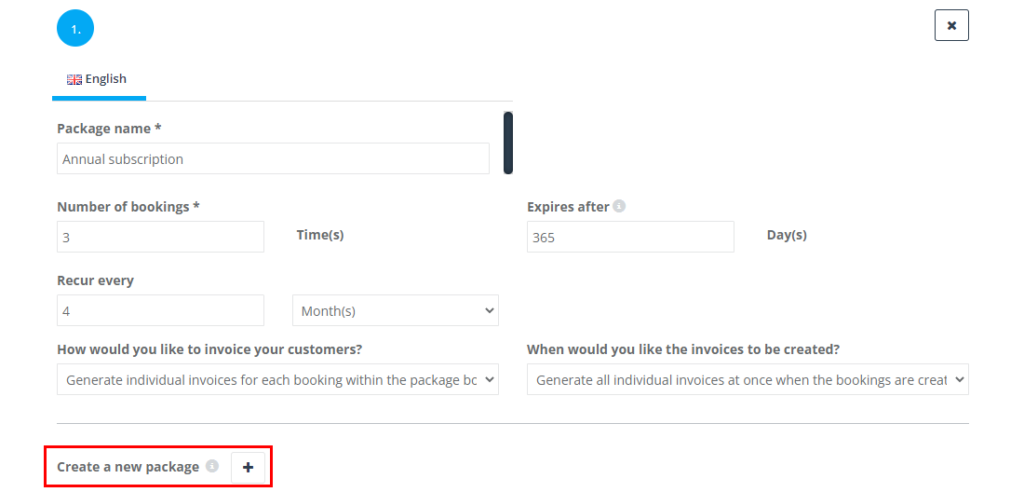
Click Create a new package + and complete the form:
Field
What it means
Package Name
Customer-facing name (required).
Number of Bookings
How many appointments the pass includes (required).
Recur Every
Default spacing between bookings (weeks, months). Leave blank to let customer pick dates.
Expires After (days)
Optional validity period; leave blank for “never expires”.
Click Next to reach Cost & Payrate. Enter the discounted per-booking price (e.g. set $60 if the normal oil-change price is $70).
Save. OctopusPro now treats this service as a prepaid bundle and auto-creates each booking on the chosen schedule.
B. Adding a package inside an existing service
Settings ▸ Service Settings ▸ Services ▸ Edit the service (e.g. Standard Lawn-Mowing).
Scroll to Packages and click Create a new package +.
Complete the same fields as above. Example:
Package Name
Number of Bookings
Recur Every
Expires After
Lawn-Care Season Pass
10
2 weeks
365
(Optional) Add another package named Single Visit with Number of Bookings = 1 so customers can still book once-off.
Save. At checkout, customers will see both Single Visit and Season Pass prices.
Field definitions & tips
Number of Bookings – must be an integer ≥ 1. OctopusPro generates that many bookings when the package is purchased.
Recur Every – drives automatic scheduling. Use “0” or leave blank if appointments will be booked manually later.
Expires After – stops unused credits after the period; prevents indefinite liabilities.
Pricing – packages inherit the service’s pricing model (per time or per unit). Enter a lower rate to show savings.
Example workflows
Mobile Mechanic – Quarterly Fleet Plan: 4 bookings, recur every 3 months, $60 per service (normal $75).
Gardening Service – 10-Cut Pass: 10 bookings, recur every 2 weeks, expiry 365 days.
Review & Start
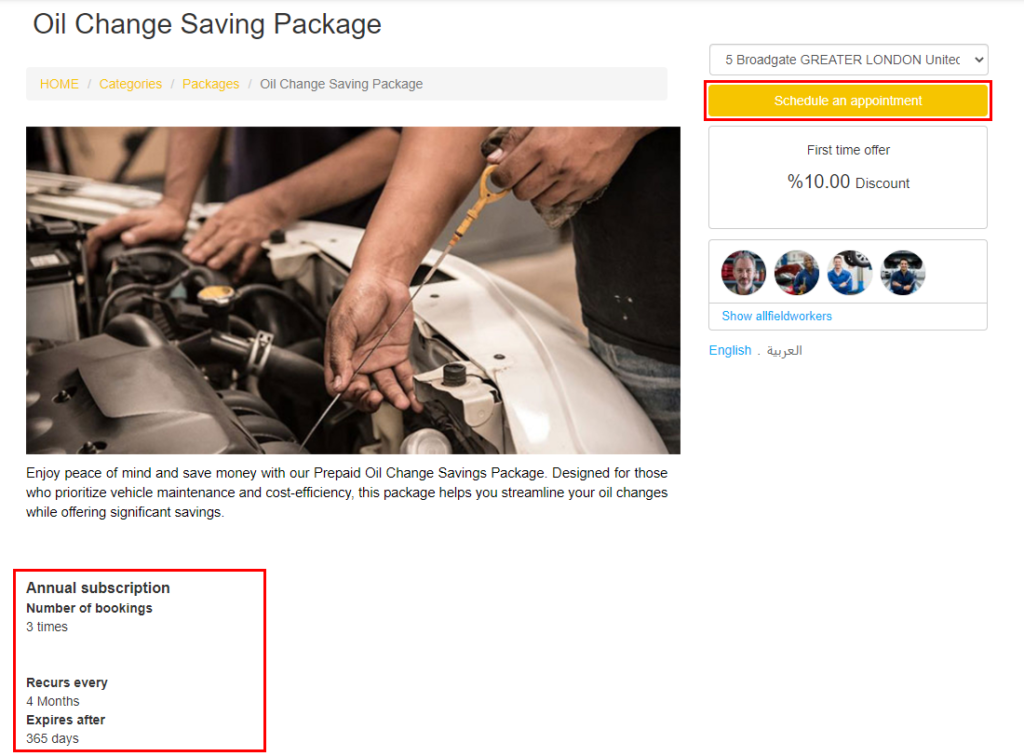
On the package detail page the customer sees:
✔ How many appointments are included
✔ Any expiry date
Click Schedule Appointment.
Enter Location → Qty → Continue Location (address or vehicle) → Default Quantity = 1 package. (Quantity refers to number of packages, not number of services inside.)
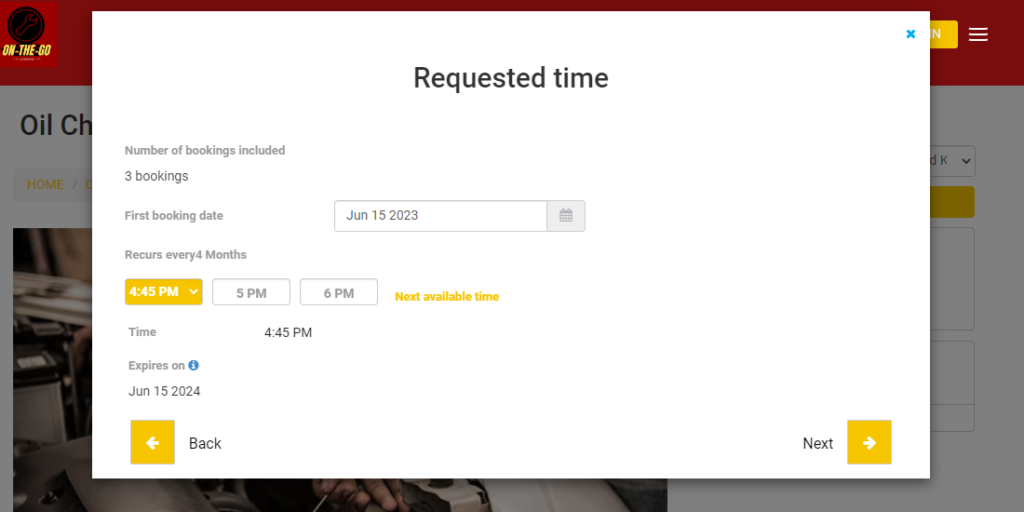
Pick First Date & Time
Select an available slot and press Next.
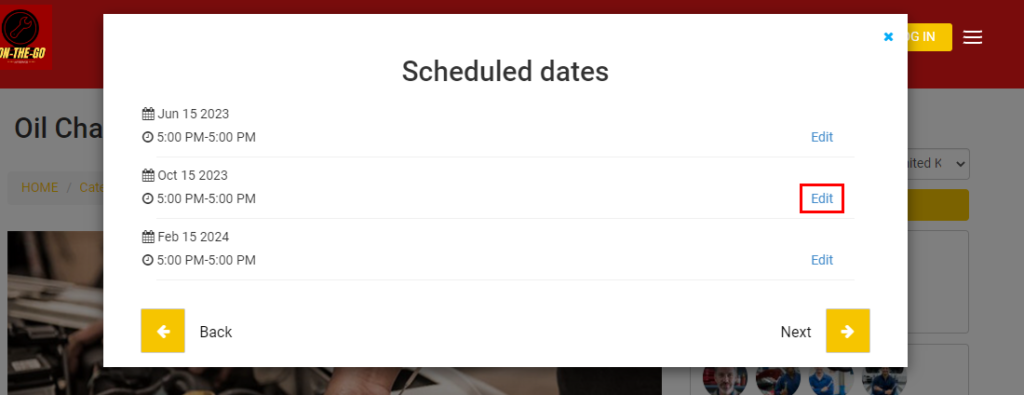
Auto-Schedule Remaining Visits
OctopusPro lists the future appointments (e.g. 3-month intervals).
• Click Edit next to any visit to change its date/time.
• Press Next → confirm → pay.
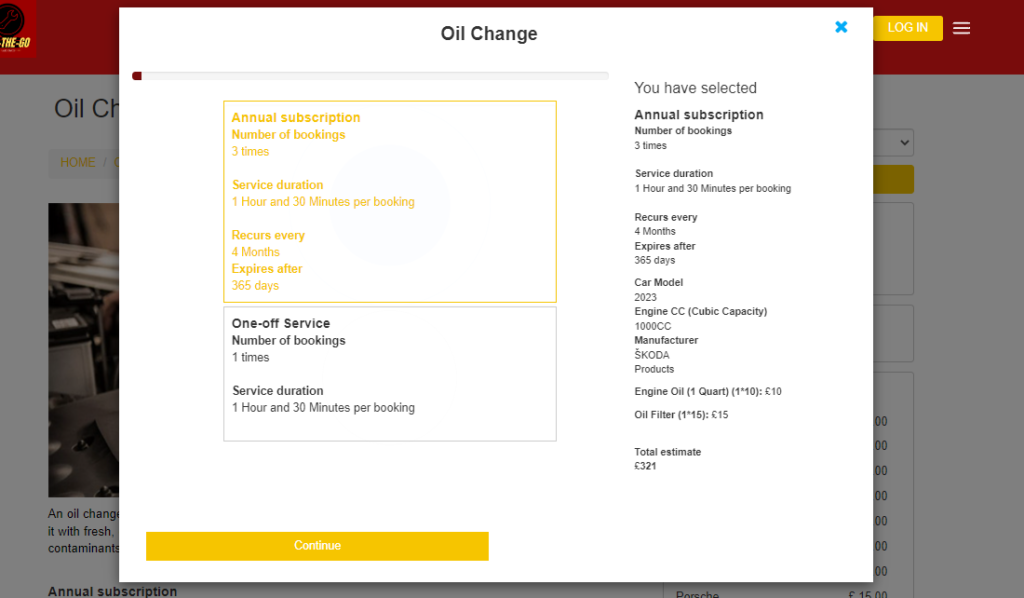
B. Booking a Package Option within a Service
Open the Service
Customer selects the base service (e.g. “Oil Change”).
Choose Package vs One-Off
In the options panel they see:
Option
What it includes
Single Oil Change
1 booking, $75
3-Pack Oil Change
3 bookings, $60 each
They pick the package they prefer.
Complete Custom Fields (if any)
e.g. Vehicle type, oil grade, add-ons → Continue to Checkout.
Select Date & Time for the First Booking
The system pre-loads the remaining appointments based on the package’s recur rule. Customers can adjust each slot before confirming.
Finish & Pay
Review the summary showing total price, number of bookings, and schedule → Confirm Booking.
Customer Experience Highlights
Full Transparency – package savings, remaining credits, and upcoming appointments are shown in the portal & emails.
Flexible Rescheduling – customers (or staff) can move individual bookings within the pass validity period.
One Payment, Multiple Visits – checkout captures the entire package value up-front (or per your payment settings). This locks in revenue and reduces no-shows.
Packages give clients an easy way to pre-plan routine services while your business secures repeat work with a single, streamlined checkout.
Popular Package Ideas by Industry
Service bundles let you pre-sell multiple sessions (or a mix of services) at a single, discounted price. Below are proven package concepts you can adapt, followed by a streamlined set-up checklist that works for any industry.
Combines different services that occur on a timeline, boosting average order value.
One Checklist for Building Any Package
Whether you’re adding a brand-new “Standalone Package” or turning an existing service into a “Choose-a-Package” option, the wizard is identical after step 2.
Open the Package wizard Settings → Service Settings → Services
• Create New (for a standalone bundle) — or — Edit an existing service and click Add Package.
Basic details
Field
Tips
Package Name
Customer-facing label, e.g. “6-Visit Grooming Pass”.
# of Bookings
How many appointments the bundle pre-pays.
Recurrence(optional)
Fixed interval (e.g. every 2 weeks) or leave blank so customer chooses.
Expires After(optional)
Days before unused sessions lapse.
Pricing & Invoicing Cost & Payrate tab
Enter Unit Price (usually discounted vs. single booking).
Pick an Invoicing Rule:
• All invoices now • One-by-one • Single lump-sum • None (manual).
Field-worker pay rules(optional)
Configure hourly or commission rates just as you would for any service.
Custom fields & media
Add intake questions, photos, or explainer video. Save to publish.
That’s it—no duplicate steps per industry. The same five-step flow covers dog walks, lawn care, tutoring blocks, or bridal packages.
Why Packages Win for Everyone
For your business
• Up-front cash-flow* – pre-payment boosts working capital.
• Higher lifetime value* – customers who pre-buy tend to re-book and refer friends.