
User & Role Management: Adding, Inviting, Importing Users
In today’s competitive business landscape where resource optimization and effective team collaboration are key, OctopusPro stands as a formidable solution for enterprises of all sizes. The platform offers a robust user management system that allows for the creation and administration of users with varied roles and permissions, contributing to heightened productivity, accountability, and transparency.
The strength of OctopusPro lies in its versatility. From admins, sales personnel, and office staff – including support and accountants – to fieldworkers, sub-workers, and contractors, OctopusPro’s sophisticated features are designed to cater to each user role. It’s essential to distinguish that customers, even those with memberships, aren’t considered ‘users’ in this system.
OctopusPro streamlines the process of user creation. It allows for manual user addition, while also offering the convenience of bulk invitations via email or importing users through an .xls file. Furthermore, it amplifies its productivity by seamlessly integrating with popular accounting platforms like Xero and Quickbooks.
Adding all your team members as users into OctopusPro brings forth a myriad of benefits and functionalities:
- Improved Communication: With the capability to create accounts for all your team members, communication becomes streamlined and effective, improving overall productivity.
- Accountability and Transparency: Different roles can be assigned to each user, defining their access level and permissions within the system. This increases accountability and brings transparency into the system.
- Enhanced Flexibility: OctopusPro allows the creation of custom roles with specific permissions and credentials, ensuring that your unique business needs are met.
- Synchronization: OctopusPro can sync user information with Xero and QuickBooks, providing an efficient, unified platform for handling your financial management and team communication needs.
- Bulk Import: If you have a large team, OctopusPro allows for importing users in bulk via an .xls file, making the process convenient and efficient.
- Email Invitations: You can invite field workers to join the platform via email, further easing the process of adding users.
With the benefits and functionalities clarified, let’s dive into the specifics of adding and managing users in OctopusPro.
Table of Contents
- Part 1: Adding a New User
- Part 2: Inviting Fieldworkers
- Part 3: Syncing from Accounting System (Quickbooks/Xero)
- Part 4: User Roles
- Part 5: User Account Management
Part 1: Adding a New User
Adding new users to your OctopusPro system is a key operation, enabling your employees to effectively interact with your company’s data, engage in seamless communication with team members, and interact with customers directly. This operation doesn’t merely add users, but also enables you to define their roles, thereby controlling the extent and nature of their access to various functionalities within the system.
Follow the detailed steps outlined below to add a new user:
- Navigate to Settings: The first step involves going to the settings of your OctopusPro account. This is where you’ll be able to manage various aspects of your account, including users, roles, and permissions.
- Select Company Settings: Under the ‘Settings’ options, you’ll find ‘Company Settings.’ This is where you’ll find broad organizational settings, including those pertaining to users.
- Choose Users: Upon clicking on ‘Company Settings’, you’ll find multiple options. Among these, you need to select ‘Users’. This is your control panel for managing everything about your users, including adding new ones, managing existing ones, defining roles, and more.
- Add User: Within the ‘Users’ panel, you’ll find the ‘Add User’ button. Clicking on this button initiates the process of adding a new user.
- Enter User Information: Upon clicking ‘Add User’, you’ll be presented with a form requesting various pieces of information about the user. This includes the user’s role (which determines their access level and permissions), their contact details (email, phone number, etc.), and their address details. This information is crucial in personalizing the user’s experience and defining how they’ll interact with the system.
- Save: Once you’ve filled in all the required information, you’ll need to save it to add the user to the system. This is done simply by clicking the ‘Save’ button. Once saved, the new user is successfully added and can now access the system in accordance with the role and permissions assigned to them.
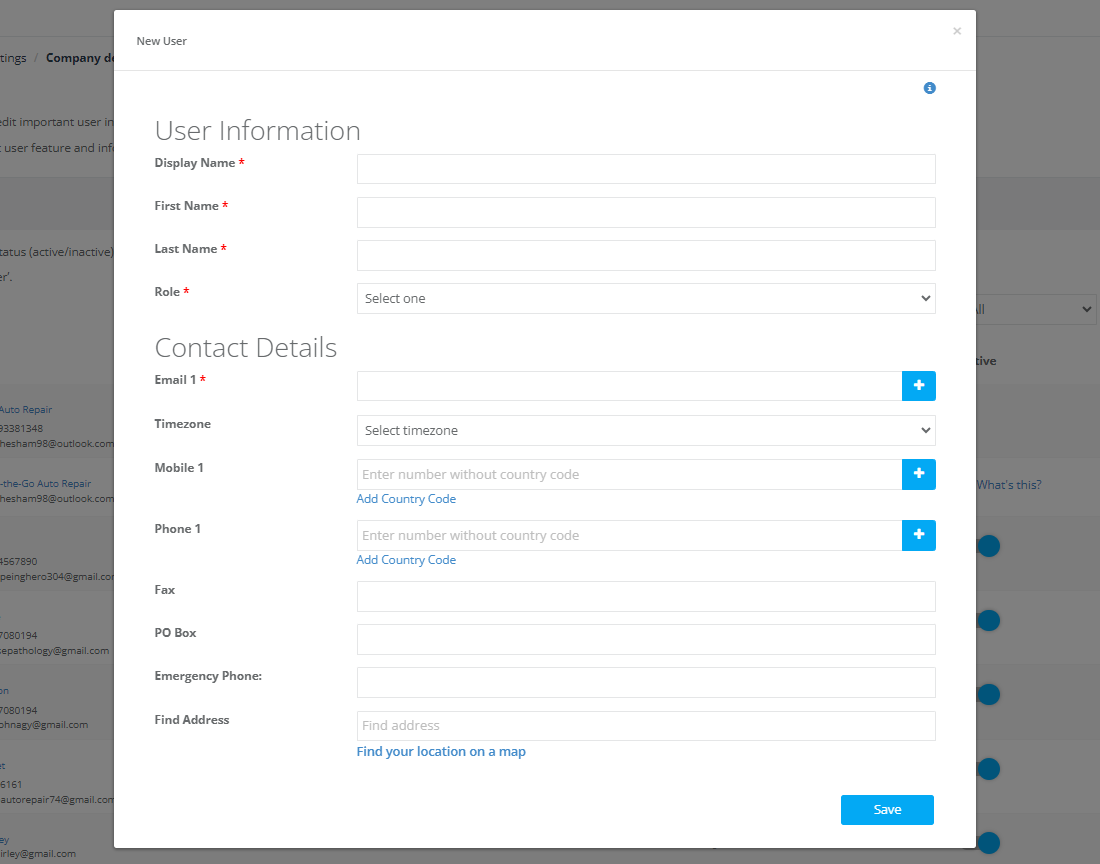
Remember, each user’s access and permissions are determined by the role assigned to them. Thus, when adding a new user, be cautious and thoughtful about the role you assign, as it defines their capability within the system.
Part 2: Inviting Fieldworkers
OctopusPro simplifies the process of bringing new users, including field workers, on board. With its ‘Invite User’ feature, you can readily expand your company’s system without the hassle of manually creating user profiles.
Inviting Fieldworkers from the Users Listing Page
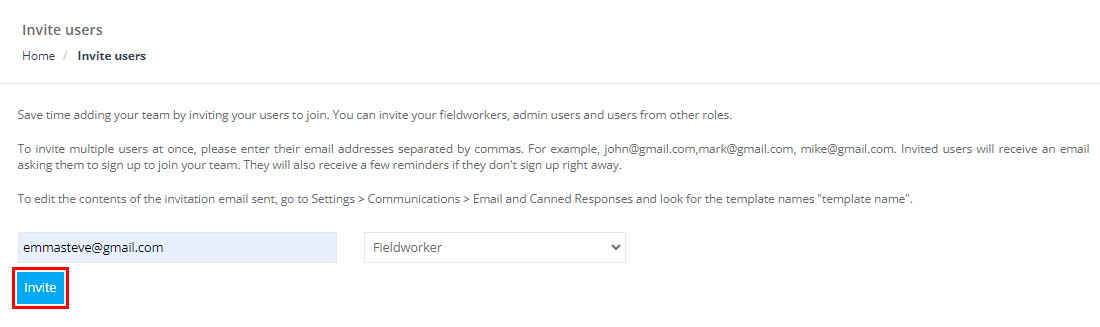
- Go to Settings > Company Settings > Users.
- Click on the “Invite User” button.
- Enter the user’s email address, select their role, and fill in any other required details.
- Click on “Send Invite.”
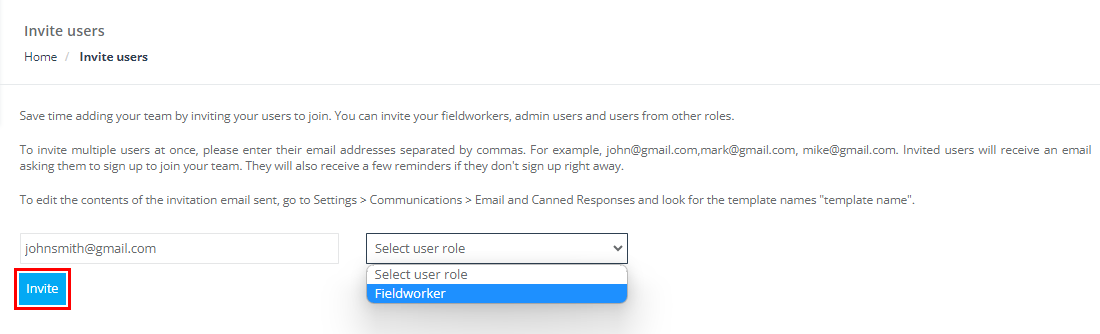
The user will receive an email invitation to join your company on OctopusPro. By following the link in the email, they can verify their email address and set their password upon logging in for the first time.
Inviting FieldWorkers from the Fieldworkers Listing Page
Apart from the general user invitation, you can specifically invite field workers from the Fieldworkers page.
1. Navigate to Fieldworkers from the main menu.
2. Click on the “Invite Fieldworker” button.
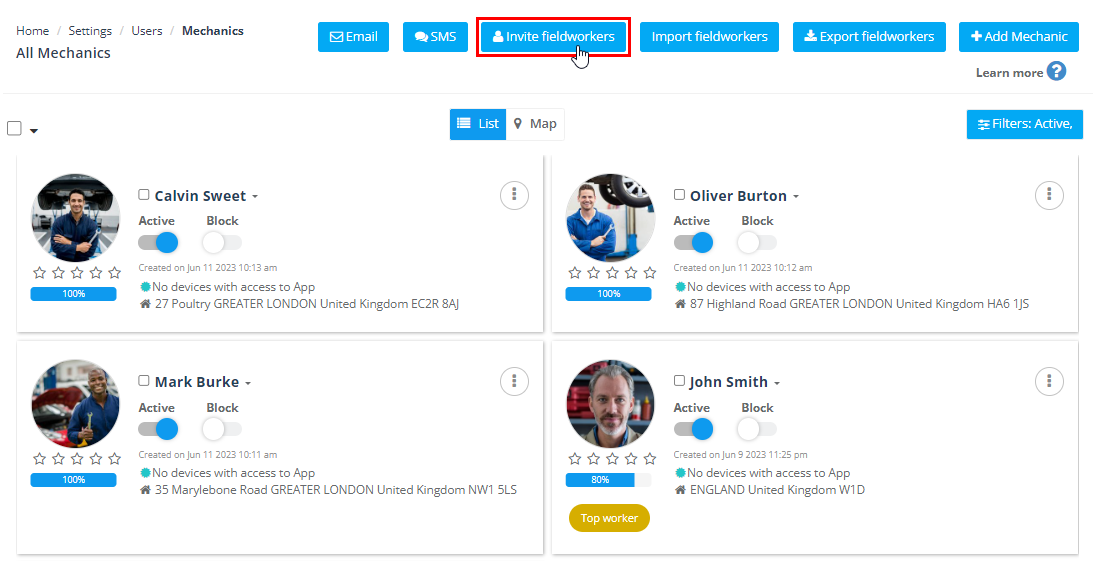
3. Enter the field worker’s email address and other necessary details.
4. Click on “Send Invite.”
Inviting users from the dedicated Fieldworkers page offers a more focused approach to integrating new field workers into your system. Like general users, field workers will receive an email invitation to join your team on OctopusPro.
Benefits of Inviting Users
Inviting fieldworkers helps streamline the user onboarding process. This method reduces manual data entry, saves time, and provides a welcoming introduction for new users, enhancing their initial interaction with OctopusPro.
Part 3: Syncing from Accounting System (Quickbooks/Xero)
OctopusPro offers seamless integration with popular accounting software like Quickbooks and Xero. This feature allows you to synchronize your users between OctopusPro and your accounting system, thereby ensuring data consistency across platforms.
To sync users from Quickbooks or Xero:
- Go to Settings > Financial Settings > QuickBooks Integration
- Connect your QuickBooks account.
- Then, click on “Pull from QuickBooks”
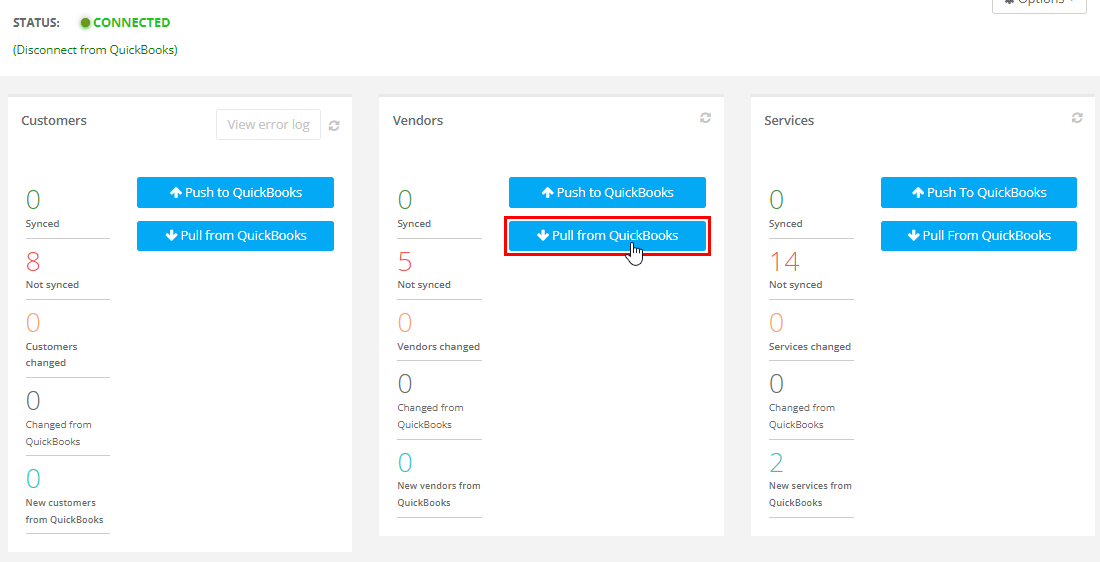
This will import all relevant user data from your selected accounting software into your OctopusPro account.
Benefits of Syncing Users from Quickbooks/Xero
User syncing provides several advantages. It eliminates the need for double data entry, saves time, reduces the risk of inconsistencies, and helps keep all your business information up-to-date across multiple platforms. This feature ensures that any updates made to user roles or details in your accounting software will be automatically reflected in OctopusPro, maintaining a single source of truth for your user data.
Part 4: User Roles
OctopusPro values the unique requirements of each user, striving to empower every team member by providing an adaptable platform. Users can be added under varying roles, with preset roles such as admin, fieldworker, sub-worker, and manager provided by default. However, OctopusPro’s versatility extends to allowing the creation of custom user roles. This flexibility allows you to designate specific credentials and permissions, giving you control over every feature and function within the system.
How to Add a New User Role
Creating a new user role is a straightforward process, carried out through the following steps:
1. Navigate to Settings: From the main menu, select ‘Settings’, the control hub for customizing your OctopusPro experience.
2. Select Company Settings: Under ‘Settings’, select ‘Company Settings’, your gateway to configuring organization-wide preferences.
3. Choose Users: Within ‘Company Settings’, select ‘Users’. This is your control panel for managing users and their roles.
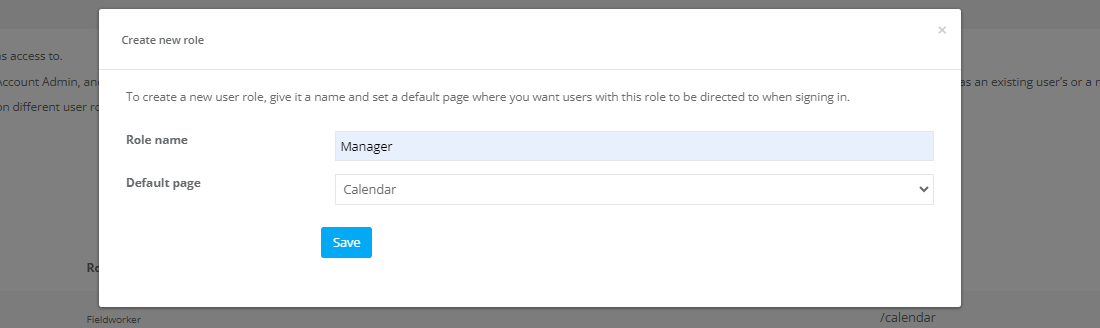
4. Select “New Role”: Under the ‘Users’ section, you’ll see an option for ‘New Role’. Selecting this initiates the process of creating a new user role.
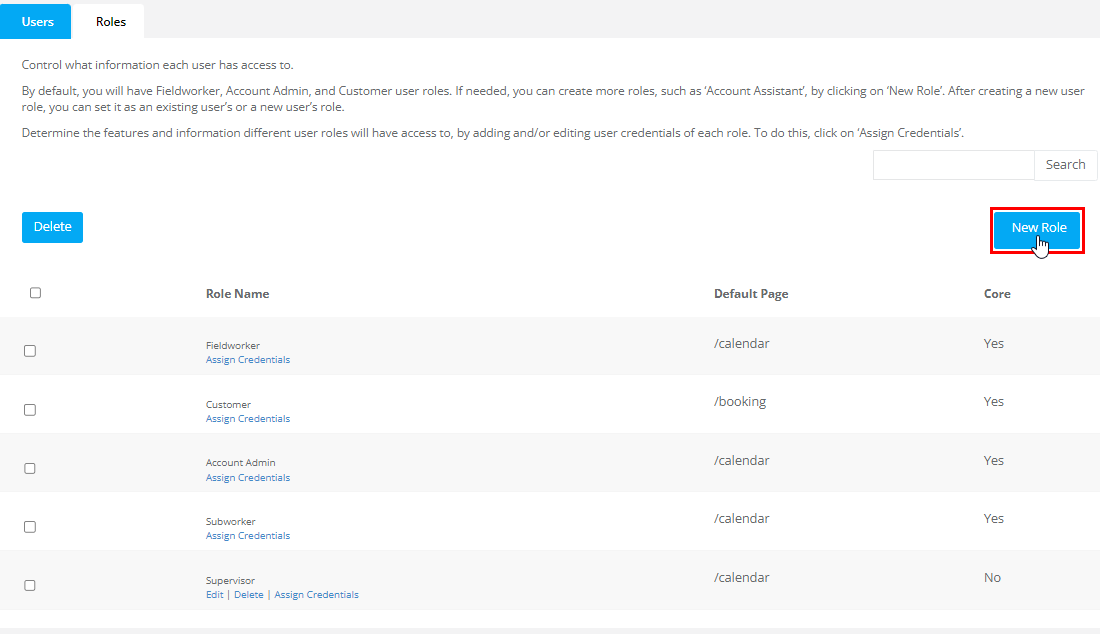
5. Input Role Details: Once ‘New Role’ is selected, you’ll need to provide the role name and set the default page for this role. The default page can be chosen by copying the tail end of the HTTP address of the desired page.
6. Save: After entering the details, press ‘Save’. Your new user role is now successfully added and available for assignment.
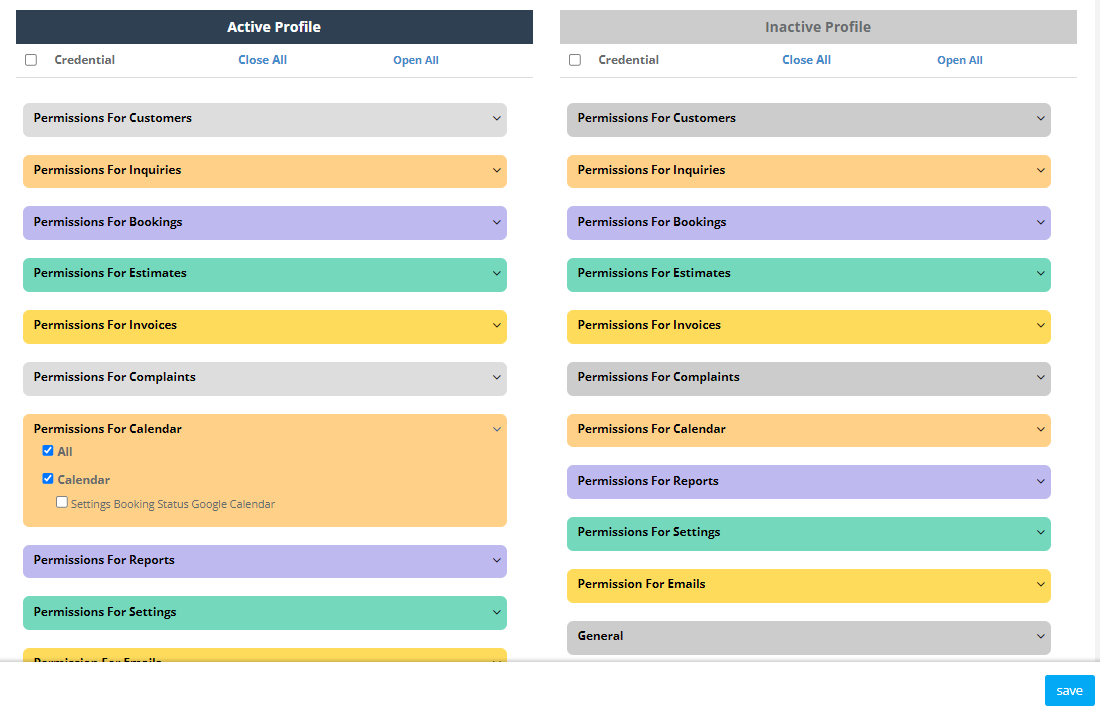
Assign Credentials to a Role
With the role created, you can now assign credentials, controlling the degree of access and interaction users have with your system. Follow the steps below to assign credentials:
1. Select “Assign Credentials”: You’ll see an option for ‘Assign Credentials’. Clicking on this allows you to specify permissions for your newly created role.
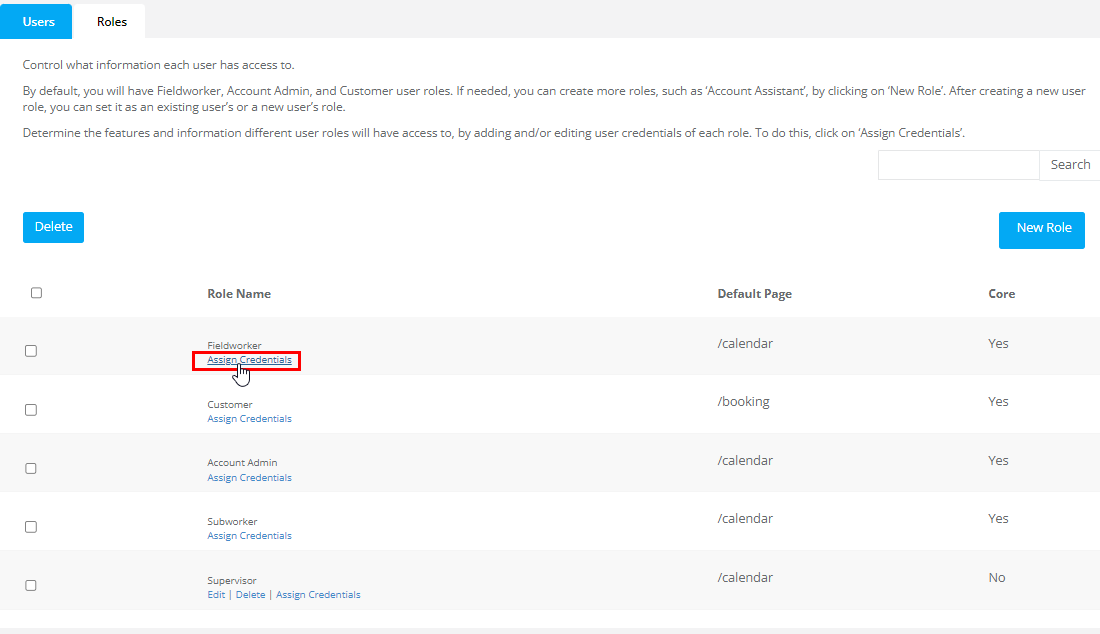
2. View and Select Permissions: Click on each heading to view permissions under that section. Alternatively, select ‘Open All’ at the top to see all available options under all headings.
3. Select Appropriate Permissions: Based on the role’s requirements, tick or untick the checkboxes next to each permission.
4. Save: Once you’ve assigned the desired credentials, press ‘Save’. Your custom role now has specific permissions, defining how users under this role will interact with the system.
 By leveraging these custom roles and permissions, you can fine-tune user access to match their responsibilities and tasks, ensuring maximum productivity and security. For more information on visit the user guide on managing user role permissions.
Part 5: User Account Management
Edit a User’s Information
Maintaining accurate and current user profile information is crucial for effective communication, smooth operations, and efficient management. OctopusPro provides comprehensive functionality that allows individual users to update their own profile details, contributing to a more autonomous and engaged workforce.
To learn more, visit Managing and Editing User Information.
User Self-Management
Individual users, such as office staff or fieldworkers, have the autonomy to update their own profile information. This includes modifying contact details, addresses, profile pictures, and other relevant data to ensure their profile remains current. Moreover, they can customize their notification preferences to suit their communication needs.
Here is how your team members can update their own profile information:
1. Log into the OctopusPro account via the OctopusPro app or web browser.
2. Navigate to ‘My Account’.
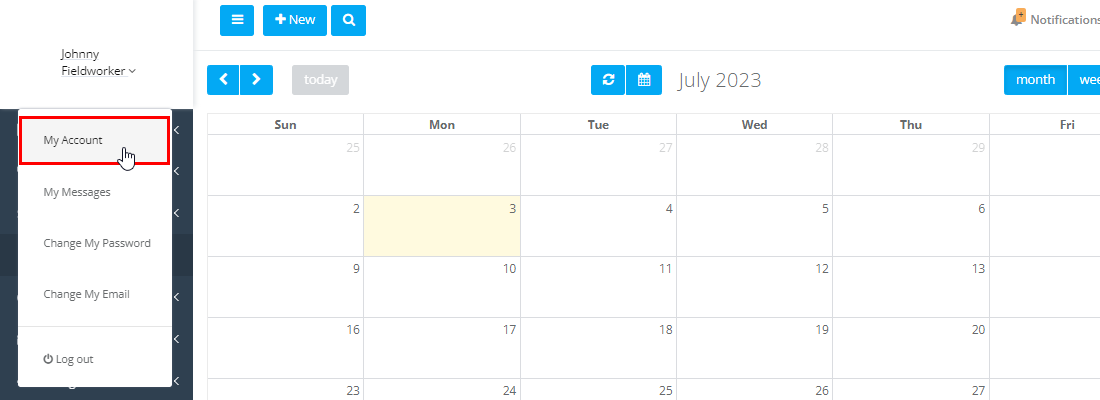
4. Update the necessary details by clicking on the edit icon.
5. Click ‘Save’.
Admin Oversight and Profile Management
As an admin, you also have the ability to edit and manage the profiles of your users. This functionality is invaluable when updating necessary information, handling role transitions, or ensuring data integrity when users neglect to update their own profiles.
To edit a user’s profile information, follow these steps:
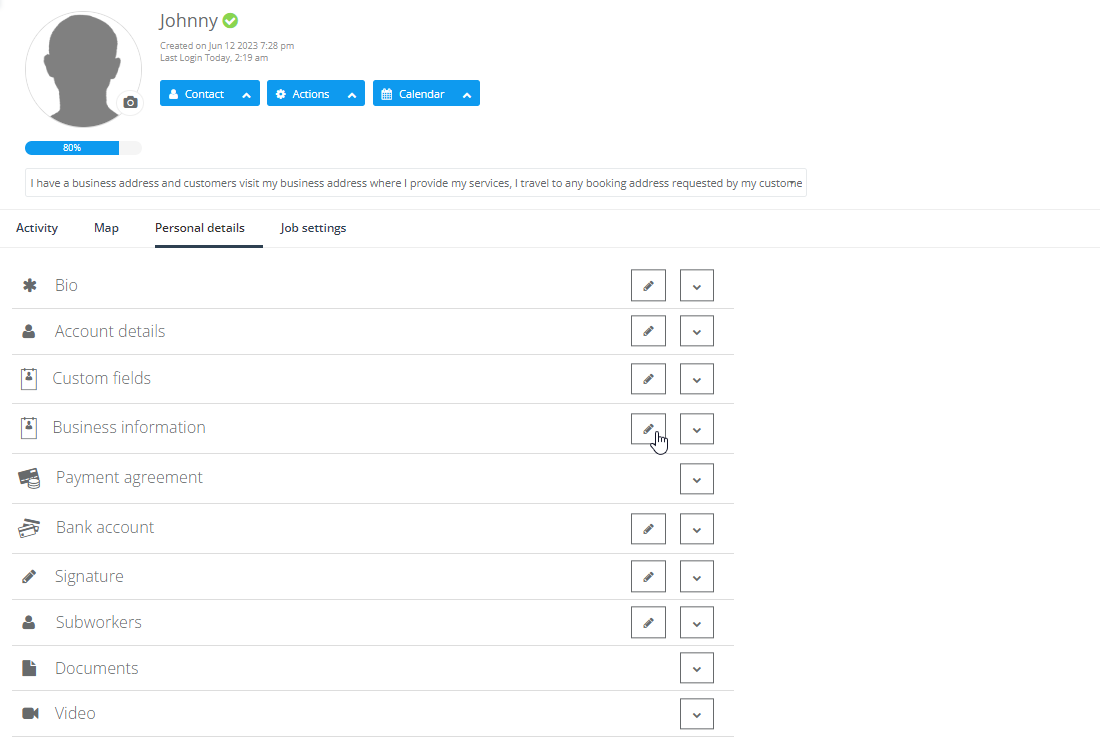
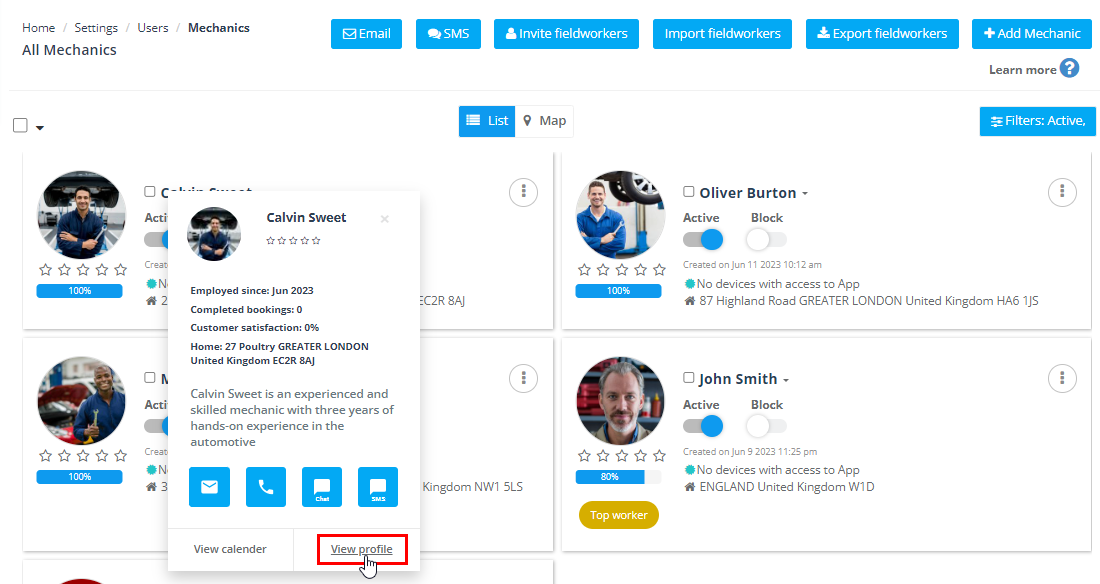
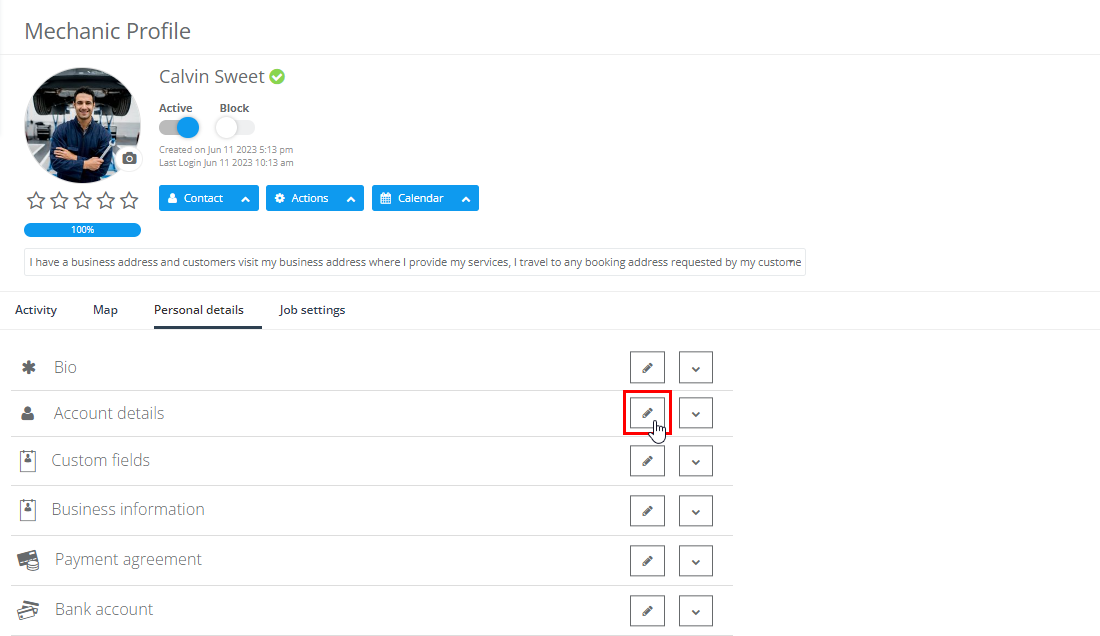
1. Navigate to “Fieldworkers” from your sidebar menu
2. Find the user you wish to edit, then hover over their display name and click on “View profile”
3. Make the necessary updates.
4. Click ‘Save’ to confirm changes.
Benefits & Functionality
- Data Accuracy: Regularly updated profiles help maintain data integrity, leading to efficient operations and effective communication.
- User Empowerment: By allowing users to manage their own profiles, you empower them to take charge of their information, fostering responsibility and reducing administrative overhead.
- Efficiency: Access to accurate and current user information expedites decision-making processes and boosts overall productivity.
- Admin Flexibility: Admins’ ability to edit user profiles caters to a range of scenarios, ensuring seamless role transitions and timely updates.
Please note, users are unable to change their assigned roles (e.g., from fieldworker to admin, or vice versa). These roles, which entail different profile data and fields in the database, can only be assigned or modified by an admin.
By encouraging users to keep their profiles current and exercising your admin privileges responsibly, you can promote operational efficiency, improve internal communication, and cultivate a more engaged and effective team.
Activate/Deactivate a User
The ability to activate or deactivate a user is an essential feature in OctopusPro that helps you manage your users’ status and control their access to various functionalities.
Activation signifies that the user is currently active within your system and can fully perform their duties based on their assigned roles and permissions. Deactivation, on the other hand, makes the user ‘inactive’, restricting them from being assigned jobs. Inactive users can still log in and view or set up their profiles unless they are blocked, signifying a temporary change in status.
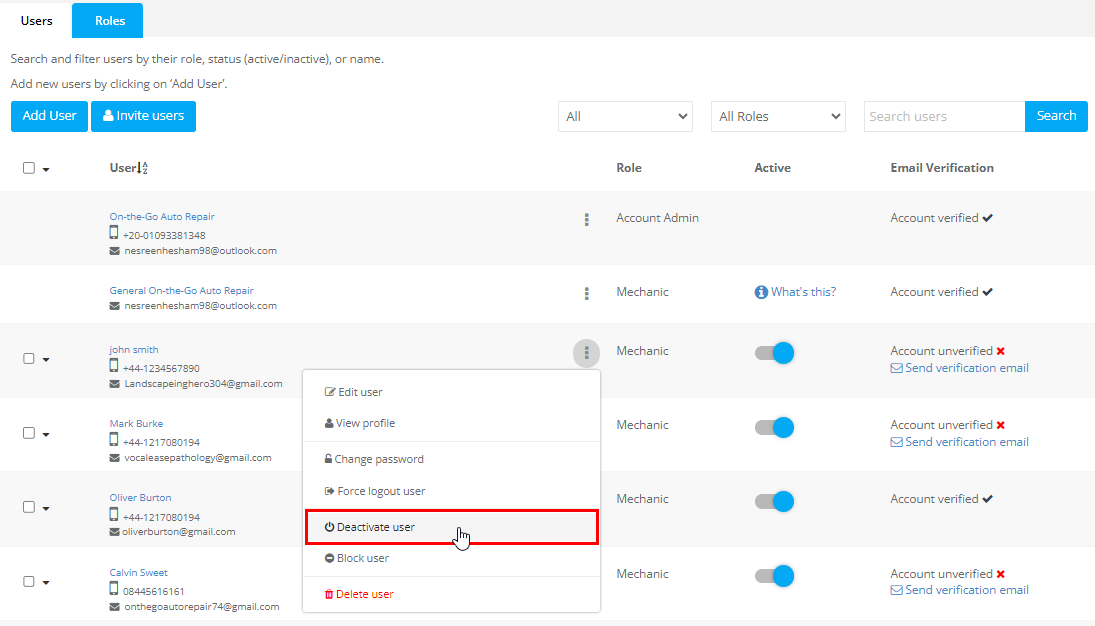
To activate or deactivate a user:
- Go to Settings > Company Settings > Users.
- Click on “Actions” on the user overview.
- Select “Activate” or “Deactivate” as applicable.
Billing Considerations
Please note that inactive users still count toward your user count, which is important if you’re paying per user. To avoid charges for inactive users, you may consider deleting their accounts or switching to the unlimited users plan.
Benefits and Use Cases
- Managing Absences: If a user is temporarily absent, deactivating their account can ensure they are not assigned jobs during this period.
- Onboarding Process: For new hires, you might initially keep their status inactive until they complete their onboarding process. This allows them to get accustomed to the system without being assigned any jobs.
- Cost Efficiency: By deleting inactive users or moving to an unlimited user plan, you can better manage costs associated with per-user billing.
Remember, always communicate any status changes to the respective users to avoid confusion and maintain transparency.
Login as Another User
In OctopusPro, the functionality to log in as another user can be a powerful tool for admins and managers. This feature lets you view the system from the perspective of another user, enabling a better understanding of their user experience, resolving any issues they might be facing, or simply performing tasks on their behalf.
How to log in as Another User:
To utilize this function, follow the steps outlined below:
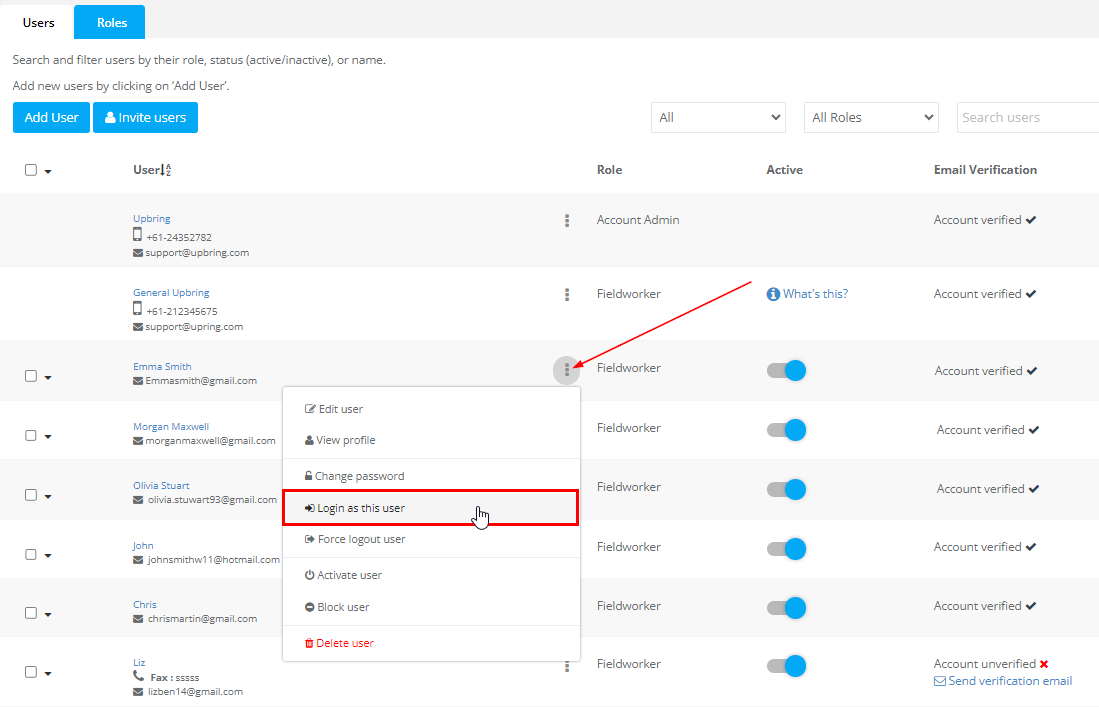
- Go to Settings > Company Settings > Users.
- Click on “Actions” on the user overview.
- Select “Login as This User.”
Use Cases and Benefits:
- User Experience Understanding: By logging in as another user, you can see and interact with OctopusPro just as they do. This can be extremely beneficial for understanding the user experience from their perspective, and identifying any potential pain points or areas for improvement.
- Problem-Solving: If a user reports a problem or an error, logging in as that user can help you replicate the issue from their perspective, facilitating quicker troubleshooting and resolution.
- Task Delegation and Assistance: In some scenarios, you may need to perform tasks on behalf of a user who may be absent, busy, or needs help with using the platform. This feature allows you to step into their shoes and complete tasks seamlessly.
- Training and Support: When training new users or providing support, logging in as them can offer a hands-on demonstration, making it easier to guide them through various functions and processes.
Remember to respect user privacy and only use this function when necessary and appropriate. The goal is to enhance productivity and user experience, while also maintaining a professional and respectful working environment.
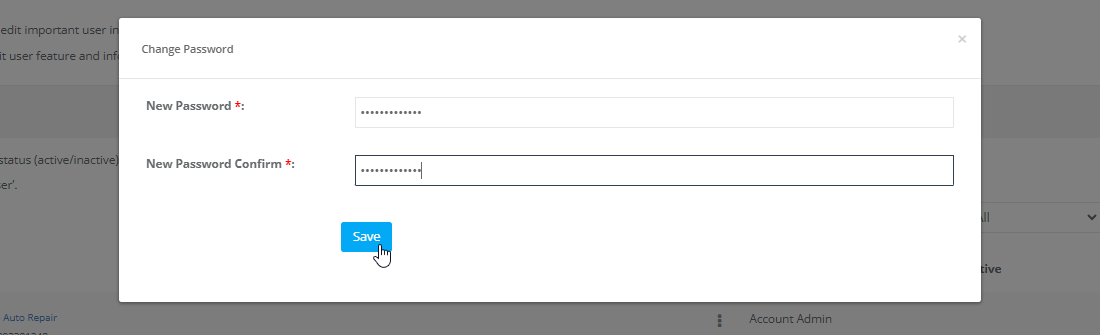
Change a User’s Password
Maintaining robust security in a digital business environment is paramount, and this includes managing user passwords. In OctopusPro, there are robust features that allow both the admin and individual users to change or reset passwords, ensuring secure and reliable access at all times.
As an administrator, you have the ability to change a user’s password in certain situations – such as if a user has forgotten their password, there is a potential security breach, or when regular password updates are part of your company’s IT security protocols. Here’s how you can do it:
1. Navigate to Settings > Company Settings > Users.
2. Identify the user whose password you need to alter and click on ‘Actions’.
3. From the dropdown list, choose ‘Change Password’.
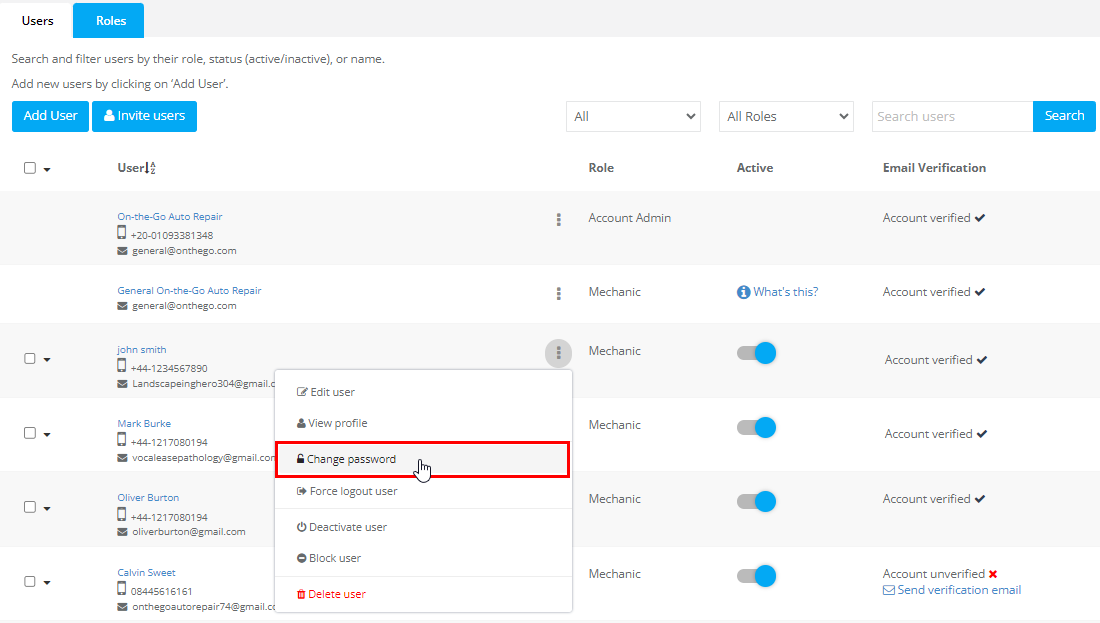
4. Enter the new password, then click on Save.
On the other hand, users themselves can also manage their passwords. When they are added or invited to the system, they will receive a verification email. This email contains a link that, when clicked, allows them to set their own password. This provides them with a personal sense of security and control over their account. Furthermore, if users need to change or reset their password in the future, they can do this by themselves from their account settings.
Benefits & Functionality
- Security Management: Consistent password updates help enhance account security and prevent unauthorized access.
- Operational Continuity: This feature enables swift action in scenarios where a user has forgotten their password, ensuring smooth operations and immediate access.
- User Autonomy: By allowing users to set and reset their own passwords, they can maintain their account security in a way that suits them best.
- Regulatory Compliance: Regular password changes are often required in many industries as part of compliance protocols. This feature enables administrators to manage this process effectively.
Use Case Examples
- A fieldworker on location forgets their password and can’t access crucial job information. As an admin, you can promptly reset their password, enabling them immediate access and ensuring task continuity.
- Regularly scheduled password changes can be a part of your company’s IT security protocol to mitigate cyber threats. As an admin, you can manage this efficiently through OctopusPro, while individual users also maintain control over their account security.
Remember to use this feature responsibly, always respecting user privacy and following relevant regulations and best practices.
Adding and managing users in OctopusPro not only enhances your operational efficiency but also significantly improves communication, accountability, and transparency within your team. Plus, with the ability to sync with Xero and QuickBooks, it streamlines your financial management too, offering a unified solution for your business needs.
To stay updated, please subscribe to our YouTube channel.