
Managing Product Lists for Field Services
OctopusPro’s Products List feature allows you to maintain a catalog of goods (e.g., consumable items, spare parts) that can be added to quotes, bookings, or invoices. By defining each product’s details—like cost, markup, and tax rate—you ensure transparent billing for both your staff and your customers.
Note: Real-time inventory tracking is not yet supported in OctopusPro. However, it’s coming very soon!
Table of contents:
- Creating a new product
- Managing product visibility
- Linking products to services
- Importing and exporting products
- Importing products
- Exporting products
- How to enable/disable the feature for different user roles?
- How to sync products with Xero?
- How to sync products with Quickbooks?
- How to add a product and a custom product in the fieldworker’s application?
- How do admin users add products and new custom products from the booking/quote form?
- From the booking form
- From the quote form
- How do fieldworkers add products and new custom products from the booking/quote form?
- From the booking form
- From the quote form
- How do products appear in bookings/invoices/quotes PDFs?
- Bookings
- Invoices
- Quotes
- How do products appear in Email attachments?
- Booking attachment
- Invoice attachment
- Product: Use cases
Accessing Product Settings
- Log In:
Ensure you have administrator or appropriate privileges in OctopusPro. - Navigate to Products:
Go to Settings > Services Settings > Products. - Manage Your Products:
This page lists any existing products. You can create new ones, edit existing listings, or configure product-related flags (see below for more details).
Creating a New Product

To add a new product, click New Product, which opens a form for defining the core details of your item:
- Product Name
- Provide a concise, descriptive title (e.g., “Air Filter,” “Lawn Mower Blade”).
- Item Code (Optional)
- Enter an internal reference code (e.g., SKU) for easier internal tracking or design-stage references.
- This code is not strictly required but can be helpful for labeling or categorization.
- Unit Label
- Define the measurement unit (e.g., liters, gallons, centimeters) representing how you quantify or sell the product.
- Supplied By
- Specify whether this product is typically provided by your company or by the fieldworker.
- This impacts how you track costs or commissions if, for example, fieldworkers bring their own materials.
- Cost per Unit
- The cost your business pays for each unit.
- Example: If you’ve set “Unit Label” to liters and type $10, it means each liter costs the company $10.
- Optional: If you don’t want the product to affect job costs, you can leave this field blank.
- Markup per Unit
- The amount (as a percentage or flat value) added to the cost to form the selling price.
- Example: A 20% markup on a $10 cost yields a $12 sale price (cost + markup).
- Markup Type
- Choose whether you’re adding a percentage-based or flat-dollar markup.
- Sale Price
- Automatically calculated from cost plus markup.
- You can override the sale price manually; if you adjust it directly, OctopusPro back-calculates and updates the markup value accordingly.
- Tax Rate
- Select a relevant tax rate (e.g., GST, VAT). If needed, you can add a new tax rate.
- Note: If you add this product as a separate line item on a quote or booking, it’s taxed independently. However, when the product is added inside a service, the service’s tax rate overrides the product’s setting.
- Visibility and Usage
- Decide if the product is visible to customers in the Customer Portal, Branded App, or email attachments. If you disable customer visibility, only your office staff and fieldworkers can add it internally.
- This setting helps you control whether customers see or select products themselves, or if only staff can do so.
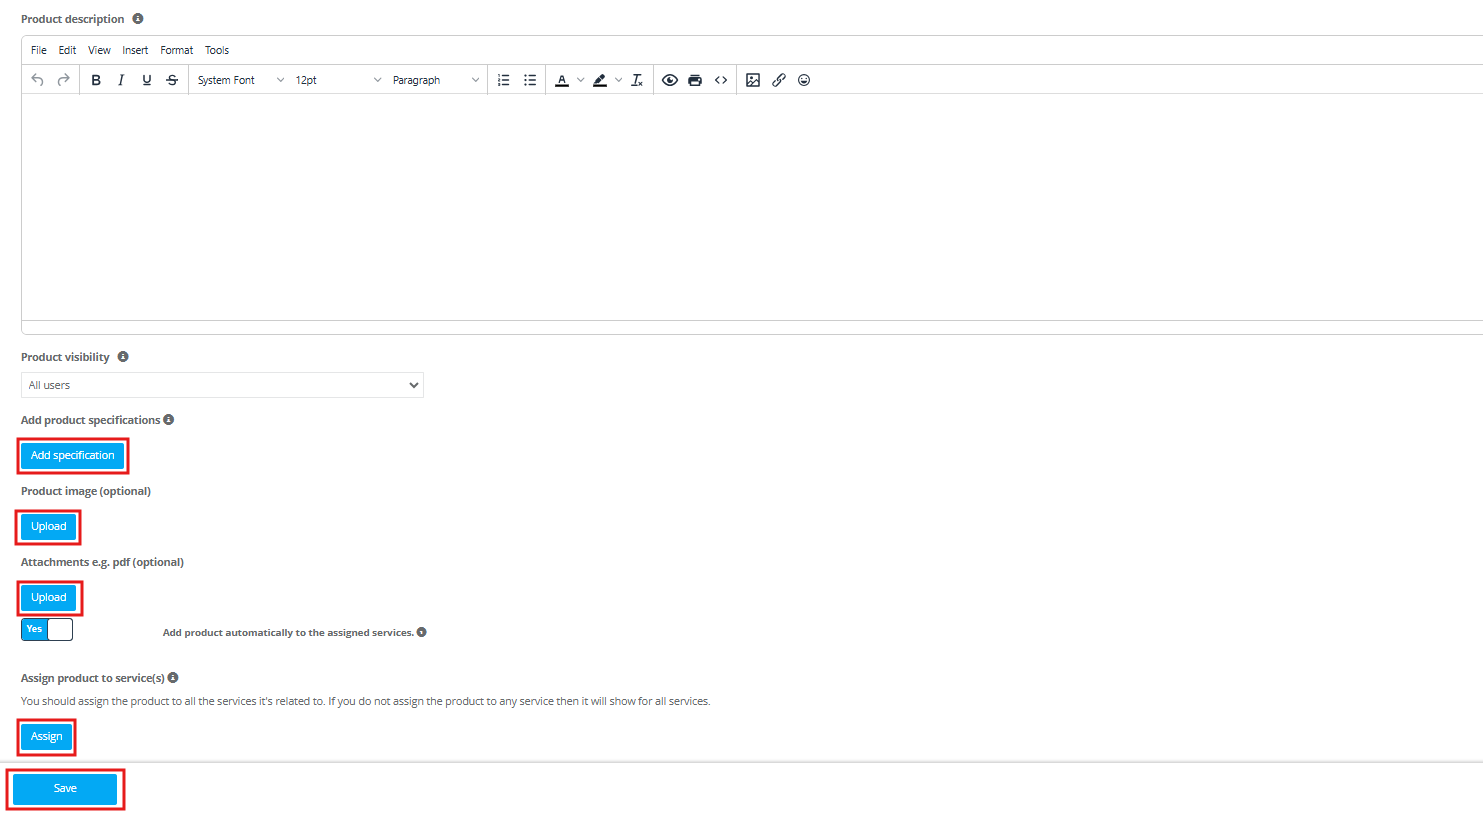
- Additional Details
- Item Description: Provide usage notes, disclaimers, or any relevant instructions.
- Attachments: Upload images or reference files (e.g., specification PDFs). This can help with marketing or clarifying how an item is used.
- Extra Fields (Examples)
- Product Description (long form): Add extended marketing text or branding details to display to customers.
- Product Image: Upload a primary photo for your item, shown in quotes/invoices if “Show product thumbnails” is enabled.
- Product Specifications
The Product Specifications section allows you to define detailed attributes for each product, helping customers and fieldworkers clearly understand the characteristics of the items being used or sold.
How to Add Product Specifications:
- When creating or editing a product, navigate to the Product Specifications section.
- Enter relevant details:
- Specification: Clearly specify the attribute name using standard industry terms, such as “Size,” “Weight,” “Material,” or “Color.”
- Value: Provide the corresponding details for each specification. Ensure the values entered are accurate and clearly communicated.
Example Specifications:
- Specification: Size | Value: 500ml
- Specification: Color | Value: Blue
- Specification: Material | Value: Stainless Steel
- Add additional rows for multiple specifications as required.
- After entering specifications, save your product. These details will appear in your bookings, quotes, invoices, and other customer-facing documents, providing clarity and enhancing customer satisfaction.
- Assigning Products to Services
- If desired, link the product to specific services (e.g., parts used only for a “Car Repair” service). If no service is selected, the product will be available under all services by default. When staff or fieldworkers create a new booking for that service, they can select from any assigned products.
- You can enable the Auto-Add Product to Assigned Services flag to automatically add this product whenever its assigned services are booked or quoted, without manual selection. Disable to require manual addition each time. This flag only appears once services are assigned to the product. This helps streamline your workflow and ensures consistent billing and inventory management.
Save: Once you confirm and save, the product becomes accessible to staff (and optionally to customers, if set to visible) for quotes, bookings, or invoices.
Flags / Settings for Product Visibility and Requirements
In the product settings area, you’ll see several flags controlling how your products display and behave. Here are their revised labels and purposes:
- Display Products in App, Emails & Attachments
- Purpose: If active, products are visible to customers in your Branded App (iOS/Android), as well as in related email communications and PDF attachments. If off, products remain hidden from customers; only office staff and fieldworkers can add them behind the scenes.
- Require Product Selection to Complete a Job
- Purpose: If enabled, at least one product must be chosen before a booking can be marked “Completed.” Ideal for businesses that always use specific consumables or add-ons, ensuring they’re billed properly.
- Change ‘Supplied By’ Default for All Products
- Options: “Supplied by Company” or “Supplied by Fieldworker.”
- Purpose: Adjusts the default supply responsibility for newly created or existing products. If fieldworkers generally bring their own items, set this to “Supplied by Fieldworker.”
- Display Product Cost Breakdown in Quotes/Invoices
- Purpose: Allows customers to see the unit cost and markup details for each product, giving them a transparent view of pricing. Disabling shows only a rolled-up total.
- Show Product Thumbnails in Estimates
- Purpose: If activated, any uploaded product images appear next to each product name in quotes (estimates). Useful for visually identifying items.
Usage in Quotes, Bookings, and Invoices
- Adding Products: When creating or editing a booking/quote/invoice, select your product from the list, specify quantity, and adjust pricing if required.
- Tax Handling: Each product can have its own tax rate—unless it’s added from within a service, in which case the service’s tax applies.
- Fieldworker Access: If configured, fieldworkers can add products through the mobile app. This helps capture real-time usage of materials and pass costs on to customers.
Editing Existing Products
- From Settings > Services Settings > Products, locate the item and click Edit.
- Update its name, cost, markup, tax rate, or any other field.
- Save changes. Quotes/invoices created after the update reflect the new details.
Best Practices
- Keep Names Descriptive, Short, and Consistent: Helps staff and customers recognize products quickly.
- Maintain Accurate Cost & Markup: Regularly confirm these values reflect real market or operational costs to avoid undercharging or overcharging.
- Enable Visibility Sparingly: Only show products customers need to see. Others (e.g., internal components) can remain hidden to avoid confusion.
- Use Attachments: Upload photos or PDFs, particularly for complex or high-value products, so staff and customers can confirm the correct item.
Linking Products to Services
Adding products to services allows you to manage product-related costs more effectively. For example, if your cleaning service uses specialized chemicals, linking these products ensures the correct item is billed whenever that service is used. You can:
- Preset Products on a Service: This auto-adds items to quotes/bookings when the service is selected.
- Allow Staff to Add Products: If you prefer manual addition, the staff can select which items they used.
- Enable Fieldworker Selection: Grant fieldworkers permission to pick items from your product list directly in the OctopusPro app.
Allowing Product Selection by Admins, Fieldworkers, and Customers
- Admin Users
- Admins can add products when creating or editing a booking, quote, or invoice.
- This ensures the final billing accurately reflects any extra items needed.
- Fieldworkers
- If enabled, fieldworkers can add items used at a job site before marking the booking as “Completed.”
- This feature helps capture on-the-spot product usage (e.g., additional materials needed for unforeseen circumstances).
- Customers
- If your business model allows customers to pick optional add-ons, you can make certain products visible in your Branded App or booking forms.
- They can then select add-on products themselves, increasing up-selling opportunities.
When these products are added (automatically or manually), the overall service price in quotes or invoices is updated based on each product’s cost, markup, and tax rate—ensuring transparency and consistent charges.
Applying Products to Email & Attachments
If a product is Visible to Customers, it can appear in email communications (quotes, invoices) or PDF attachments, so customers see itemized costs. This can help:
- Clarify what was used or purchased.
- Provide marketing info or disclaimers via attachments.
- Encourage upsells if customers see beneficial add-ons in quotes or after-service invoices.
Additional Marketing & Branding
You can add product-specific marketing details or images to showcase the item’s quality or brand, especially if your customers pick products themselves in the portal or app. Including images or PDFs with product specs or usage instructions can elevate customer confidence and help them make better-informed choices.
Importing and Exporting Products
OctopusPro provides both a manual CSV-based approach for importing and exporting products, as well as a direct sync with Xero or QuickBooks for users who prefer seamless data integration.
1. Manual Import/Export (CSV)
- Access Products Page
- Log in as an admin user (or a fieldworker with sufficient permissions).
- Go to Settings > Services Settings.
- Select Products in the left-side menu.
- Importing Products
- Click “Import Products.”
A pop-up window appears with instructions. - Download the Template.
This CSV file includes headers for product attributes (e.g., Product Name, Cost per Unit, Markup, etc.).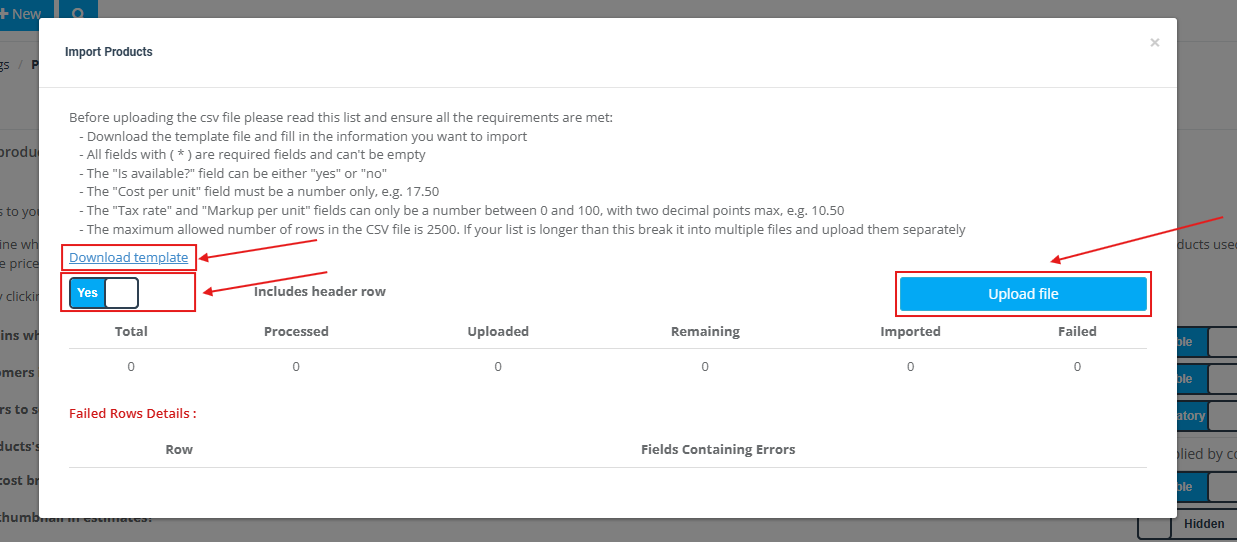
- Populate the Template.
Enter your product data, making sure to follow the guidelines in the instructions (e.g., specifying cost, markup, tax rates). - Upload the Completed File.
- Decide whether your file includes a header row.
- Click “Upload File” and select your CSV.
- OctopusPro processes the file, adds new or updates existing records, and displays a success/error summary.
- Click “Import Products.”
- Exporting Products
- Click “Export Products.”
A window appears, offering a direct download of your current product list. - Download File.
This CSV includes all product records and their associated data—such as product name, availability, tax rate, unit label, cost, markup, and description.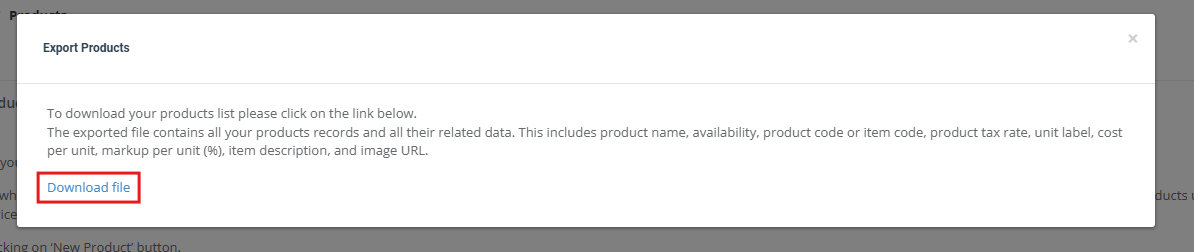
- Click “Export Products.”
Why Use CSV Imports/Exports?
- Bulk Updates: Quickly add multiple new products or revise large catalogs at once.
- Backups: Export a copy of your product data for safekeeping or future reference.
- Inter-System Transfers: If you store product info in a third-party system without direct integration, CSV import/export is a flexible workaround.
2. Sync with Xero or QuickBooks
OctopusPro can directly integrate with Xero and QuickBooks, allowing you to push/pull product data for comprehensive financial recordkeeping. If your products are already in Xero/QuickBooks, you can avoid manual CSV uploads; likewise, you can back up OctopusPro product details by syncing them to your accounting software.
A. Sync with Xero
- Go to “Xero Integration”
- Navigate to Settings > Financial Settings > Xero Integration.
- Connect to Xero
- Click “Connect to Xero”. A pop-up prompts you to log into your Xero account.
- Authorize OctopusPro
- Upon successful login, grant permission for OctopusPro to access your Xero data.
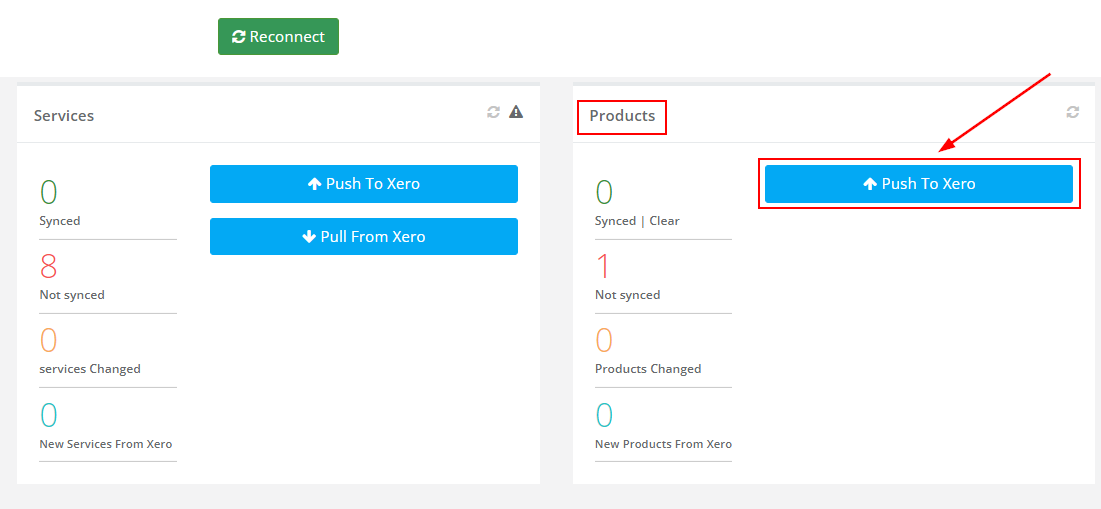
- Push to Xero
- Once linked, select “Push to Xero” to synchronize your products from OctopusPro into Xero. Any new items appear in Xero, including essential details like name, codes, pricing, and tax setups.
B. Sync with QuickBooks
- Open “QuickBooks Integration”
- From Settings > Financial Settings, choose QuickBooks Integration.
- Connect to QuickBooks
- Click “Connect to QuickBooks”. You’ll be prompted to sign in or create an Intuit account if you don’t have one.
- Allow Permissions
- Confirm access so OctopusPro can interact with your QuickBooks account.
- Sync Products
- Similar to Xero, you can “Push” your OctopusPro product data to QuickBooks, ensuring both systems remain in harmony.
- Similar to Xero, you can “Push” your OctopusPro product data to QuickBooks, ensuring both systems remain in harmony.
Why Sync with Xero/QuickBooks?
- Unified Financial View: Keep your product list consistent across OctopusPro and your accounting platform, minimizing discrepancies in cost or pricing.
- Time Savings: Eliminates manual data entry, reducing potential errors.
- Real-Time Updates: Any changes in product details can quickly propagate to your accounts, improving reliability for invoicing, tax calculations, and financial reporting.
Enabling or Disabling Product Access for Different User Roles
- Navigate to User and Role Management
- Log in with your admin account.
- Go to Settings > Company Settings > Users.
- Click on the Roles tab.
- Select a Role and Assign Credentials
- Click Assign Credentials for the desired role (e.g., “Fieldworker,” “Admin,” “Sales Team”).
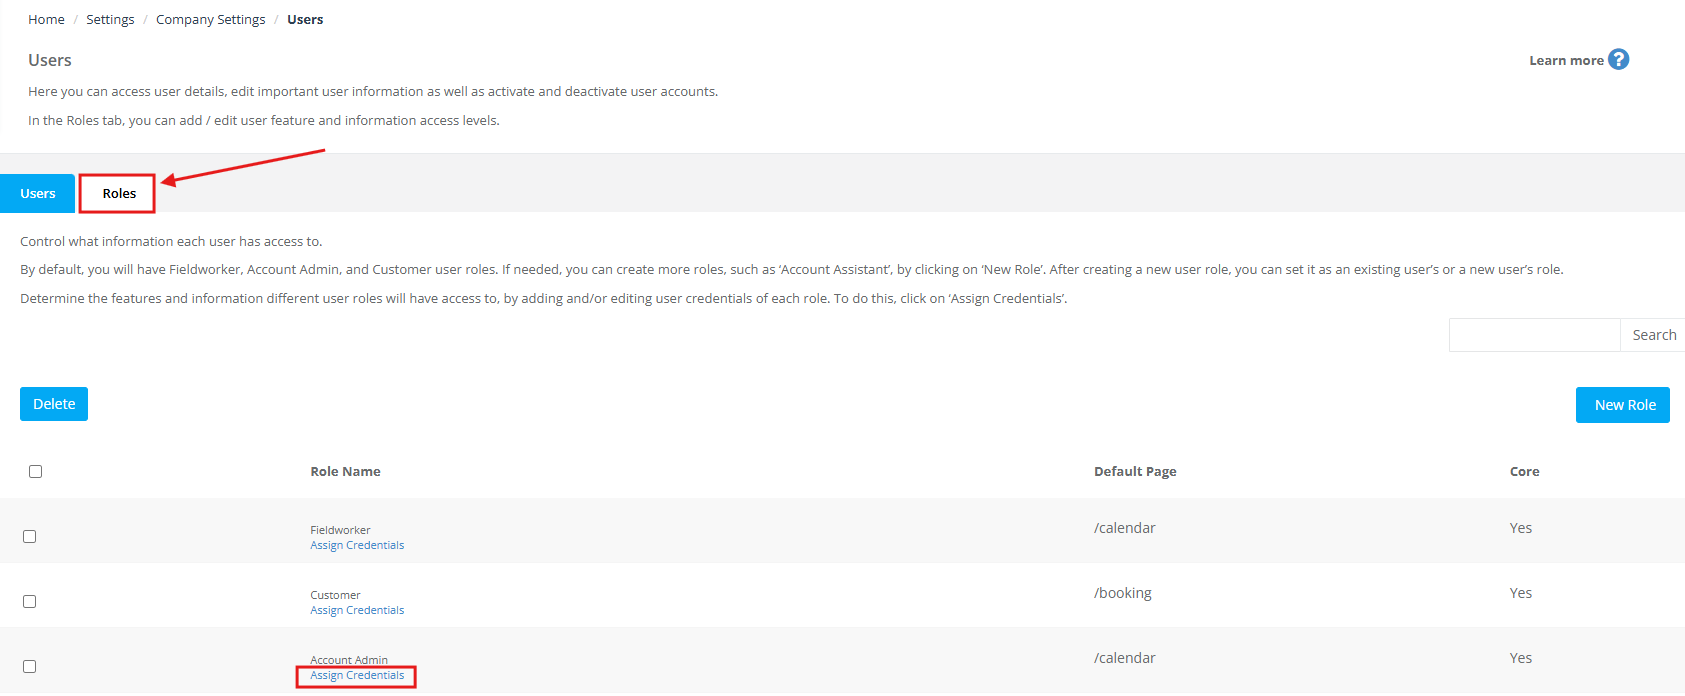
- Expand Permissions for Settings or the corresponding permissions section where Product access is listed.
- Click Assign Credentials for the desired role (e.g., “Fieldworker,” “Admin,” “Sales Team”).
- Toggle the Product Feature
- Enable: Check (tick) the box next to the product-related permission(s) to grant that role access to creating and managing products.
- Disable: Uncheck (untick) the box if you do not want users in that role to view or manage products.
- Enable: Check (tick) the box next to the product-related permission(s) to grant that role access to creating and managing products.
- Save Your Changes
- Once done, click Save or Apply to confirm your updated permissions.

Note: If you disable the product feature for a specific role, the “Products” menu option will disappear from their interface, preventing them from adding or viewing products in service settings, quotes, or invoices.
By customizing which roles can create, modify, or view products, you maintain a secure and streamlined workflow, ensuring each team member only has access to the functionality that aligns with their job responsibilities.
Standard Products vs. Custom Products
- Standard Products
- Created in Settings > Services Settings > Products.
- Pre-defined with consistent pricing, markup, tax rate, etc.
- Suitable for commonly used items across multiple customers (e.g., air filters, oil containers).
- Custom Products
- Added on the spot when a unique or one-off item is needed.
- Typically used for special orders or custom builds with distinctive cost parameters.
- Only relevant to a specific job or small set of customers.
Adding a Product to Quotes & Bookings in the Admin/Office View
- Open or Create a Booking/Quote
- From Bookings (or Quotes) > Create New, fill out the main details (service date, customer info, etc.).
- Scroll Down to Services
- If needed, add one or more services first.

- If needed, add one or more services first.
- Select a Product
- A “Products” tab or button appears beneath each service.

- Click Add to choose an existing product from your library or create a new custom product.
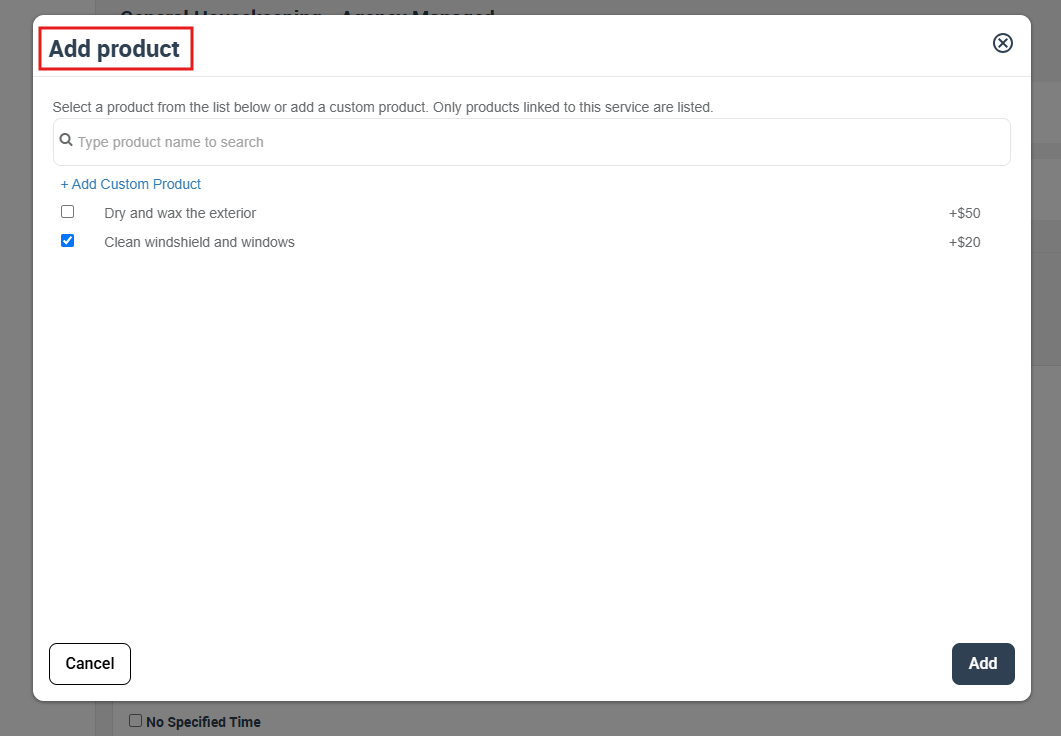
- A “Products” tab or button appears beneath each service.
- Quantity & Pricing
- Adjust the quantity.
- If you need to change the sale price, you can manually override it. The system recalculates your markup accordingly.
- Save your changes.
- Add Extra Marketing Info (optional)
- Attach images or PDFs so the customer can learn more about this product when they see it in their invoice or portal.
Adding a Product to Quotes & Bookings in the Fieldworker App
Note: Fieldworkers must have permissions to add or edit products in bookings.
- Access All Bookings
- In the mobile app, tap Bookings > All.
- Select a Booking
- Tap the Services to see product options.
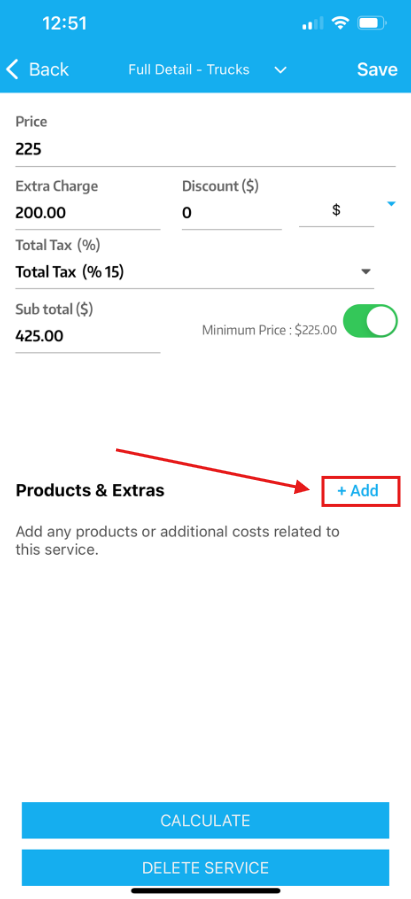
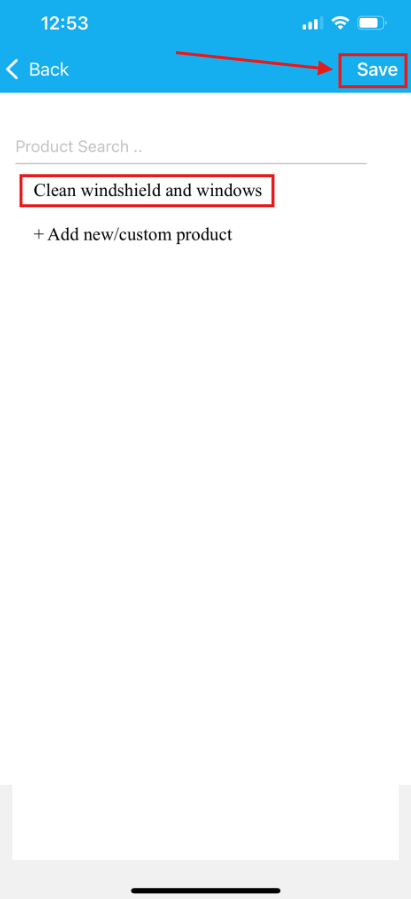
- Add Products
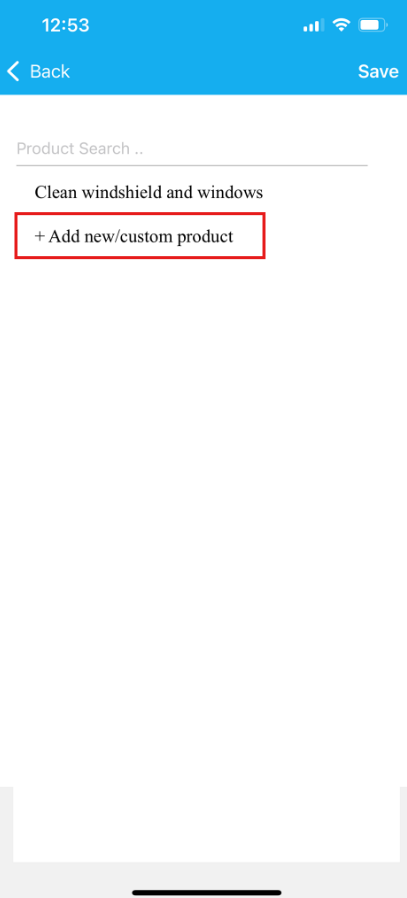
- Tap +Add. A list of linked products (or the option to create a new custom product) appears.
- Search for an item or click Create New to define a custom product.
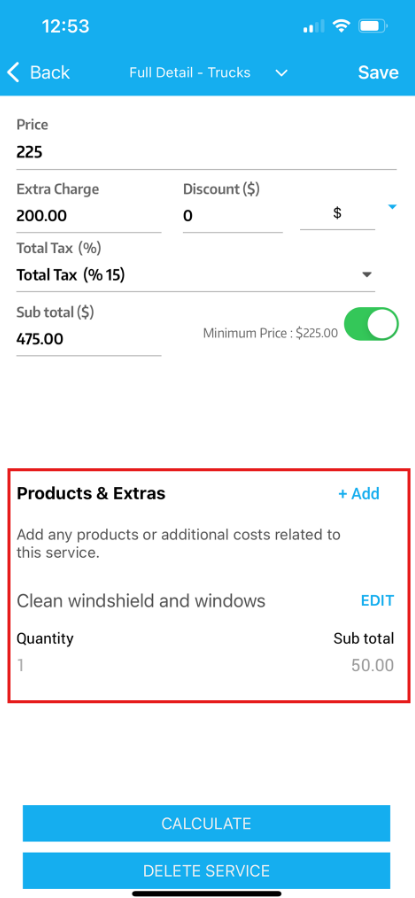
- Define Quantity & Price
- Specify how many units were used.
- Adjust the sale price or discount if appropriate.
- Save
- The product cost is added to the booking’s total.
- Fieldworkers can repeat the process for additional products as needed.
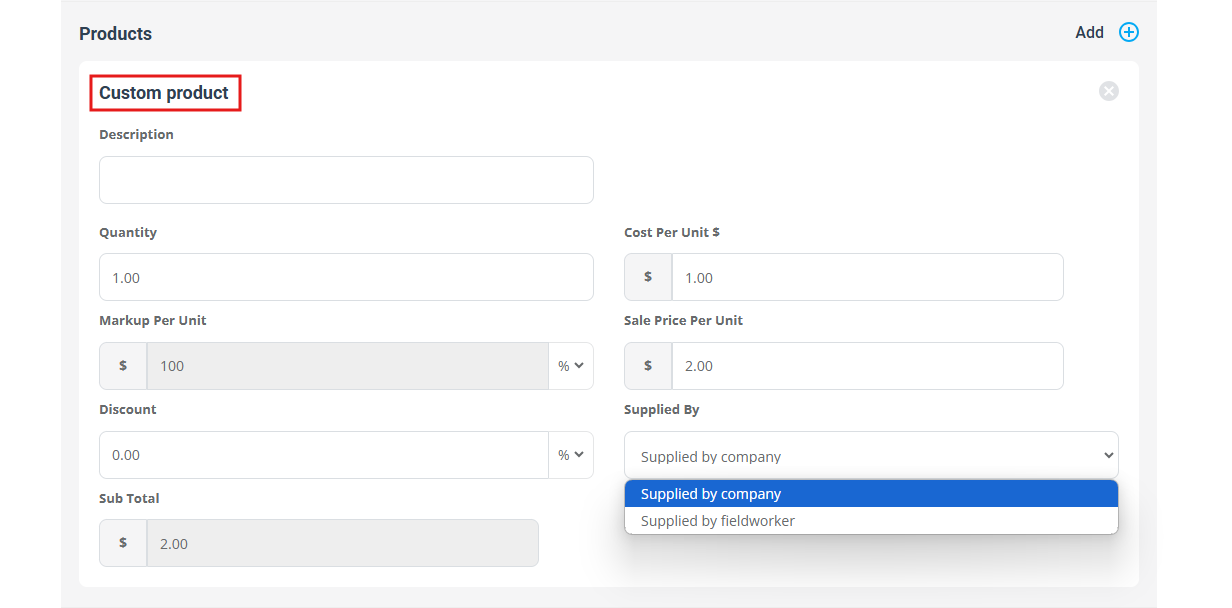
Adding a Custom Product
If no existing product fits your needs:
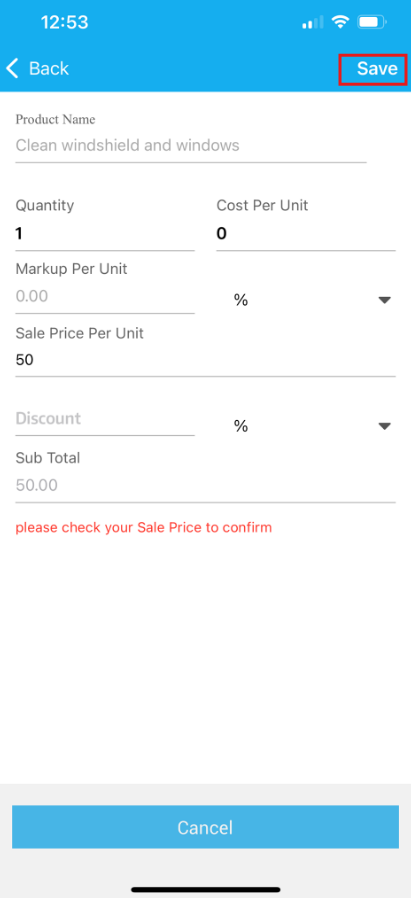
- Choose +Add custom product from the product selection popup.
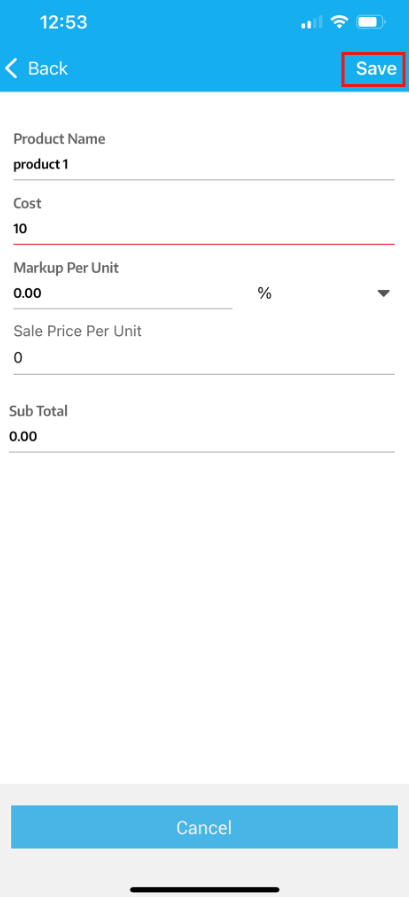
- Enter a Name, Cost Per Unit, Markup Per Unit, and Sale Price.
- Sale Price = Cost Per Unit + Markup. If you change the sale price, the markup recalculates accordingly.
- Optional Discount: Enter a percentage or fixed value to reduce the final sale price.
- Supplied By: Decide who provides the item (company or fieldworker).
- Save to finalize.
Viewing Products in Bookings, Invoices, and Quotes
After adding products to a booking, invoice, or quote, users can preview and print a PDF that includes each product’s details—such as name, unit price, quantity, and total cost.
Bookings
- Access Bookings
- From the admin web view, select Bookings in the side menu.
- Choose Upcoming or Past bookings, depending on the status of the booking you need.
- Open the Desired Booking
- Click the Actions button next to the booking and select View Booking.
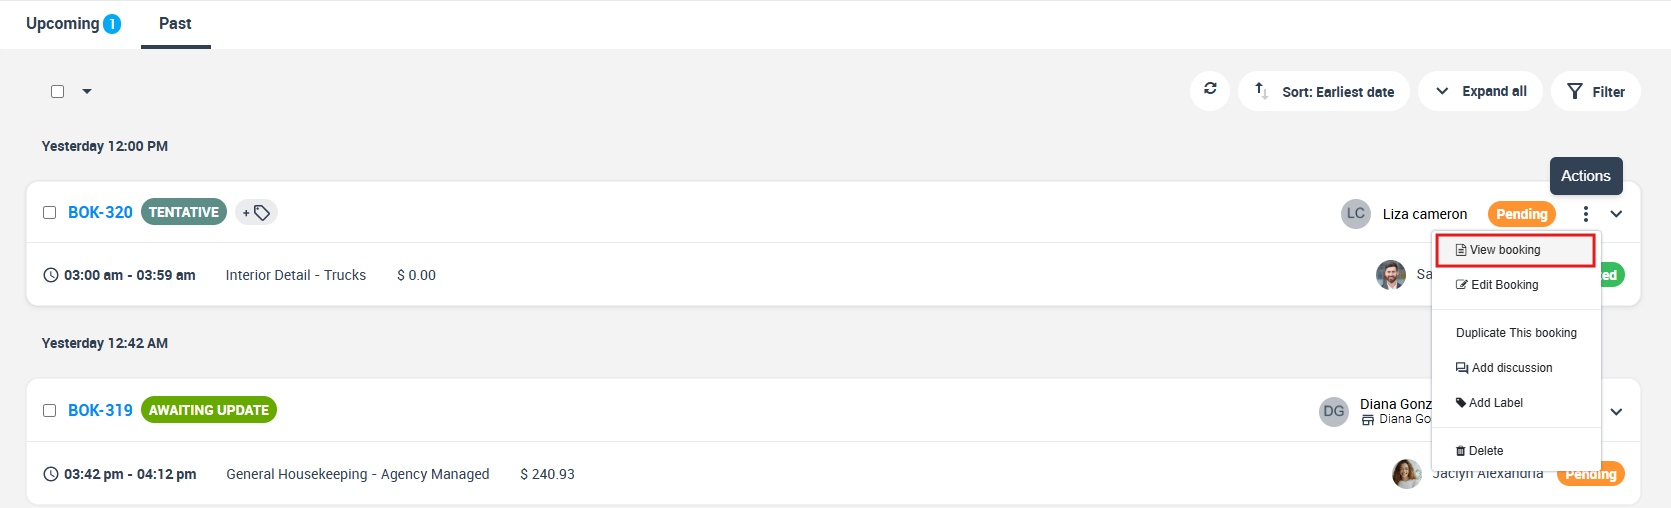
- Click the Actions button next to the booking and select View Booking.
- Preview Products
- On the booking details page, scroll to the Services section to see the products added to that booking.
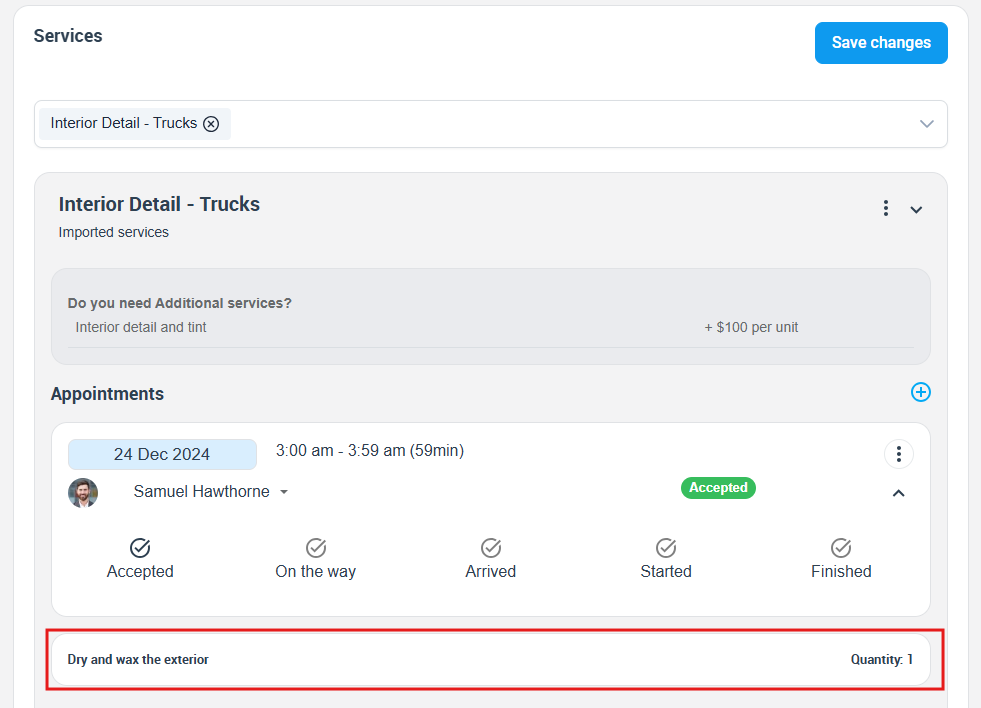
- On the booking details page, scroll to the Services section to see the products added to that booking.
- Generate a PDF
- In the booking details page, open the Actions button again and select Print Booking PDF.

- The PDF will include any products, their quantities, and their costs as line items alongside any associated services.
- In the booking details page, open the Actions button again and select Print Booking PDF.
Invoices
- Access Invoices
- From the admin web view, select Invoices in the side menu.
- Navigate to Outstanding invoices or choose another category (e.g., “All Invoices”) depending on the status you want to view.
- Open the Desired Invoice
- In the invoice list, find the one you wish to view.
- Click the Actions button next to it and select Preview Invoice.
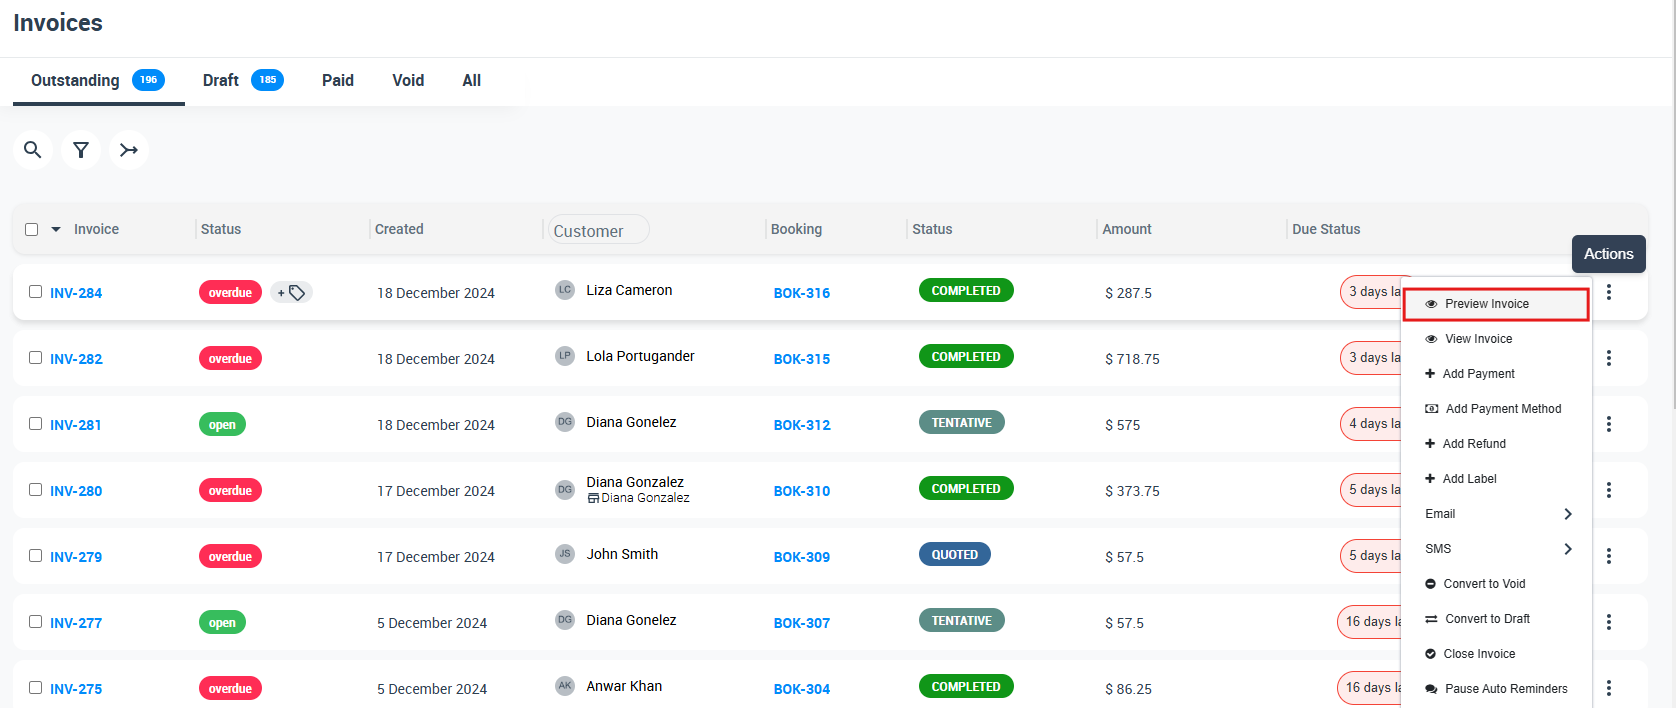
- Preview Products
- In the preview window, you’ll see each product listed with its unit price, quantity, and total cost.
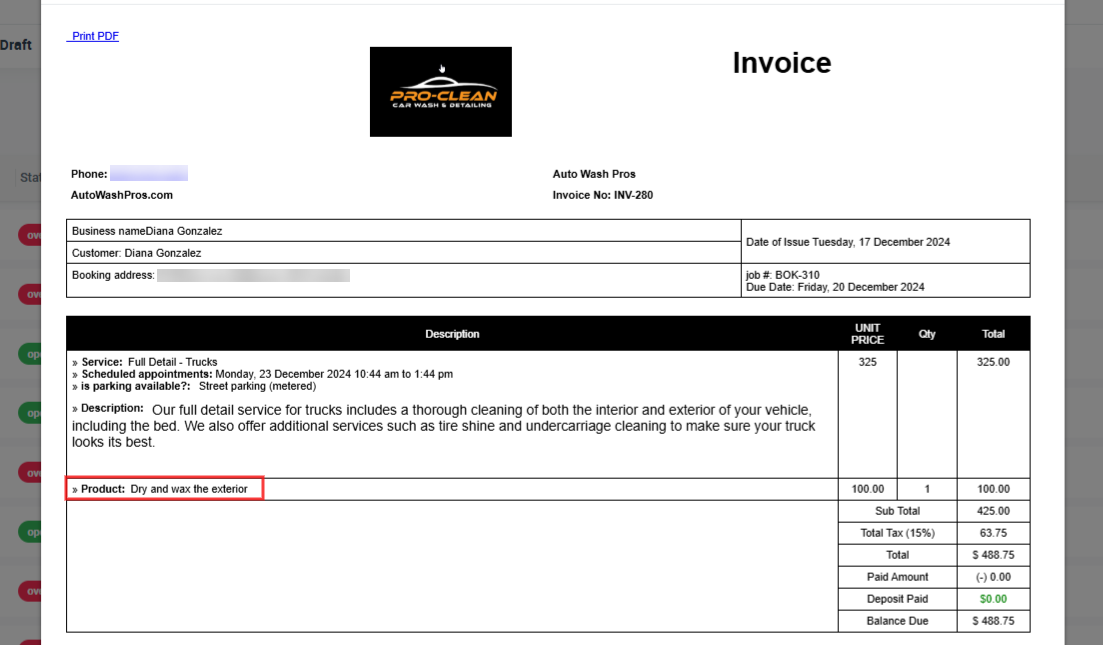
- This ensures office staff or fieldworkers can verify billed items before sending it to the customer.
- In the preview window, you’ll see each product listed with its unit price, quantity, and total cost.
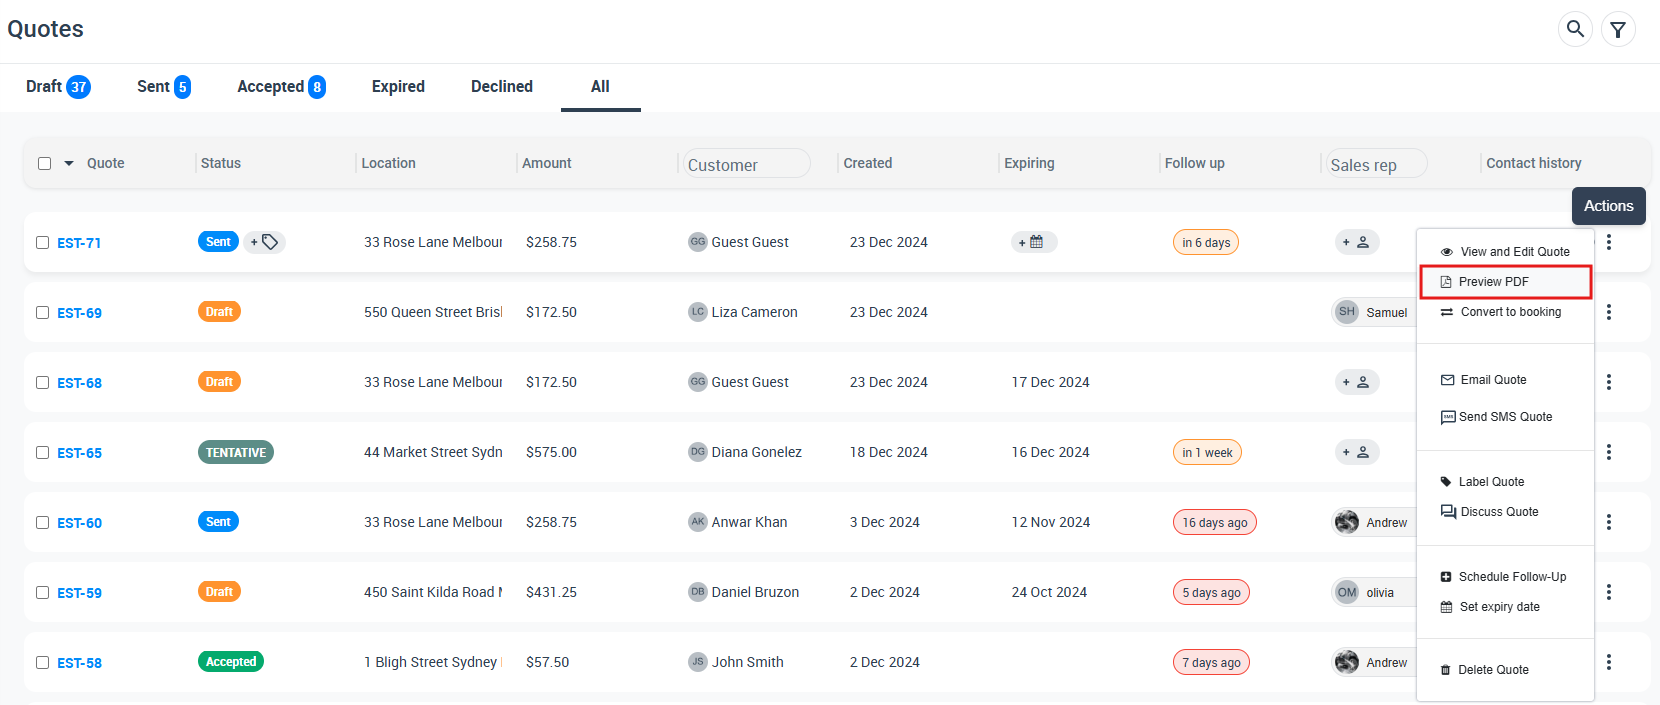
Quotes
- Access Quotes
- Go to Quotes in the side menu.
- Select All Quotes or the relevant subcategory.
- Open the Desired Quote
- Locate the quote you want to view.
- Click the Actions button and select Preview PDF.
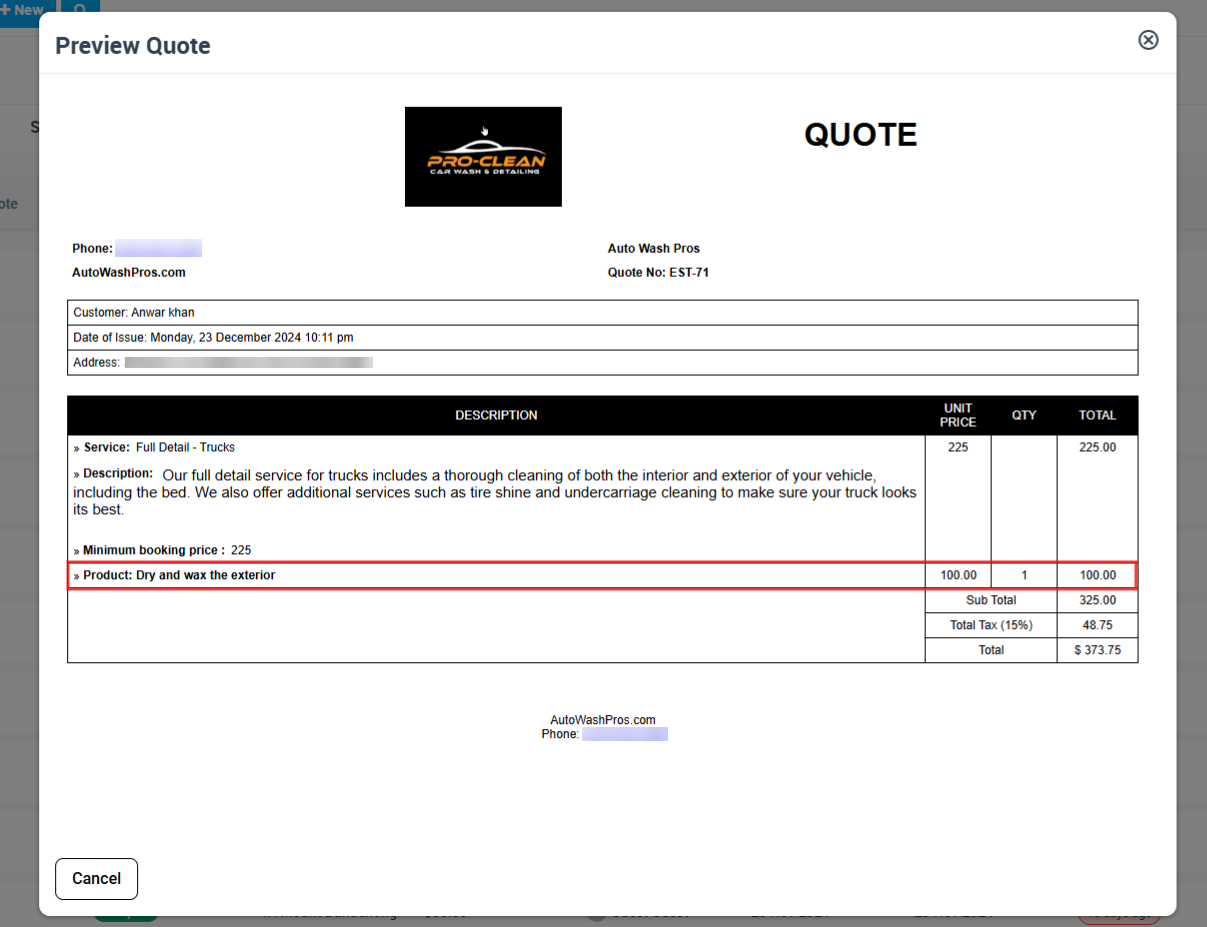
- Preview Products
- In the quote PDF preview, each product is displayed alongside its price, quantity, and total cost line item.
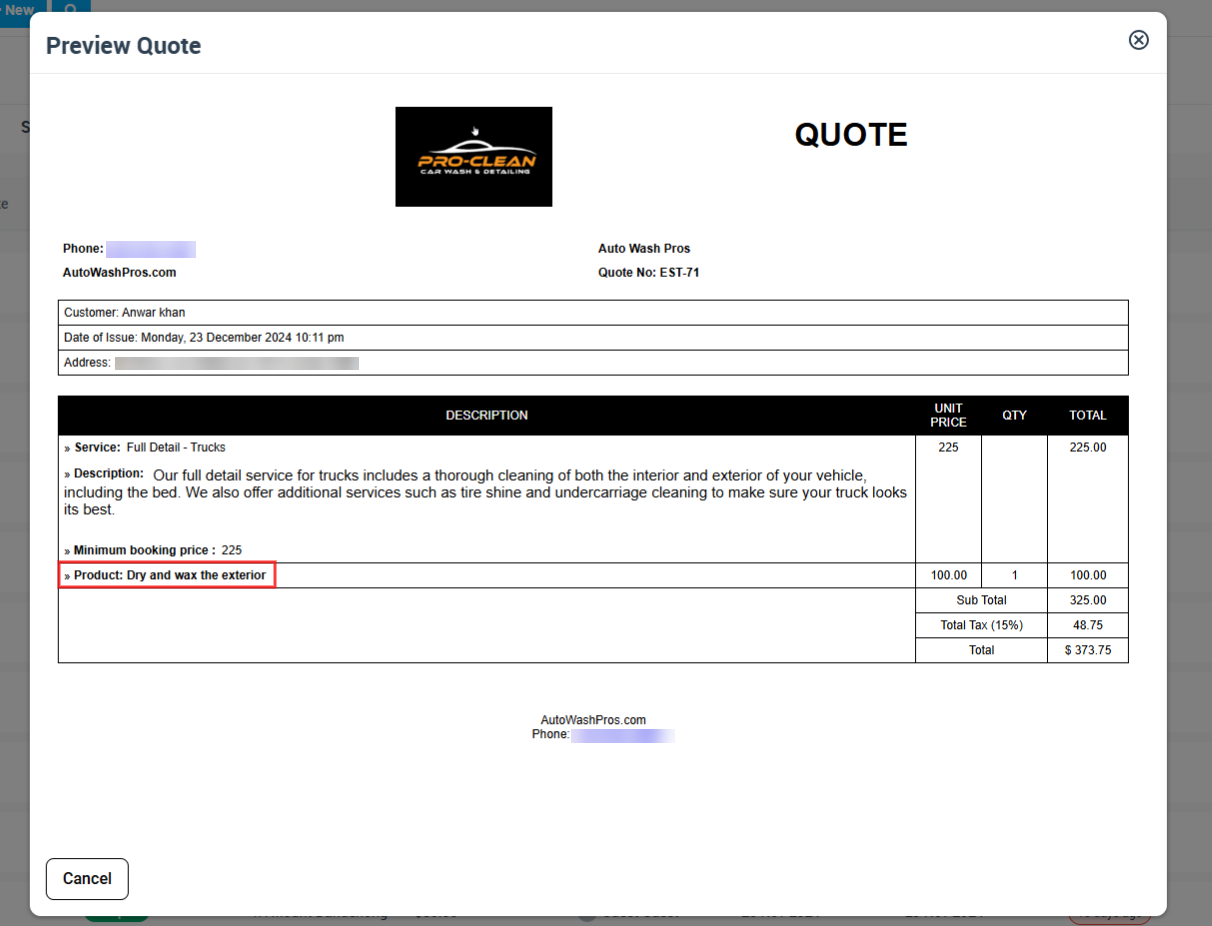
- You’ll see a clear breakdown of any items added during quote creation.
- In the quote PDF preview, each product is displayed alongside its price, quantity, and total cost line item.
Displaying Products in Email Attachments
When OctopusPro emails a quote or invoice PDF to a customer, each product appears as a line item in the attached PDF. Details generally include:
- Product Name
- Quantity
- Unit Price (or cost, if the markup is not broken out)
- Total Price
Quote Attachments
- The PDF file attached to a quote email shows product details such as name, quantity, and total price.
- This helps customers clearly see any materials or goods included with the quoted services.
- For more on emailing quotes, see [Emailing a Quote].
Invoice Attachments
- When an invoice is sent to a customer, the PDF displays each product line item with price and quantity.
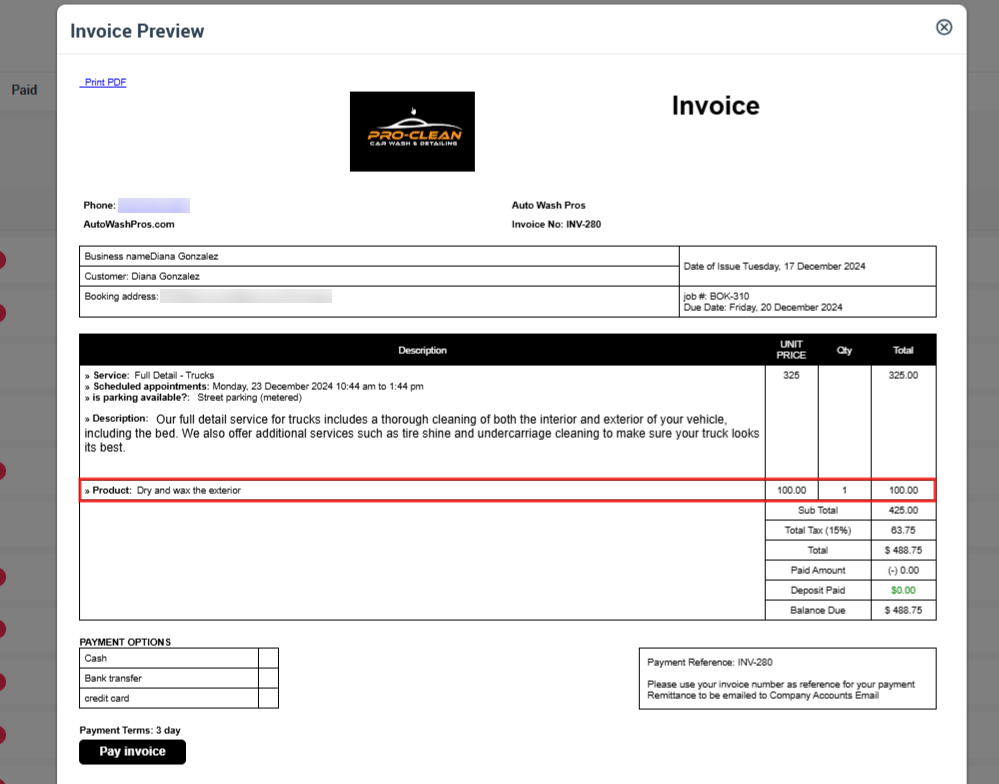
- Customers can review the breakdown of products plus the final total owed.
- For more on emailing invoices, see [Emailing an Invoice].
Practical Use Cases
- Customized Services: If your “Body & Skincare” service can include various toners, oils, or serums, you can easily select (or create) those products at booking time, ensuring accurate billing and clarity for the customer.
- Job Completion Requirements: When certain tasks (e.g., HVAC repairs) always need specific spare parts, requiring product selection ensures costs are captured automatically.
- Fieldworker Add-Ons: For on-site upselling or unforeseen needs, fieldworkers can add a product directly during job completion, guaranteeing no missed revenue opportunities.
By integrating product selection directly into your booking or quote process, you not only simplify data entry for your team but also provide customers with transparent, detailed information regarding the items used or sold during the service. This approach can raise overall satisfaction by ensuring customers pay only for what’s necessary and fully understand the added value each product brings.
Summary
By building a product list in OctopusPro, you streamline how materials, parts, or add-ons are priced and added to each quote or booking. You can decide who sees and selects products (admins, fieldworkers, or customers) and how these items affect final costs. Attach supportive marketing or informational materials to each product for clarity and up-selling opportunities. While OctopusPro doesn’t track stock levels yet, it provides a robust solution for consistent pricing, easy item integration, and clear cost breakdowns across your quotes, bookings, and invoices.
For stay updated please subscribe to our youtube channel.