
Dynamic Geographical Pricing Zones
Optimize Service Pricing Based on Geographical Location
Modern field‑service brands rarely pay the same wages, fuel, tolls, or permit fees in every suburb—so charging a flat, one‑size‑fits‑all rate leaves money on the table in premium areas and scares off customers in lower‑cost regions. OctopusPro’s Geo‑Pricing Zones let you draw any number of service areas on a map (or upload postcodes) and attach a unique price table to each one. When an admin, fieldworker, or customer enters a job address, the platform instantly swaps in the correct rate and displays it transparently on quotes, bookings, and invoices.
Why use it?
- Align price with real costs – raise rates in high‑wage CBDs, keep them competitive in rural postcodes, or add a congestion surcharge inside low‑emission zones.
- Match market demand – premium call‑out fee for emergency plumbers in Manhattan; off‑peak discount for lawn‑care jobs in quiet counties.
- Automate regional compliance – include mandatory disposal fees only in states that require them, or tack on city licence fees where applicable.
- No more manual overrides – schedulers choose the service; OctopusPro chooses the right zone price in milliseconds.
Industry snapshots
| Field‑service vertical | Typical zone rule |
|---|---|
| HVAC & Refrigeration | Add a $45 parking/permit fee inside downtown cores mapped as “Zone A”. |
| Mobile Pet Grooming | Increase per‑dog price by 15 % for coastal suburbs with higher fuel & toll costs. |
| Solar Panel Installers | Offer a 10 % equipment discount in state‑funded “Green Rebate” regions to capture subsidy demand. |
| Medical Equipment Rental | Metro hospitals $95/day; regional clinics $70/day—same product, different logistics cost. |
| Commercial Cleaning | Canary Wharf high‑rise offices billed at £5.50 / m²; outer borough warehouses at £3.80 / m². |
What this guide covers
- Drawing, importing, and validating Geo‑Pricing Zones.
- Linking zone tables to service prices and to individual custom‑field options (e.g., equipment hire add‑ons).
- How zone pricing interacts with tiered rates, bulk‑quantity discounts, and mileage fees.
- Best‑practice examples for trades, home services, healthcare, and equipment rental, so you can copy proven strategies, not reinvent the wheel.
Use Geo‑Pricing Zones to charge with surgical precision—premium where you need it, competitive where you don’t—while giving every customer a crystal‑clear, location‑specific quote.
Table of Contents
- Create or Edit Geo‑Pricing Zones for a Service
- Implementing Geo-Pricing Zones for Custom Field Values
- Who Sees Geo‑Pricing and When?
To highlight the potential of this feature, let’s explore its benefits and use cases in various field service sectors:
| Industry | Zone‑pricing use‑case | Typical rule |
| Healthcare Home‑Care | Urban carers face higher wages & parking fees. | Zone A (metro) + $25 call‑out; Zone B (regional) base rate. |
| Legal Consultation (mobile/paralegal visits) | Travel & market demand differ by county. | Inner‑city postcodes 20 % surcharge; rural postcodes base fee. |
| Specialised Tech Support (industrial equipment) | Long drive‑time and toll roads for remote plants. | Add $0.80/km outside 30‑km ring; flat metro price inside ring. |
| Home Renovation | Material & permit costs spike in premium suburbs. | Premium zone: labour rate £55 / h; Standard zone £45 / h. |
Additional Geo‑Pricing Playbooks
| Playbook (field‑service focus) | Typical Geo‑Rule | Business Benefit |
|---|---|---|
| HVAC & Refrigeration | Urban congestion zone → + $35 “city access fee” added to labour rate | Offsets parking, tolls, and permit costs in dense downtown cores without raising suburban prices |
| Plumbing / Drain‑Jetting | Rural postcodes > 40 km from depot → + $1.20 /km travel surcharge | Keeps distant call‑outs profitable while keeping base rate competitive in metro suburbs |
| Residential & Commercial Cleaning | High‑rise CBD polygon billed at £5.50 / m²; outer boroughs £4.00 / m² | Captures the extra time/equipment needed for vertical access and stricter site rules |
| Pest‑Control | Coastal termite‑risk strip → automatic 12 % premium | Reflects higher chemical costs and state compliance fees only where risk (and demand) is greatest |
| Solar Panel Installation | Government “Green‑Rebate Zone” → –10 % materials discount auto‑applied | Passes on subsidies inside rebate postcodes to win price‑sensitive eco customers |
| Lawn & Grounds Maintenance | Drought‑restricted county → + $15 flat water‑compliance fee per visit | Covers permit paperwork and water‑saving additives only where regulations apply |
| Mobile Auto Detailing | Airport precinct polygon → $25 security‑clearance surcharge | Pays for extra ID checks and wait‑times at high‑security locations |
| Electrical Contracting | Heritage zone polygon → labour rate +15 % | Compensates for permit delays, parking bans, and extra insurance only in protected districts |
| Home Health & Aged‑Care Visits | Inner‑metro postcodes → +$8 parking/toll fee; rural postcodes → –$10 travel subsidy | Balances high city overheads and incentivises carers to service remote patients |
| Equipment & Lift Hire | Major resources corridor → +10 % “high‑wear” surcharge | Accounts for harder wear & tear and higher retrieval costs only where heavy mining activity occurs |
How this complements Tiered / Bulk Pricing
- Geo‑Pricing Zones adjust the starting unit price based on where the job is.
- Tiered Unit Rates change the unit price based on how many units or hours the customer orders.
- Quantity‑Based Discounts apply a single subtotal rebate once the booking quantity falls within a range.
Used together, you can quote three‑dimensionally:
Higher rate in an expensive CBD zone × lower rate after 100 m² − 10 % bulk‑order discount—all calculated automatically.
Getting Started with Geo-Pricing Zones
OctopusPro uses Google Maps under the hood, so creating location‑based prices is just six quick steps:
| Step | What you do | How it works |
|---|---|---|
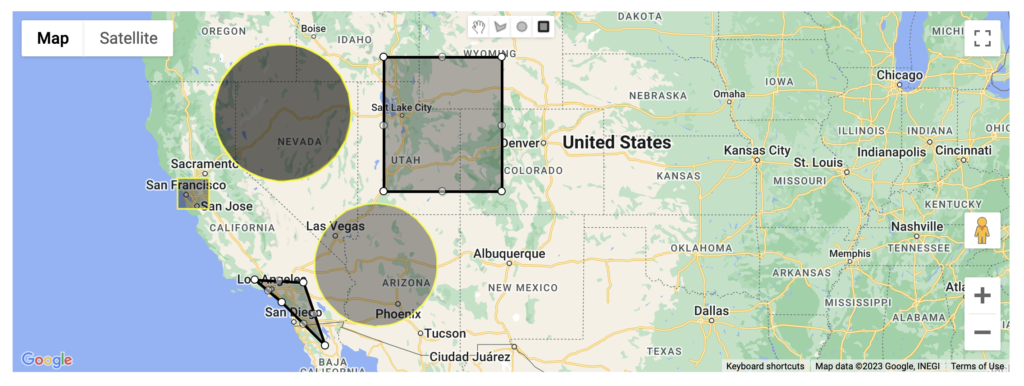
| 1 · Draw your zones | In Settings ▶ Geo‑Pricing Zones open the map and trace a polygon (or upload postcodes). | Google Maps Drawing Tools capture every corner of the shape. |
| 2 · Save the polygon | Click Save Zone and give it a name (e.g. “CBD Premium”, “Rural Discount”). | The latitude/longitude array is stored in your OctopusPro database, ready for look‑ups. |
| 3 · Attach a price table | Edit a service → Geo Pricing → Add Zone Price ➜ enter the zone and its rate (per unit, per hour, or flat fee). | Each zone now has its own override of the service’s base price. |
| 4 · Customer selects address | On a quote, booking, or portal checkout the user types or pin‑drops their location. | Google Geolocation API returns precise coordinates. |
| 5 · Zone detection | OctopusPro runs containsLocation() (Google Geometry Library) to test which polygon the point sits in. | Zero coding for you—just instant matching. |
| 6 · Price swap | If a match is found, the zone’s price replaces the default; if not, the global price remains. | The UI refreshes live, so the customer/admin sees the correct fee before confirming. |
Result: every quote reflects real‑world costs—higher in dense metro areas, lower where overheads are cheap—without a single manual calculation.
Tip: combine Geo‑Pricing with Tiered Unit Rates or Bulk Discounts for a fully dynamic pricebook that reacts to both where and how much your customer orders.
Grouping Several Map Areas into a Single Price Zone
Need the same rate in scattered pockets of the map?
OctopusPro lets you bundle any number of shapes—across suburbs, cities, or even state lines—into one zone record:
- Draw or import multiple polygons and give the collection a single zone name (e.g. “Premium Waterfronts” or “Metro Service‑Fee Area”).
- All addresses that fall inside any of those polygons inherit the same price table.
- No geographic limits—mix ZIP codes from different counties, coastal strips, or industrial parks under one rule.
Example: A pest‑control firm charges a “high‑rise access fee” in three distinct downtown clusters. Instead of creating three separate zones (and three price rows), they draw three polygons, label them “CBD High‑Rise Zone”, and attach one surcharge. Every job inside those pockets now picks up the extra fee automatically.
This multi‑polygon flexibility keeps your zone list short, your pricing logic clear, and your admin workload low—no matter how many hotspots you service.
Create or Edit Geo‑Pricing Zones for a Service
Where to start:
- Existing service: Settings ▶ Service Settings ▶ Services → Edit
- New service: Settings ▶ Service Settings ▶ Services → Create New
Both paths lead to the Cost & Payrate tab, where Geo Pricing is configured.
| Step | Action |
|---|---|
| 1 | Open the Cost & Payrate tab, then click Geo Pricing → Manage Zones.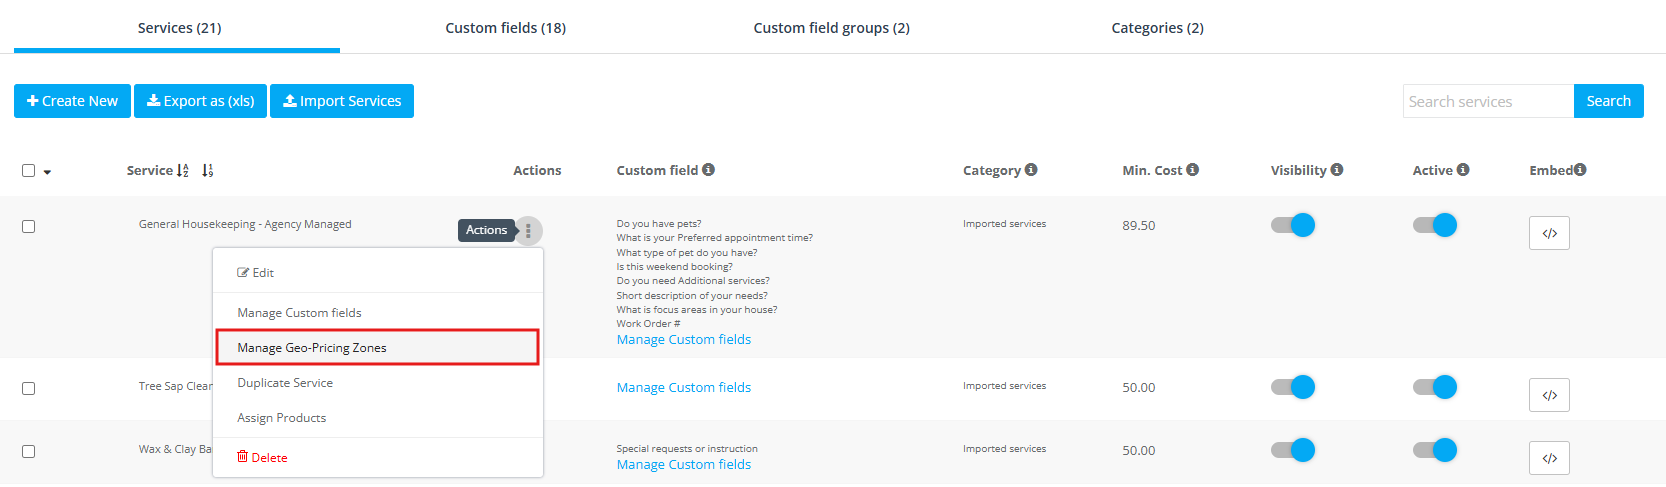 |
| 2 | Click Add Zone. Give the zone a clear name (e.g. Downtown Premium, Rural Discount).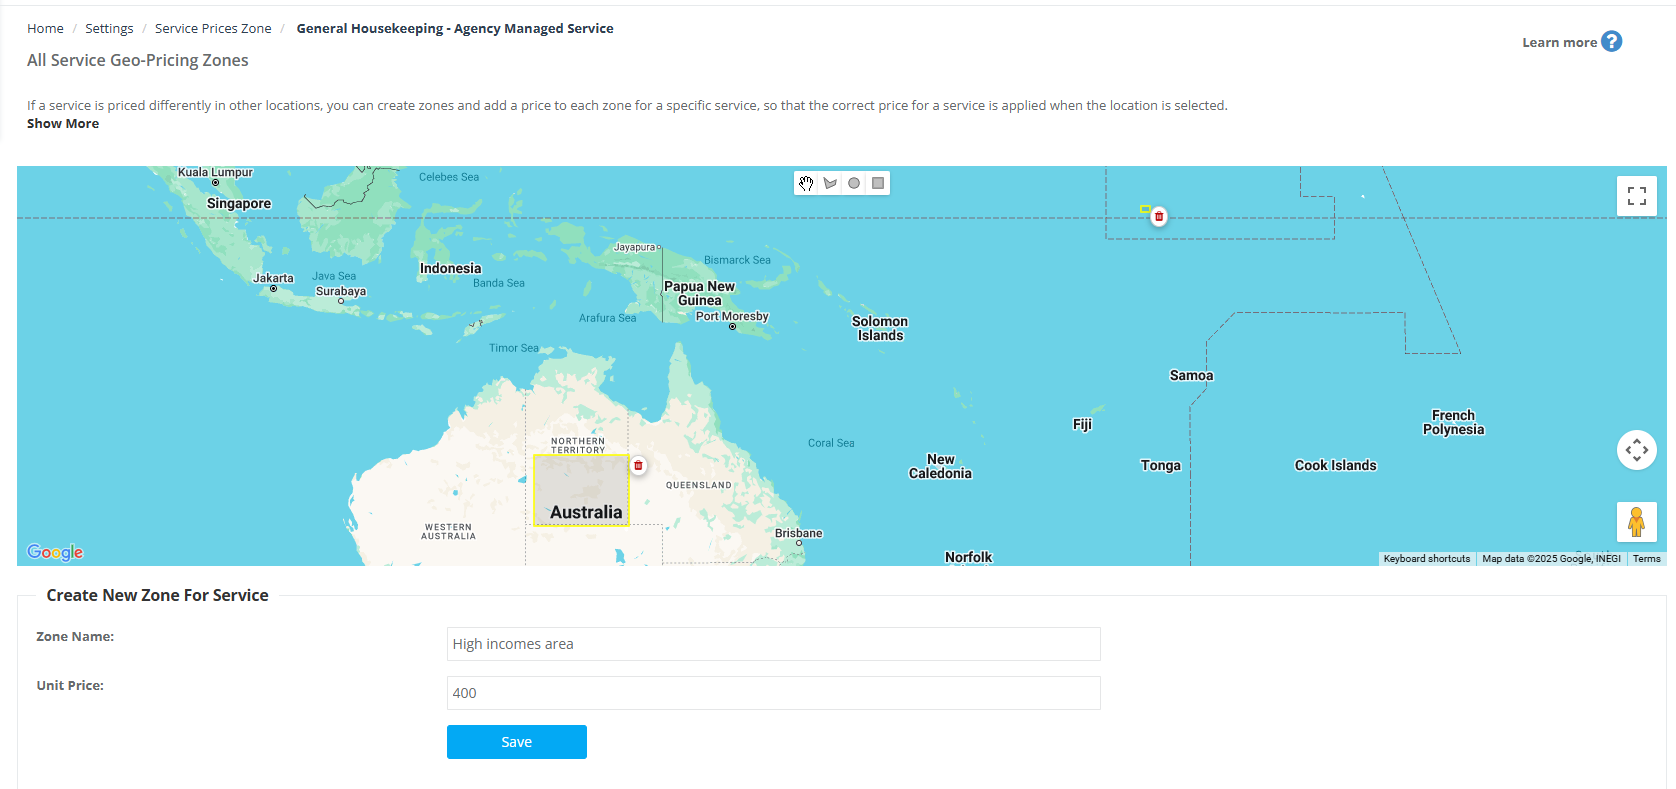 |
| 3 | Draw the zone on the map (or select postcodes). Multiple polygons can share the same zone if they use the same rate. |
| 4 | Enter the zone‑specific price (per hour, per unit, or flat fee – it follows the service’s pricing model). |
| 5 | Save Zone. Repeat for any other regions that need their own rate. |
| 6 | Save Service. OctopusPro now auto‑applies the correct price whenever a booking address falls inside one of your zones. |
Example
HVAC Service — Base rate $90/h
CBD Zone (extra permits & parking) → $110/h
Outer‑metro Zone (lower costs) → $80/h
Schedulers choose the service, enter the address, and the platform selects $110, $90, or $80 automatically.
Geo‑Pricing Zone at Custom‑Field Option Level
Sometimes an add‑on inside a service—not the service itself—needs a different rate in one suburb versus another. OctopusPro lets you attach a zone‑specific price to each value of a custom field (radio button, dropdown item, checkbox, etc.).
When is this useful?
| Service | Custom‑field option | Geo‑pricing win |
|---|---|---|
| Tile & Grout Cleaning | “Factory‑Wax Removal” surcharge | $3 / m² standard, $4 / m² inside high‑rise CBD zone where disposal fees apply |
| Aerial Drone Inspection | “Night‑Flight Permit” checkbox | +£120 flat in rural counties, +£180 in London air‑space polygons |
| Mobile Dog Grooming | “Large Breed (30 kg+)” add‑on | +$15 in metro toll zone, +$10 elsewhere |
How to set an Option‑Level Zone Price
- Settings → Service Settings → Services
- Locate the service and click Manage Custom Fields.
- Open the field that contains the value you want to zone‑price:
- Selectable‑option fields (Dropdown, Radio Button, Button Group, Checkbox, List)
- Click Actions → Edit.
- Expand the required value row (e.g. Oil‑Stain Removal).
- Click Set Geo‑Price Zones.
- Free‑entry fields (Text Field, Toggle, (+/–) Stepper)
- Edit the field header and switch Affects the Service Price to YES.
- Save. An option row for the field now appears.
- Expand that row and click Set Geo‑Price Zones.
- Selectable‑option fields (Dropdown, Radio Button, Button Group, Checkbox, List)
- In the Zone Manager dialog:
- Click Add Zone.
- Enter a Zone Name – e.g. CBD Disposal Surcharge.
- Draw or select the area(s) on the map.
- Enter a Unit Price that replaces the option’s default whenever the booking address falls inside this zone.
- Save Zone. Repeat for additional regions or option values as needed.

Key points
- Unit selector (per hour, per m², flat, %) defaults to the option’s current cost unit but can be changed.
- Stacking logic – An option‑level geo price is applied only when that value is chosen and then stacks with:
- any Service‑level Geo‑Price Zone, and
- any Quantity‑Based Discount that matches the booking.
This gives you precise, location‑aware pricing without manual edits.
Why not at the field level?
Prices usually vary by value (e.g., wax removal vs oil stain removal), so OctopusPro keeps the zone list inside each individual option. That way you aren’t forced to create separate custom fields—or entire services—just to handle regional surcharges.
Best‑practice tip
Keep zone names descriptive (Inner‑Ring Toll Zone, Mountain Fuel Surcharge) and review them whenever council boundaries or travel costs change. One quick edit updates every future quote automatically.
Who Sees Geo‑Pricing and When?
Geo‑Pricing kicks in the moment an address is entered—whether by an admin, a fieldworker, or a customer.
The price on screen instantly swaps to the zone rate, so there are no surprises at invoice time.
1 · Admin view (Back‑office)
- Bookings ▶ Create New → pick the customer or type a new address.
- Add the service (and any option that carries its own zone price).
- OctopusPro checks the coordinates against your polygons and displays the correct unit price or surcharge.
Example
A plumbing dispatcher selects an address inside the “Mountain‑Toll Zone”. The service line shows Travel Surcharge $30 automatically; staff no longer have to remember to add it.
2 · Fieldworker view (Mobile app / Portal)
- New Booking → enter job address.
- Choose the relevant service and custom‑field option.
- The line item updates with the zone price, so the tech sees—and can quote—the exact cost on site.
Example
A mobile dog‑groomer booking a return visit at the client’s driveway sees the Outer‑Metro rate $15/travel unit, reflecting extra fuel costs.
3 · Customer view (Customer Portal / Branded App)
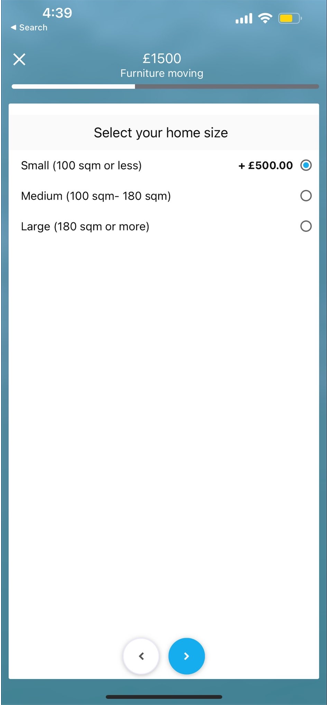
- Customer selects their address or uses GPS lookup.
- When they move to the service step, OctopusPro re‑prices the service (and any add‑on option) using the zone table.
- The total shown is final; customers can’t override it, ensuring consistency with your pricing rules.
Example
A home‑cleaning client in a coastal postcode sees “Beachfront Premium +10 %” automatically applied to the per‑m² rate; a suburb client does not.
Why it Matters
- Accuracy first time – no manual edits, no missed surcharges.
- Transparent quotes – everyone sees the same zone‑adjusted price before confirmation.
- Reduced disputes – the booking, job sheet, and invoice all carry the identical, auto‑calculated amount.
Leverage Geo‑Pricing to reflect real travel, permit, or cost‑of‑living differences and keep every job profitable—wherever your team works.
Conclusion
Geo‑Pricing Zones let field‑service companies price work as precisely as they perform it—matching labour, travel, and compliance costs to the neighbourhood, not a national average.
Whether you’re …
- an HVAC contractor adding a downtown congestion surcharge while keeping suburban call‑outs competitive,
- a pest‑control firm auto‑loading a termite‑risk premium only along coastal postcodes, or
- a mobile auto‑detailer offering a travel‑distance discount to win fleet work in industrial parks,
… OctopusPro’s zone engine updates the quote the moment an address is selected, no spreadsheets or manual overrides required.
The result: higher margins where overheads are steep, sharper prices where the market is tight, and total transparency for customers in every location.
Need help configuring your first zone map or importing postcode lists?
👉 Reach our support team any time—our specialists will walk you through best‑practice setups for your trade and region.
Unlock location‑based pricing today and let OctopusPro keep every job profitable, wherever the road takes you.
To stay updated, please subscribe to our YouTube channel.