
Google Calendar Integration with OctopusPro
Google Calendar integration helps you keep OctopusPro and Google Calendar aligned so your team can manage schedules more efficiently, reduce double bookings, and improve visibility across fieldworker and business calendars.
Once connected, OctopusPro can push bookings to fieldworkers’ Google Calendars, import Google Calendar busy events into OctopusPro as unavailable time blocks, and help admin users make better scheduling and dispatch decisions without constantly switching between systems.

This guide explains what the integration does, how to choose the right sync method, how to connect business and fieldworker calendars, what information is synced, how to control which bookings are pushed to Google Calendar, and how to disconnect the sync when needed.
On this page: What this integration does | Key benefits | Before you start | OctopusPro Google API vs Private Google API | Set up Google Calendar sync | Sync your business Google Calendar | Working with synced Google Calendar in OctopusPro | Access multiple calendars | View Google Calendar events in OctopusPro | Connect Google Calendar as a fieldworker | Connect a fieldworker’s Google Calendar as an admin | Disconnect Google Calendar sync | Troubleshooting | Best practices | Related guides
What this integration does
Google Calendar integration connects OctopusPro with Google Calendar so fieldworkers and admin users can manage work schedules and personal availability in a more connected way.
Depending on how you configure it, the integration can help you:
- Push OctopusPro bookings to a fieldworker’s Google Calendar
- Display Google Calendar events inside OctopusPro as busy or unavailable time blocks
- Show a fieldworker’s combined schedule inside OctopusPro
- Help dispatchers avoid conflicts before assigning work
- Reduce manual calendar updates across multiple systems
This is especially useful for businesses where fieldworkers already use Google Calendar for personal appointments, subcontractor work, travel, training, or other commitments that should be considered when scheduling jobs.
Key benefits
- Reduce double bookings: See Google Calendar busy time alongside OctopusPro schedules.
- Improve scheduling visibility: Admin users can better understand real-world fieldworker availability.
- Save time: Reduce manual copying between OctopusPro and Google Calendar.
- Keep schedules organized: Fieldworkers can manage work and personal events in one familiar calendar environment.
- Improve dispatch decisions: Better visibility helps prevent assignment conflicts and missed appointments.
Before you start
Before enabling Google Calendar integration, make sure:
- Your OctopusPro account is already set up and you are actively scheduling jobs.
- Fieldworkers have valid email addresses on their profiles.
- Fieldworkers understand they may receive an authorization email and need to grant permission using their Google account.
- You decide whether to use the built-in OctopusPro Google API or your own private Google API.
Each fieldworker can connect to one Google account at a time. However, multiple fieldworkers can connect to the same Google account if your business uses a shared or team calendar.
OctopusPro Google API vs Private Google API
OctopusPro supports two main Google Calendar connection methods.
Use OctopusPro Google API
This is the easier option for most businesses. It is ideal when you want a simpler setup and prefer individual users to connect their calendars one by one.
- Faster to set up
- Best for most standard accounts
- Useful when you want selected users to authorize their own calendars
Use Private Google API
This option is better suited to businesses using Google Workspace that want to manage the integration through their own Google Cloud project and API credentials. It is generally used when you want a broader organization-level Google Workspace setup rather than only individual user connections.
- Better for Google Workspace environments
- Useful when your business wants to manage its own Google API credentials
- Better suited to organizations that want more control over authorization and governance
Set up Google Calendar sync
Whether you use OctopusPro’s Google API or your own private Google API, the setup starts from the same place in OctopusPro:
Settings > Company Settings > Integrations (API) > New Developer Integrations (API)
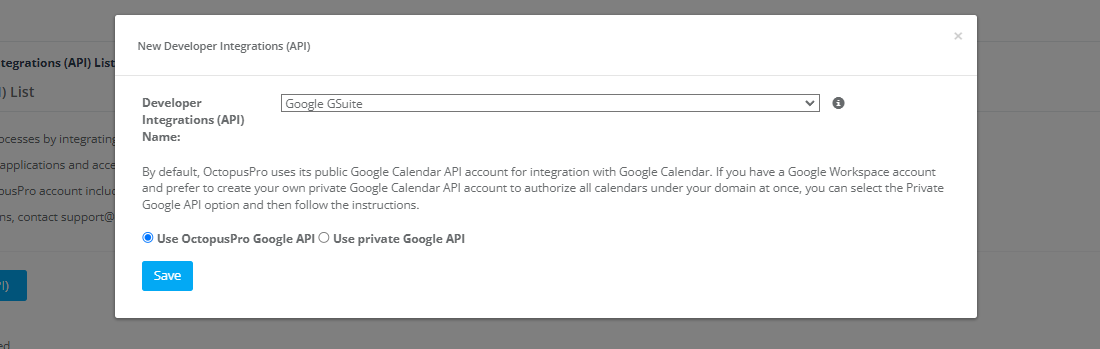
Using OctopusPro Google API
Select Google GSuite as the integration name, choose Use OctopusPro Google API, then click Save.
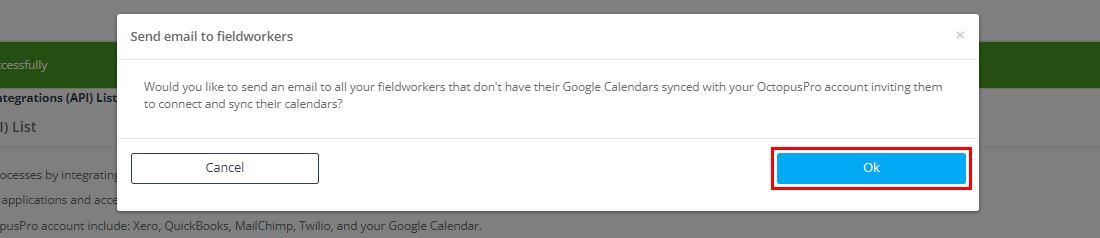
After saving, automatic emails can be sent to your active fieldworkers to ask them to grant permission to sync their calendars with OctopusPro.
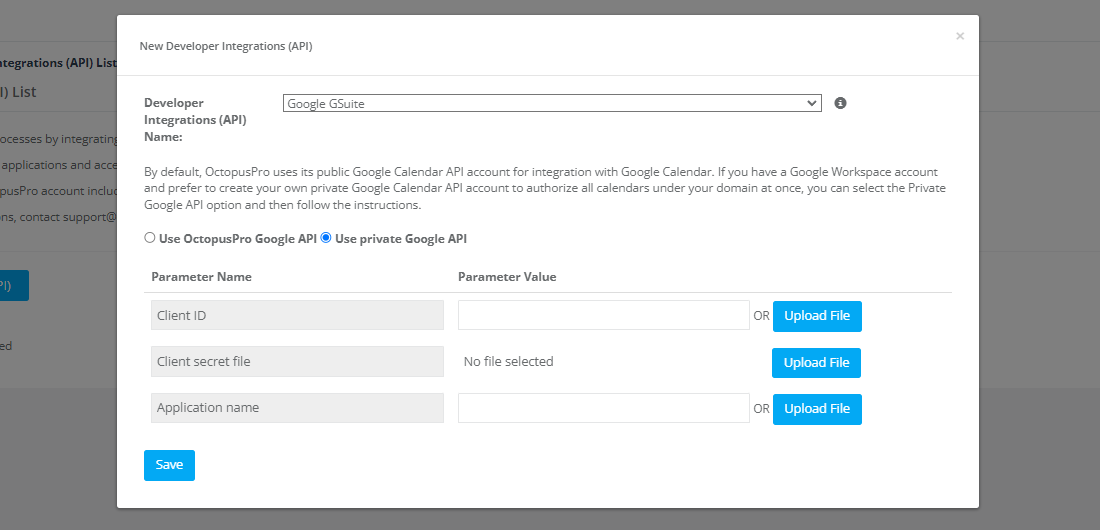
Using Private Google API
As an admin, you can synchronize Google Workspace accounts with OctopusPro calendars using your own Google Cloud project.
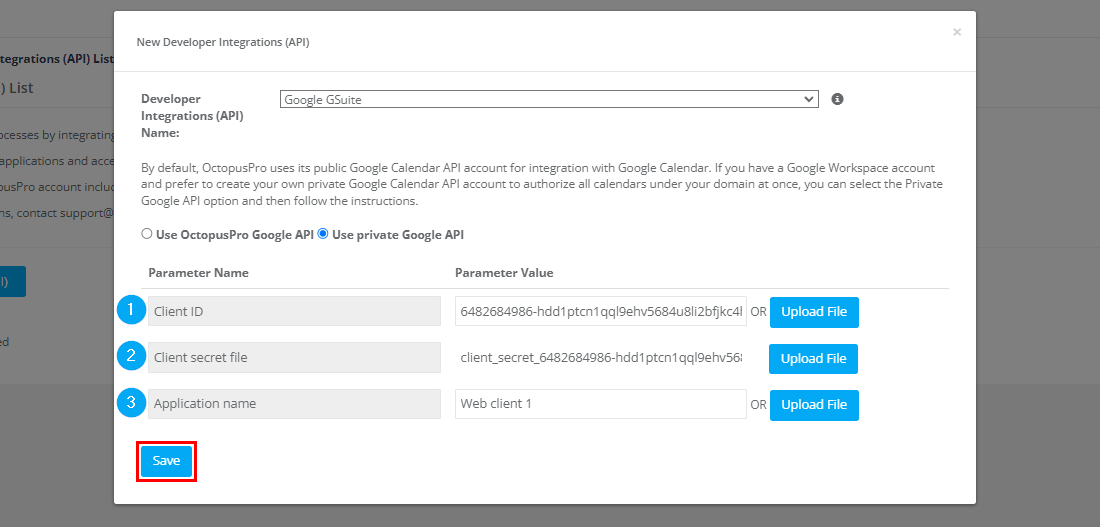
- Navigate to Settings > Company Settings > Integrations (API) > New Developer Integrations (API).
- Click New Developer Integrations (API).
- Select Google GSuite from the integration name dropdown.
- Select Use private Google API.
- Click Save.
After that, set up your Google Workspace account in Google Cloud:
- Go to the Google Cloud Console.
- Select a project or create a new one.
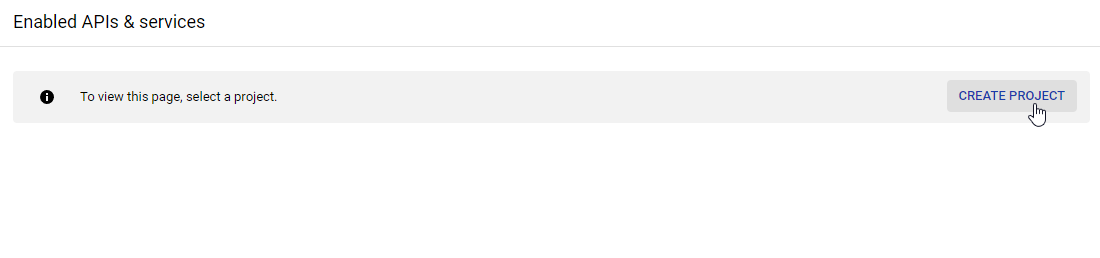
- Choose a project name, such as Gmail and Calendar API, and select your Google Workspace or Cloud Identity organization. If you do not have one yet, you can use a free trial.

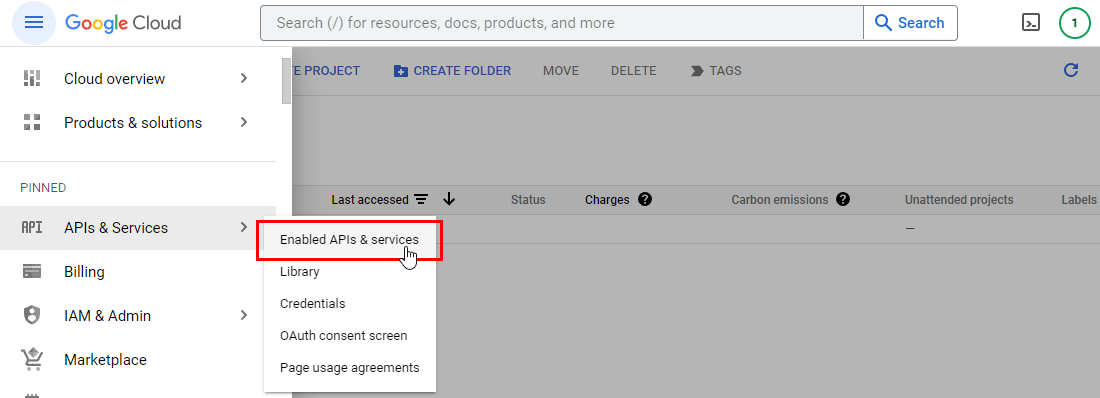
- From the navigation menu, go to API & Services > Dashboard.
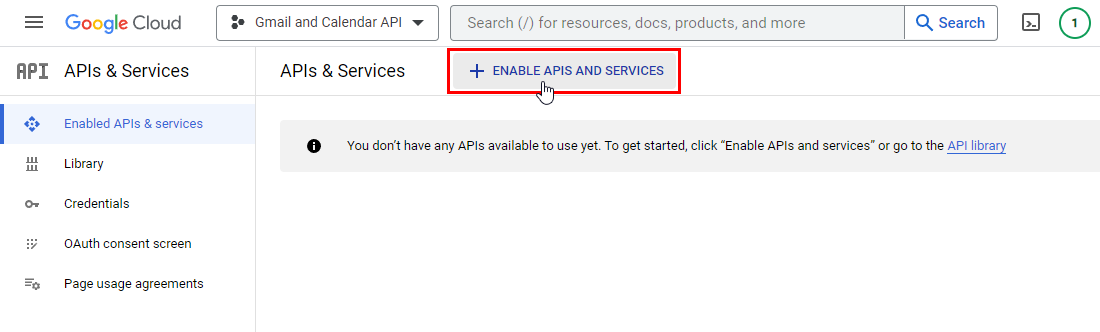
- Enable the required APIs.
- Search for and enable Gmail API if you also use Gmail-related features in OctopusPro.
- Repeat the process for the Google Calendar API.
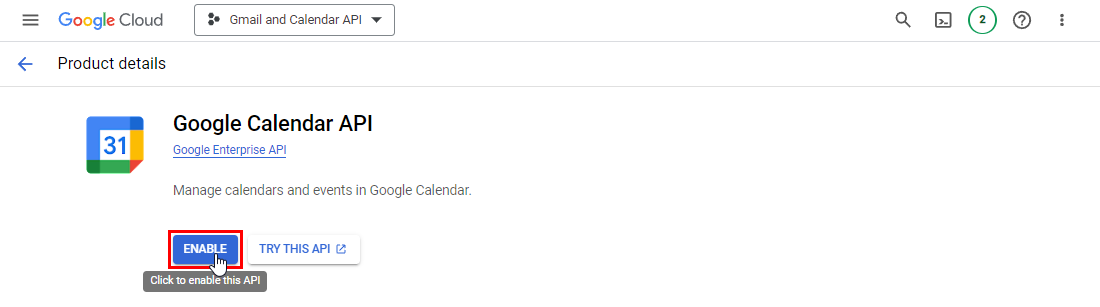
- After enabling the Google Calendar API, click Create Credentials.
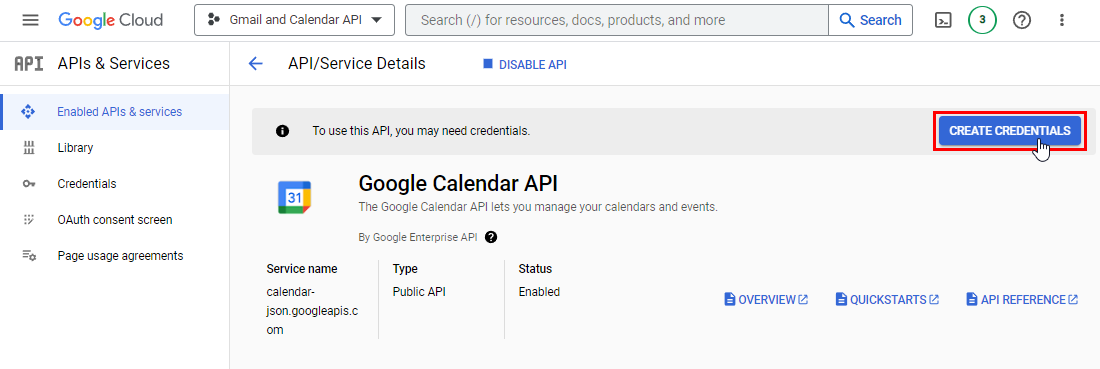
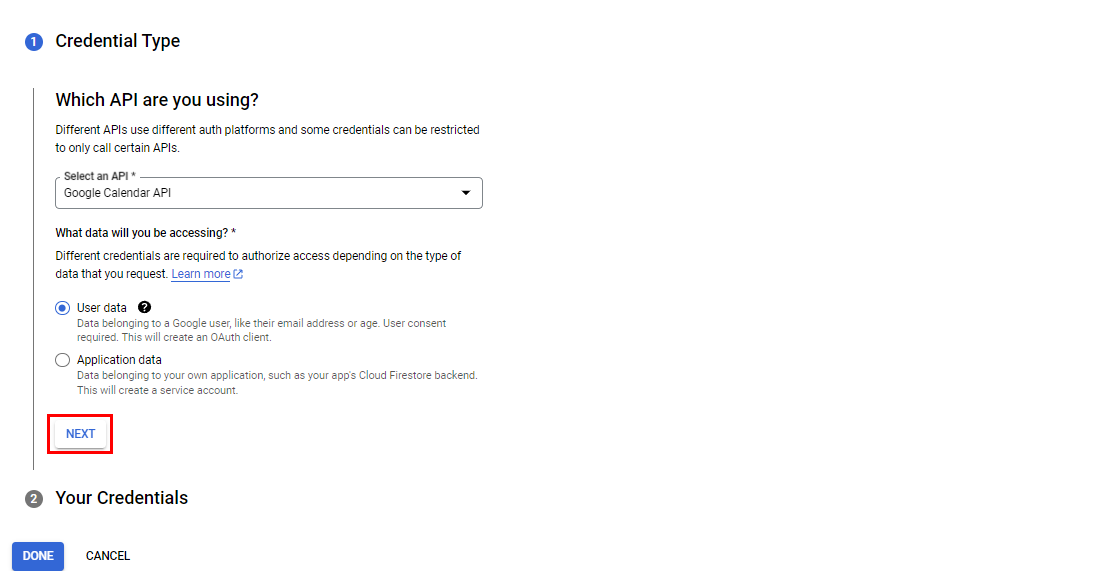
- Select Google Calendar API when asked which API you are using.
- Choose User data when asked what data you will be accessing, then click Next.
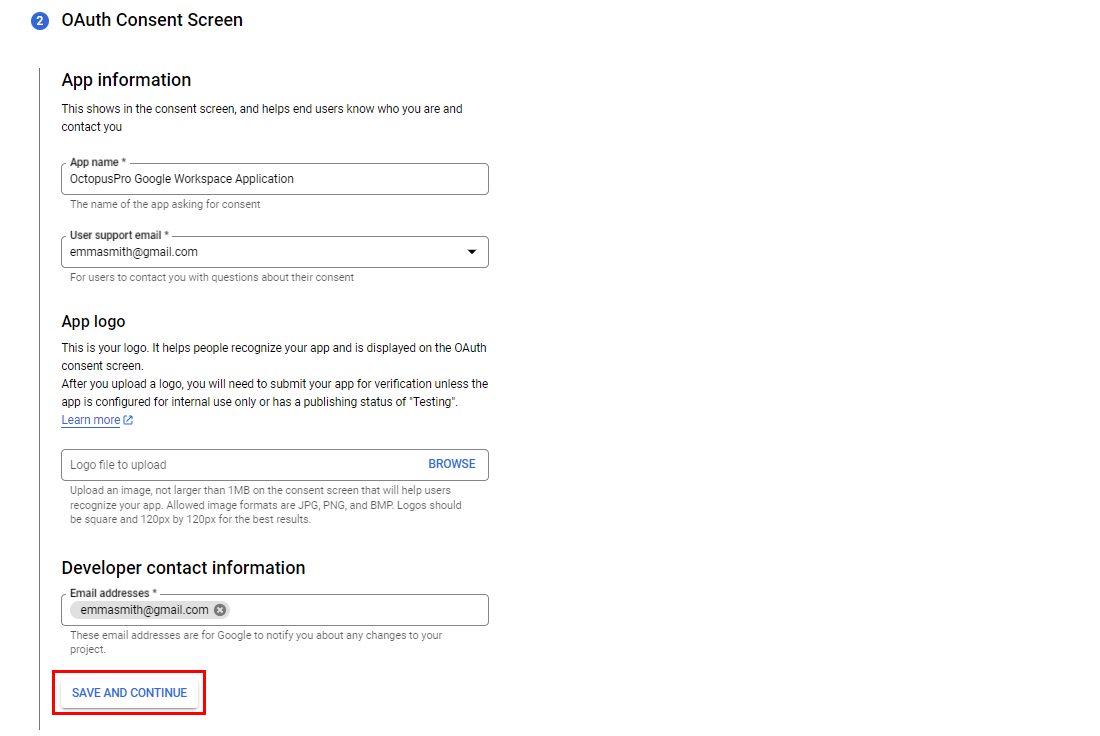
- Configure the OAuth consent screen.
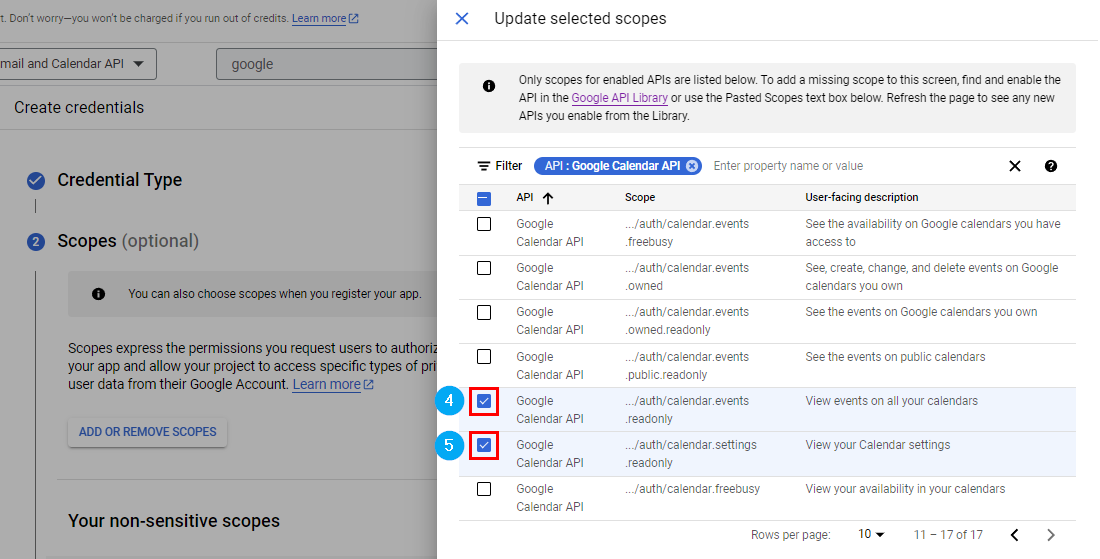
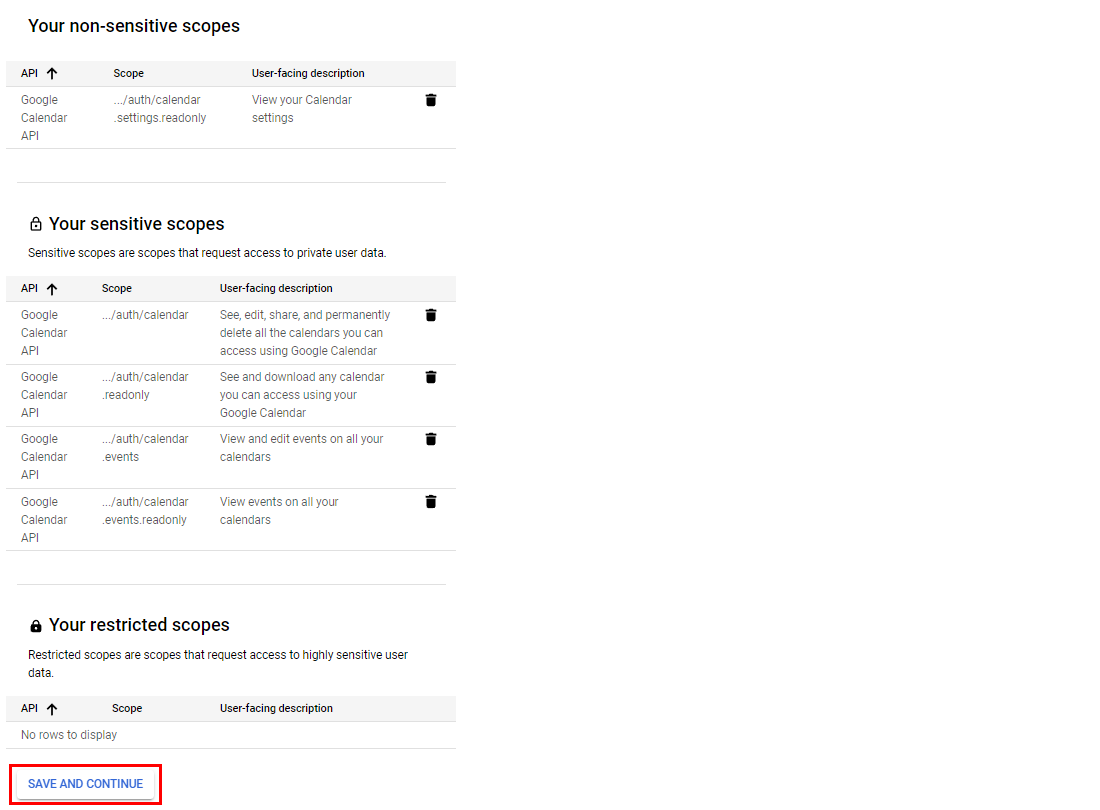
- When prompted to add scopes, click Add or Remove Scopes.
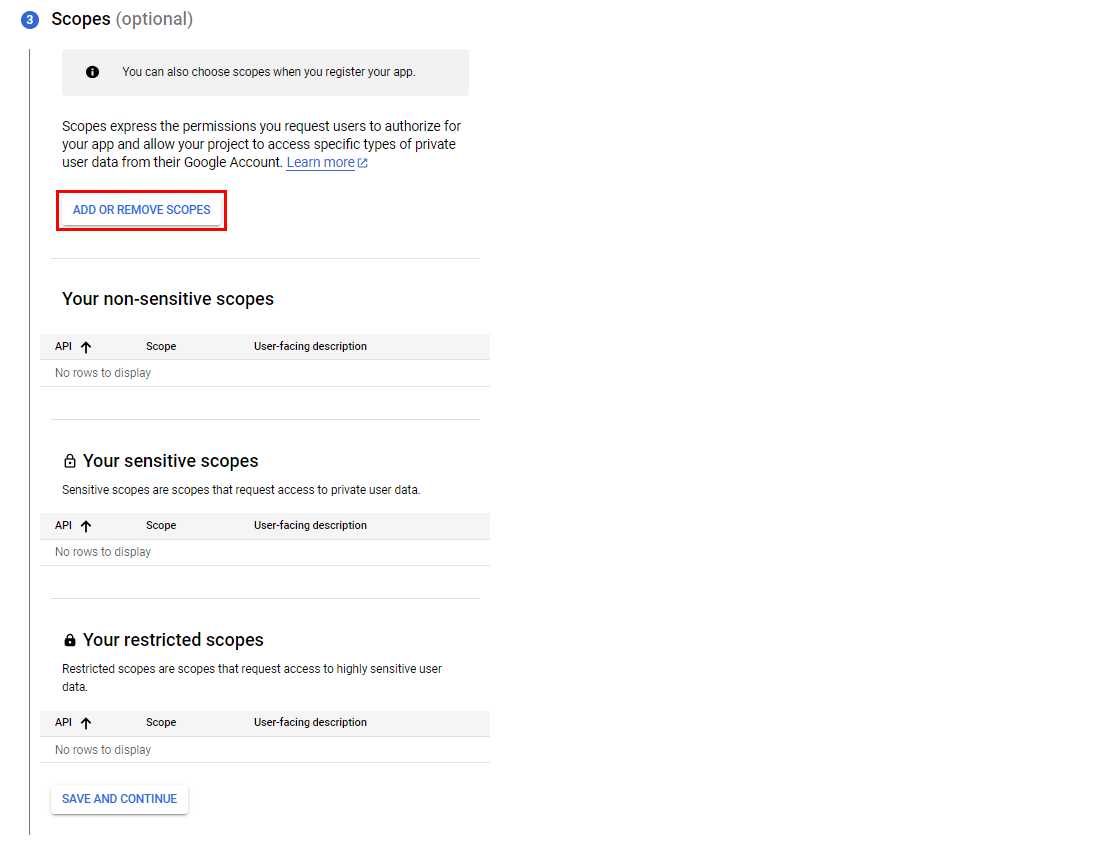
- Select the required Google Calendar scopes.

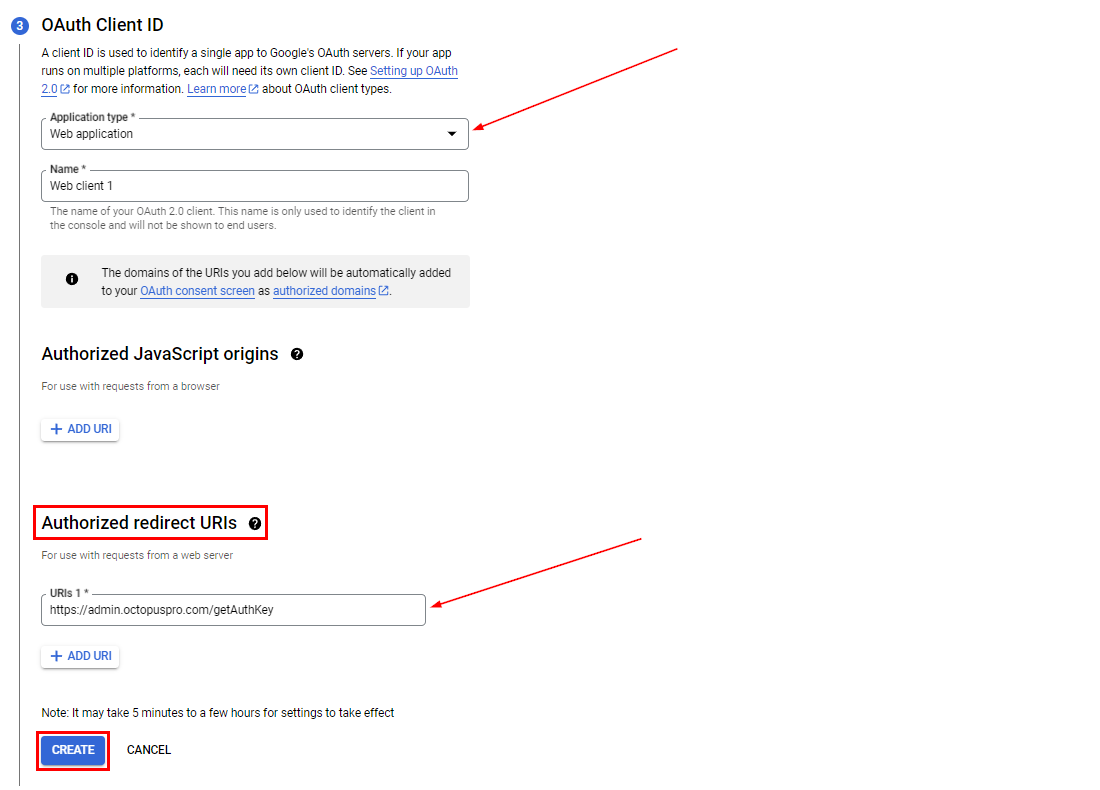
- Create an OAuth client ID.
- Choose Web application as the application type.
- Add this redirect URI: https://admin.octopuspro.com/getAuthKey
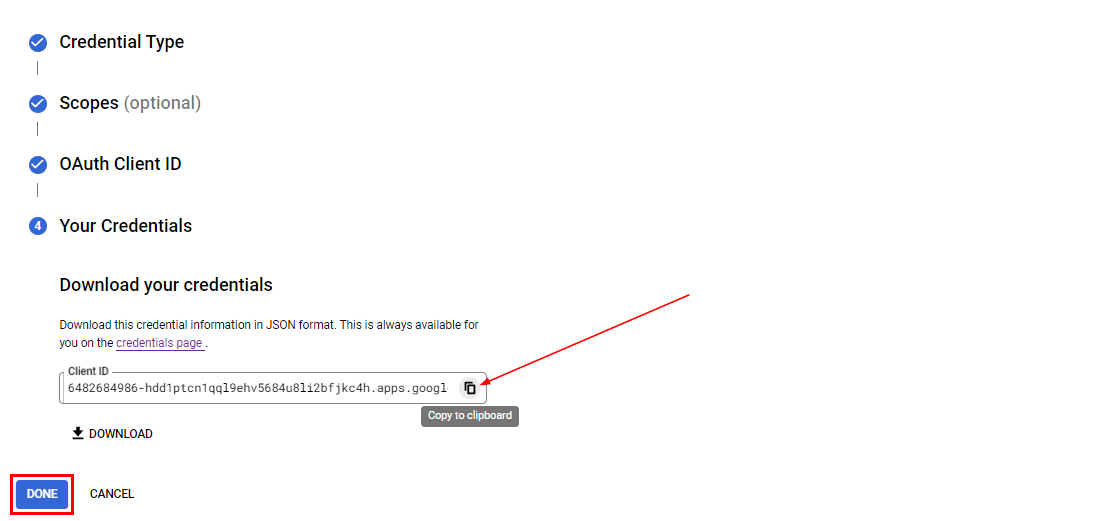
- Copy the Client ID.
- Download the Client secret file.

- Return to OctopusPro.
- Go to Settings > Company Settings > Integrations (API).
- Select Google Workspace, choose Use private Google API, then enter the values you copied from Google Cloud.
- Click Save.
Once these steps are complete, your private Google API setup is ready. OctopusPro can then send automated emails to active fieldworkers asking them to grant permission for calendar synchronization.
Sync your business Google Calendar
If your business uses Google Calendar and you want to synchronize it with OctopusPro, you can connect it through the General Fieldworker profile. This profile acts as your business’s default calendar connection.
Connect from the General Fieldworker profile
- Log in as an admin user.
- Open the General Fieldworker profile.
- Click Actions.
- Select Send Google Calendar integration link or Send Google Calendar authorization email.
- Send the email.
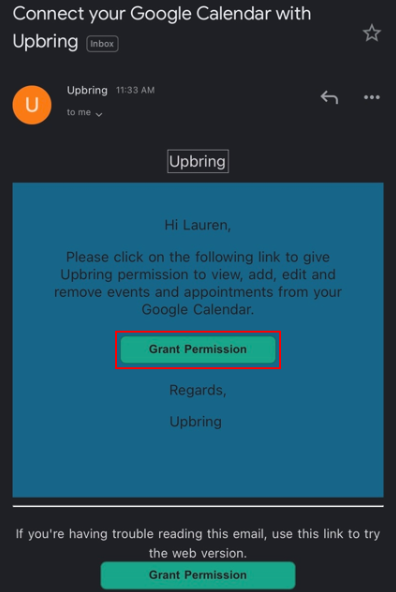
- Open the received email and click Grant Permission.
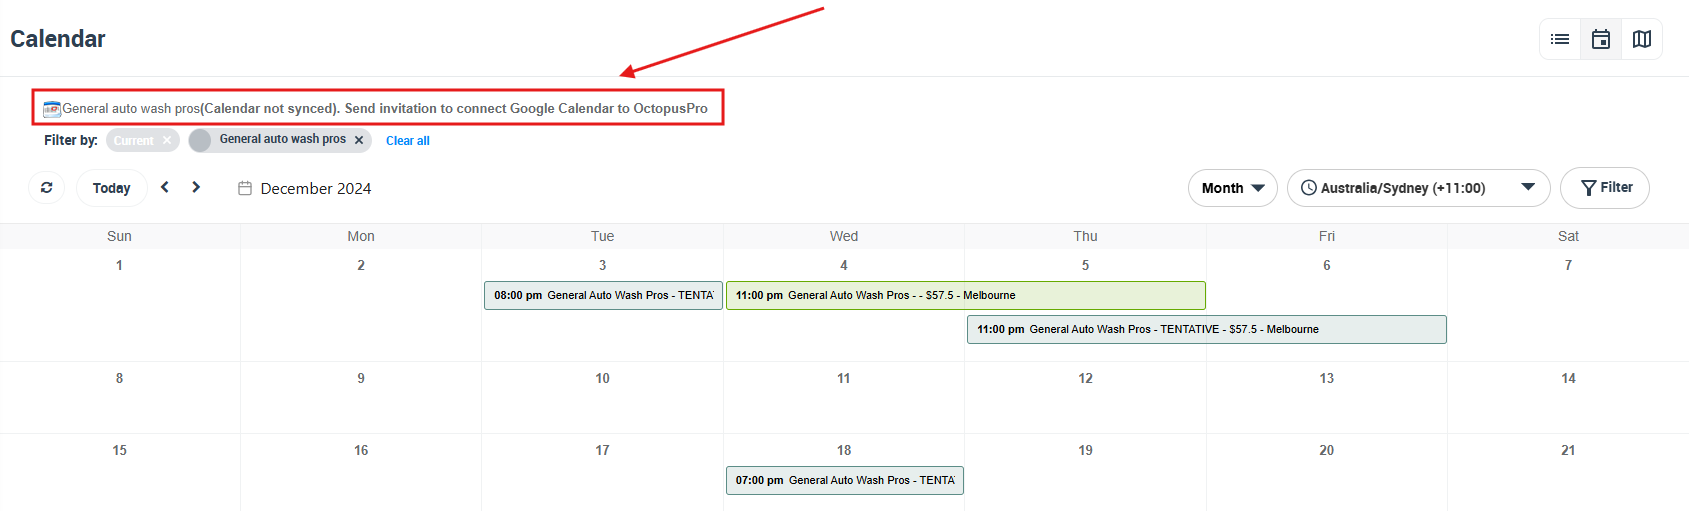
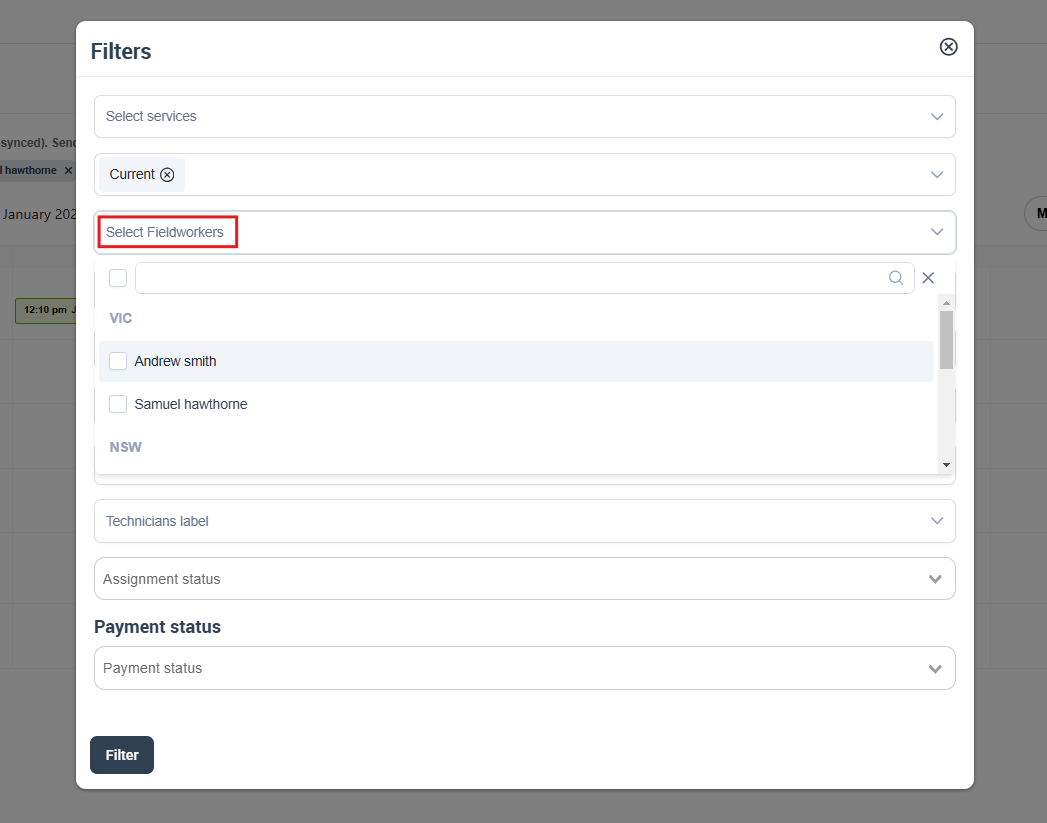
Connect from the Calendar page
- Go to Calendar.
- Click Filters.
- Select the General Fieldworker.
- Click Filter.
- Click Send invitation to connect Google Calendar to OctopusPro at the top of the calendar.
- Send the email invitation.
- Open the received email and click Grant Permission.

Working with synced Google Calendar in OctopusPro
Once Google Calendar is connected with OctopusPro, here is how the synchronization works.
How the sync works
The sync is triggered whenever an event is created, edited, or deleted on either side. However, the behavior depends on where the event was created.
- Bookings created in OctopusPro → Google Calendar: bookings are pushed to Google Calendar in real time.
- Events created in Google Calendar → OctopusPro: Google events are imported into OctopusPro as busy or unavailable time blocks.
- Important: Google Calendar events do not create bookings in OctopusPro.
If you edit or delete an OctopusPro-created appointment directly in Google Calendar, the booking in OctopusPro will not be updated. For consistency, always edit booking details in OctopusPro.
When Google events are updated or deleted in Google Calendar, the changes are reflected in OctopusPro as availability updates.
To reduce sync load, OctopusPro syncs future events between Google and OctopusPro calendars, not historical events.
Booking times shown in Google Calendar follow your configured date and time preferences. To review this, see Date & Timezone Configuration.
What gets synced and what does not
- OctopusPro → Google Calendar: bookings and appointments, based on booking status rules and fieldworker authorization
- Google Calendar → OctopusPro: Google events imported as busy or unavailable time blocks
- Not synced as bookings: Google events never become OctopusPro bookings or jobs
Once a fieldworker grants permission, OctopusPro may create a dedicated calendar inside their Google account, usually named using your company name, to store OctopusPro booking appointments separately from personal events.
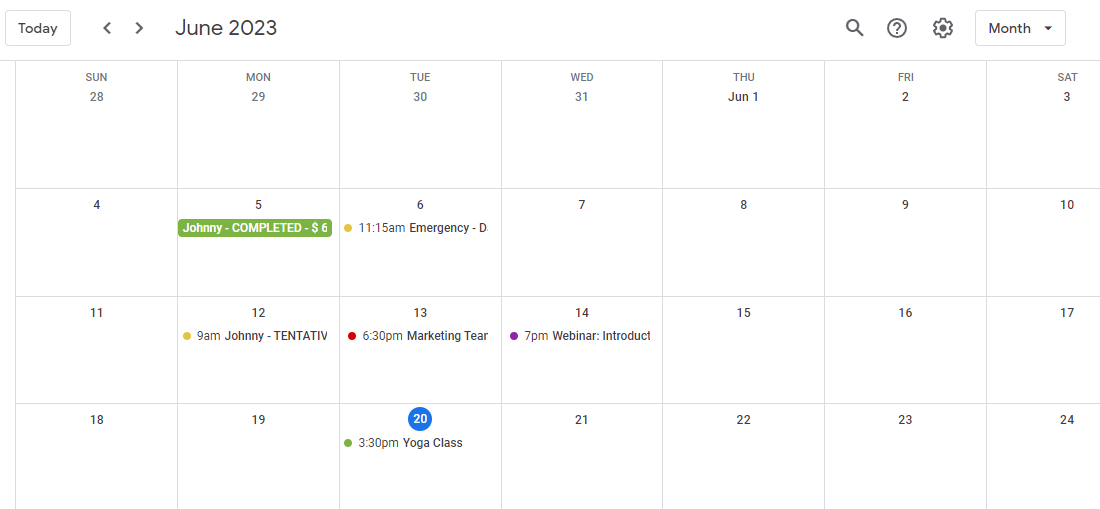
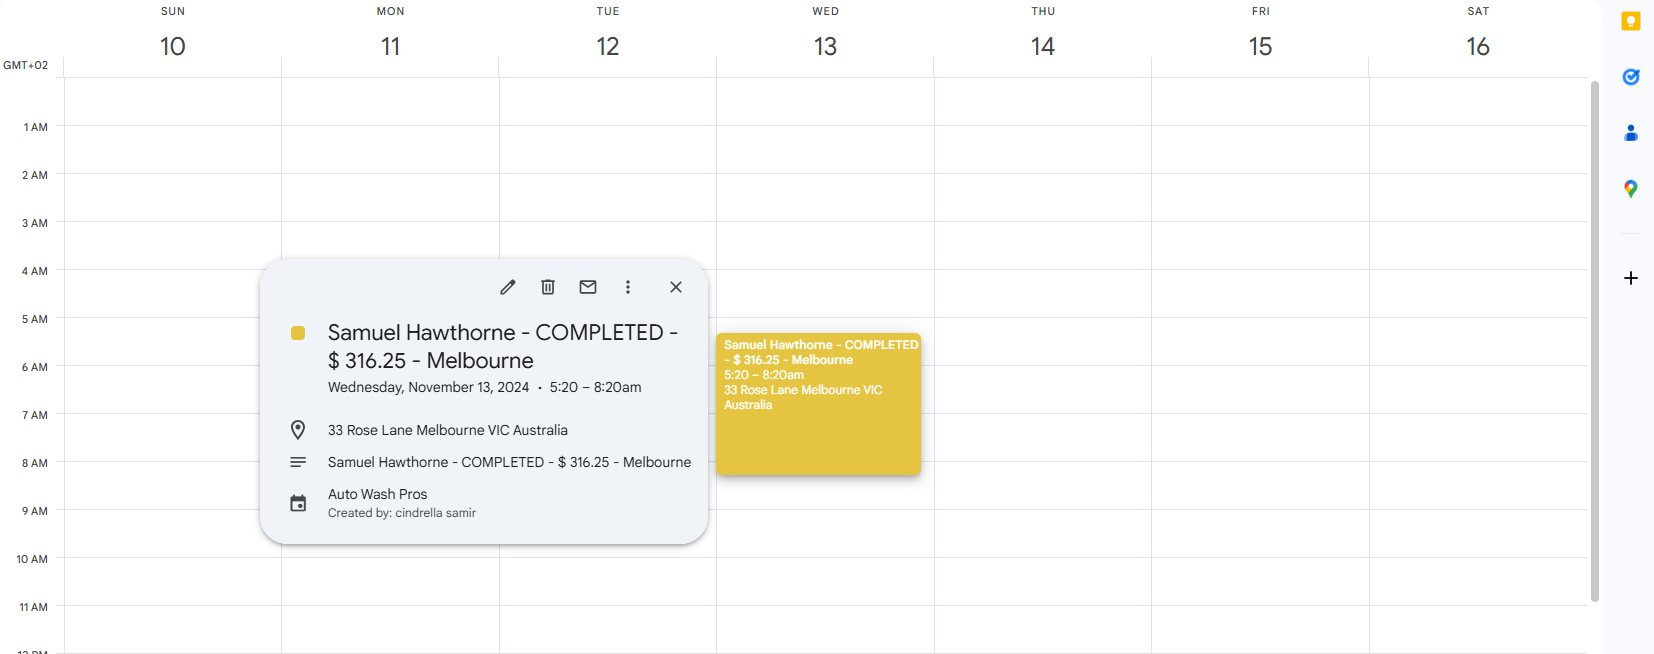
What you’ll see in Google Calendar
When a booking is pushed from OctopusPro to Google Calendar, the event can include:
- Booking status
- Fieldworker name
- Currency symbol
- Booking amount
- Suburb name
- Scheduled dates with start and end times
- Customer name
- Business name for business clients
- Customer contact details
- Booking address, including up to three addresses where applicable
- Service name and description
- Customer properties linked to the appointment
- The user who created the appointment
- The date the appointment was created
- Unavailable events added from OctopusPro, if used
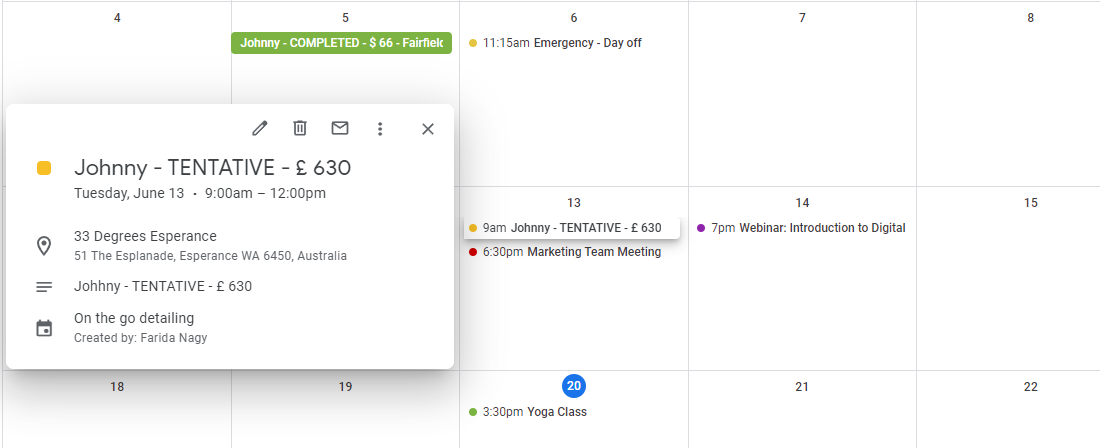
Best practice: if you only want confirmed work to appear in Google Calendar, use the booking status rules below so draft or tentative bookings do not push too early.
Control which bookings sync
You can control which booking statuses push bookings to Google Calendar by editing your booking status settings.
Go to Settings > General Settings > Booking Settings > Booking Statuses, then create or edit a booking status and use these flags:
- Push to Google Calendar – pushes bookings in that status to the assigned fieldworker’s Google Calendar
- Delete from Google Calendar – removes the Google Calendar event when the booking is deleted in OctopusPro or reassigned to a different fieldworker

If a booking was assigned before the fieldworker connected Google Calendar, you can resend it manually later. Learn more here: Manually Push Bookings to Google Calendar.
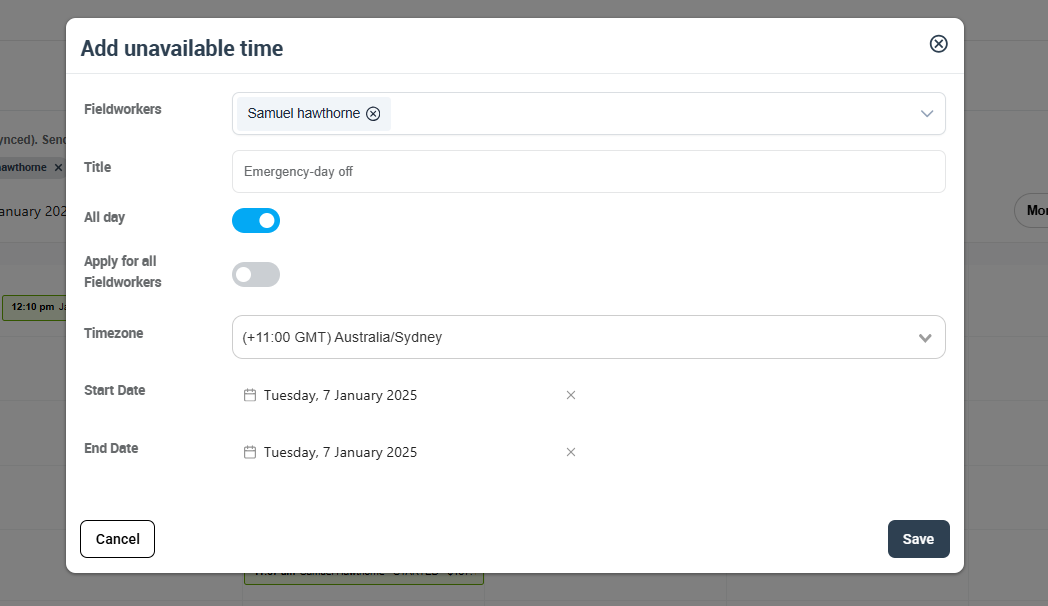
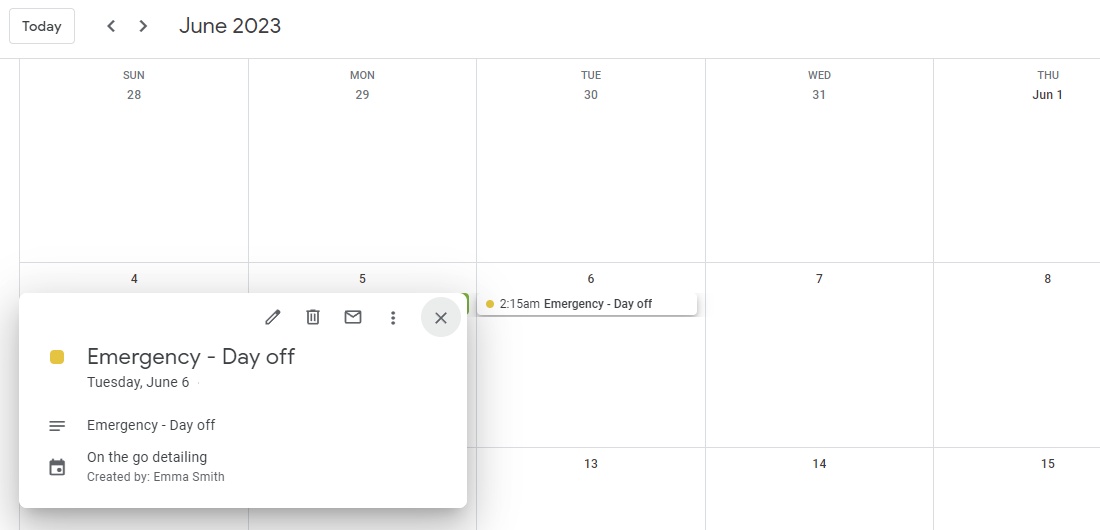
Sync unavailable time blocks
In OctopusPro, you can block times when a fieldworker is unavailable by creating an event and marking it as Unavailable. This can then sync to Google Calendar, helping prevent scheduling conflicts.
This is useful for leave, breaks, holidays, training, travel, medical appointments, or any other period when a fieldworker should not be booked.
- Open Calendar from the admin or fieldworker web portal.
- Click any date on the calendar.
- Select Add unavailable time.
- Select one or more fieldworkers.
- Enter the title or reason.
- Choose All day or set a time range.
- Click Save.
For more detail, see Block Unavailable Dates & Times in the Calendar.
Access multiple calendars
Google Calendar supports multiple calendars, such as personal, work, school, and client-specific calendars. After connecting, fieldworkers can manage their Google calendars and OctopusPro calendar together.
Fieldworkers can view their personal Google Calendar, their OctopusPro calendar labeled with your company name, and any other calendars they have created, all from their Google Calendar interface.
Once the first synchronization is complete, calendars listed under the fieldworker’s My calendars menu in Google can be imported into OctopusPro.
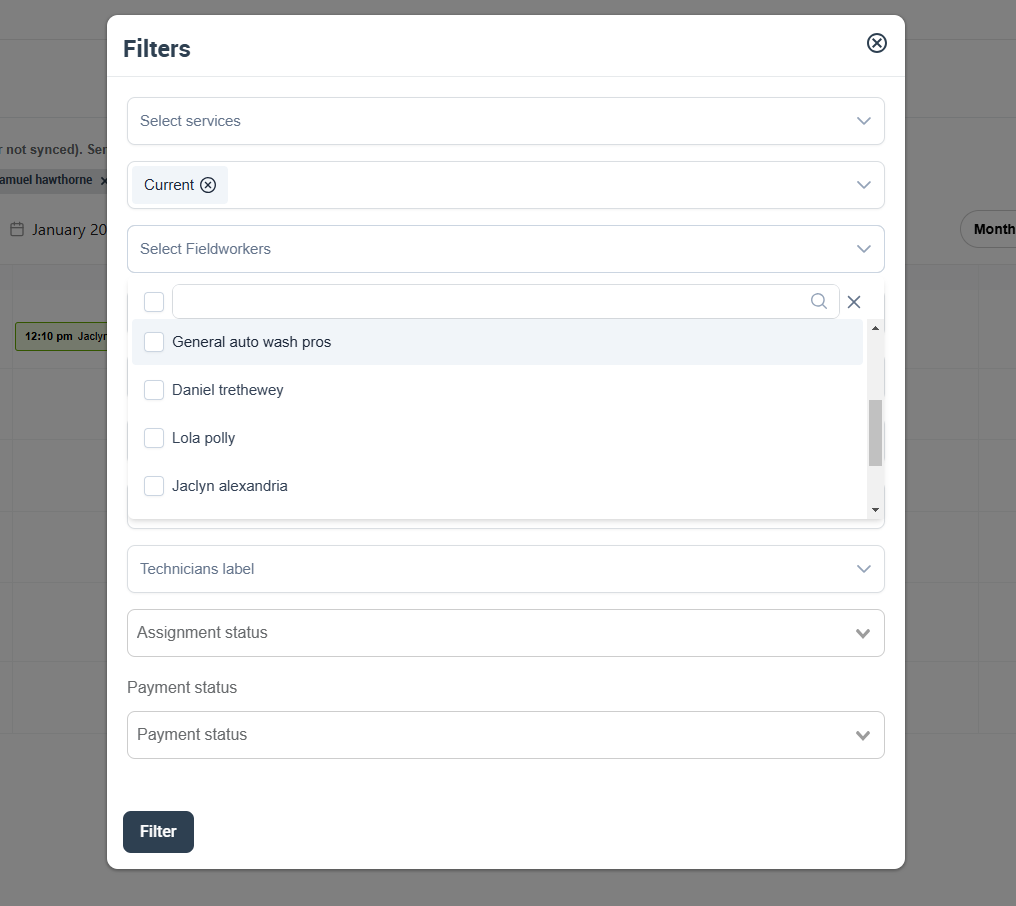
View Google Calendar events in OctopusPro
After a fieldworker grants permission, admin users can view that fieldworker’s combined schedule inside OctopusPro.
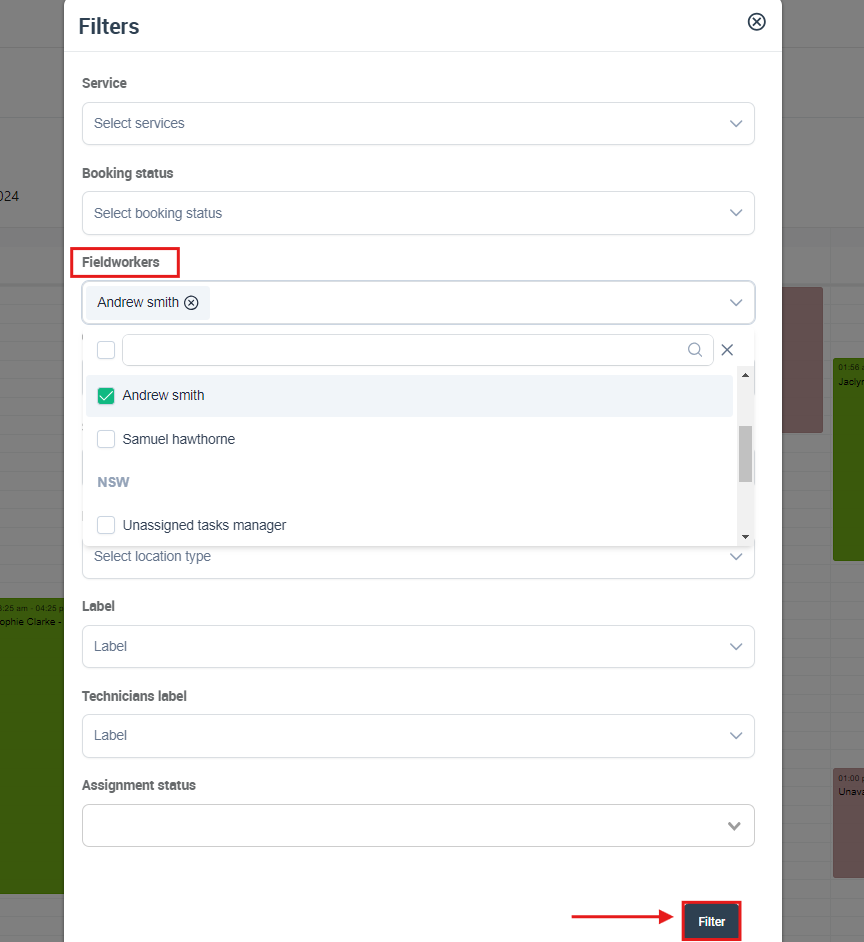
- Go to Calendar.
- Click Filters.
- Select the relevant fieldworker.
- Click Filter.
Google Calendar events appear in OctopusPro as busy or unavailable availability blocks. They do not appear as bookings.
Admin users can also view the calendars selected by fieldworkers from the calendars list in the Customize display calendar pop-up.
For more detail, see View Fieldworker Google Calendar from OctopusPro and Fieldworker Calendar & Availability.
Connect Google Calendar as a fieldworker
Fieldworkers can connect their own Google Calendar from the web portal and, in some accounts, from the mobile app. The standard setup flow is through the web portal:
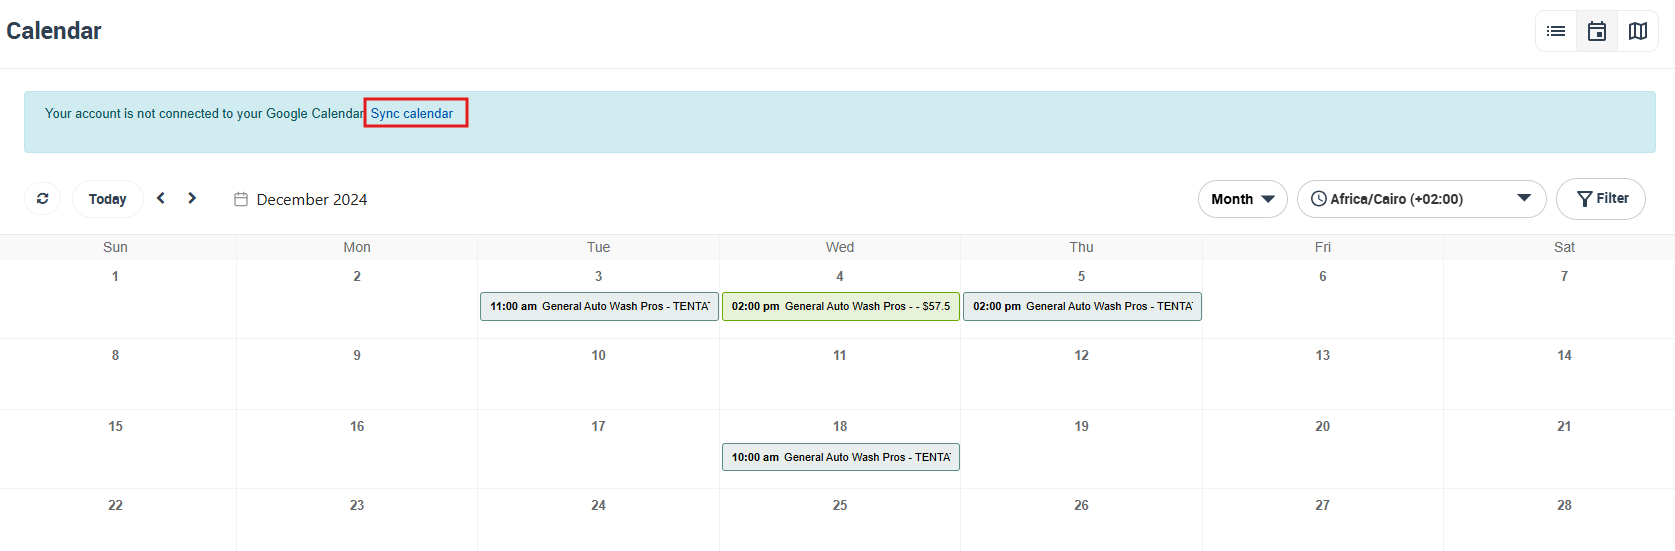
- Log in to the fieldworker account through the web portal or app.
- From the web portal, open the Calendar page.
- Click Sync calendar.
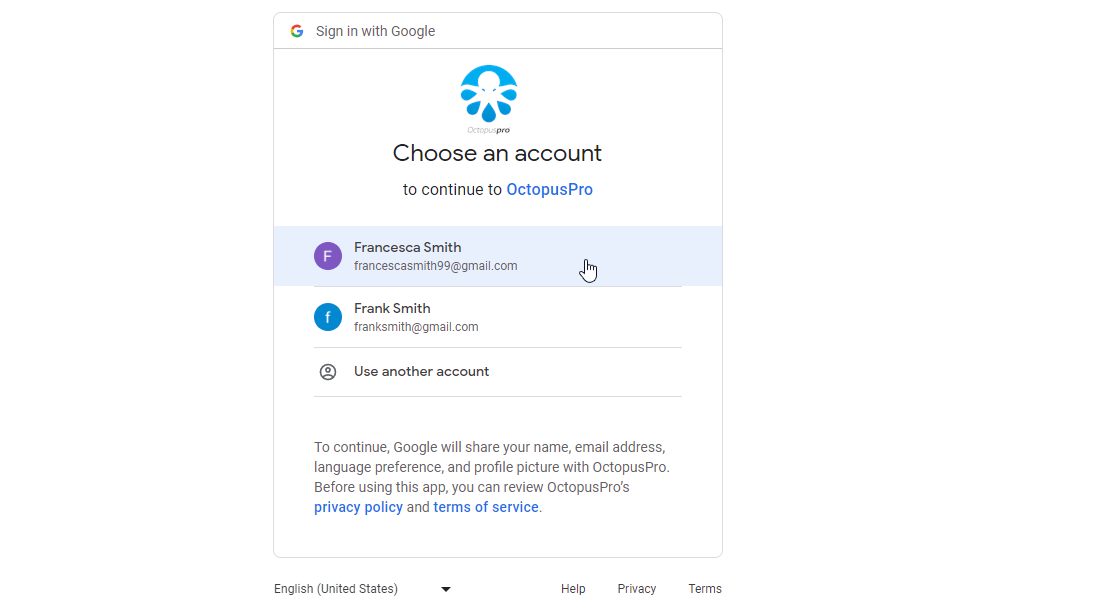
- If not already logged in to Google, sign in.
- Review and allow the requested permissions.
- Confirm the permissions to complete the setup.
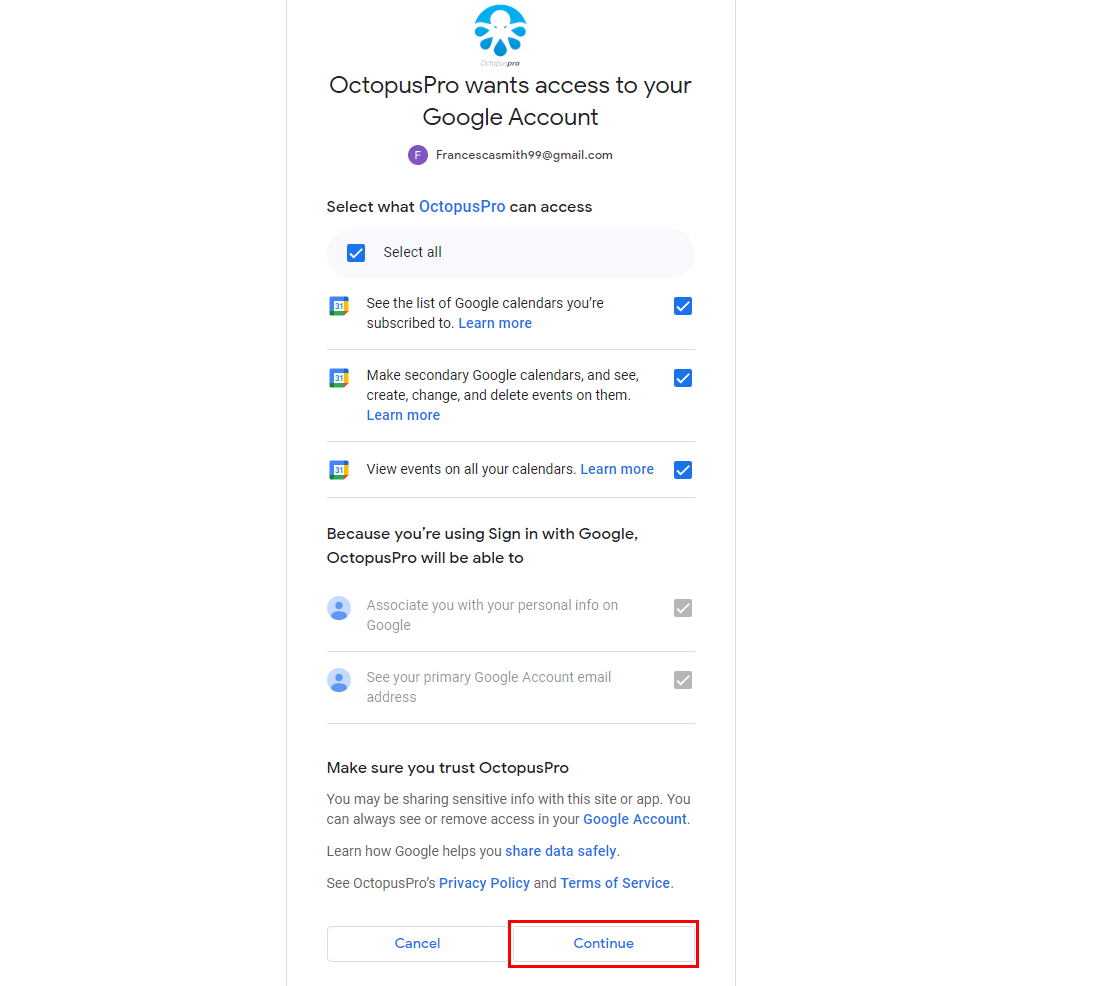
Google typically asks for permission to:
- See the list of calendars in the fieldworker’s Google Calendar account
- Add a secondary Google Calendar and create, edit, or delete events on it
- View events on all the fieldworker’s Google Calendars so busy time can block availability in OctopusPro
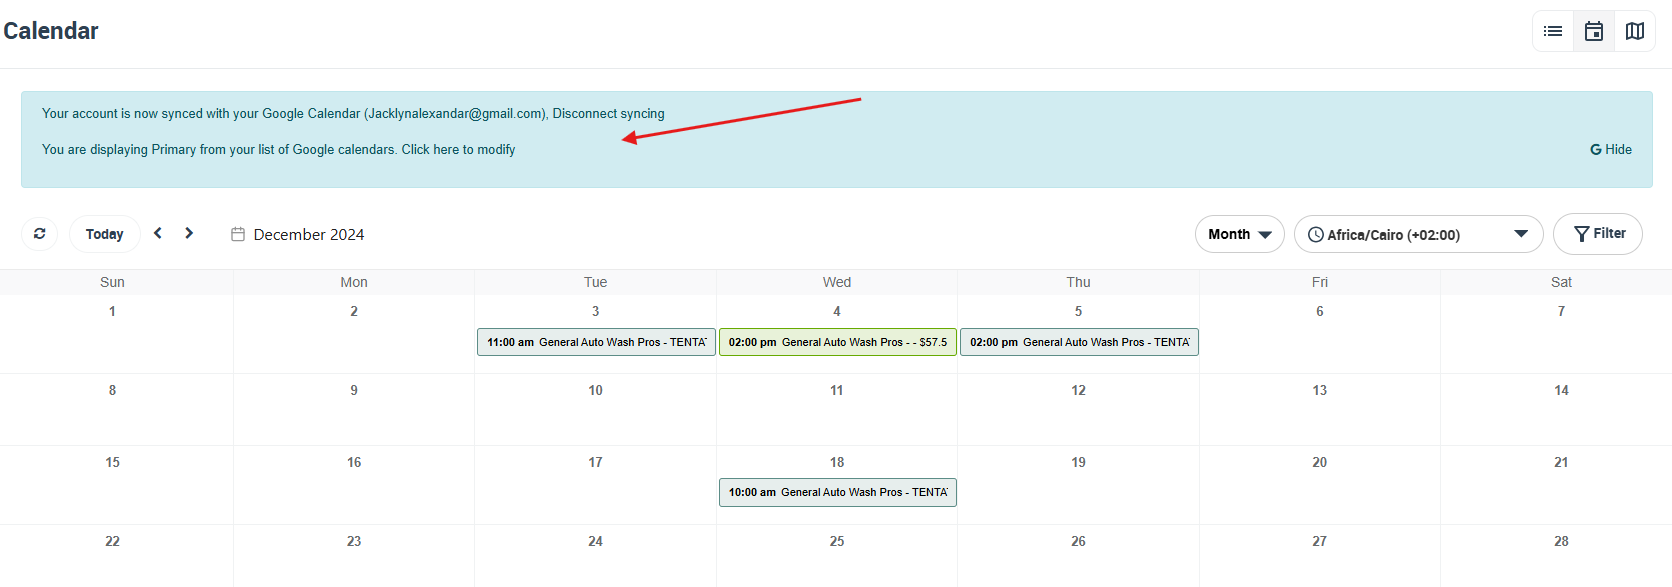
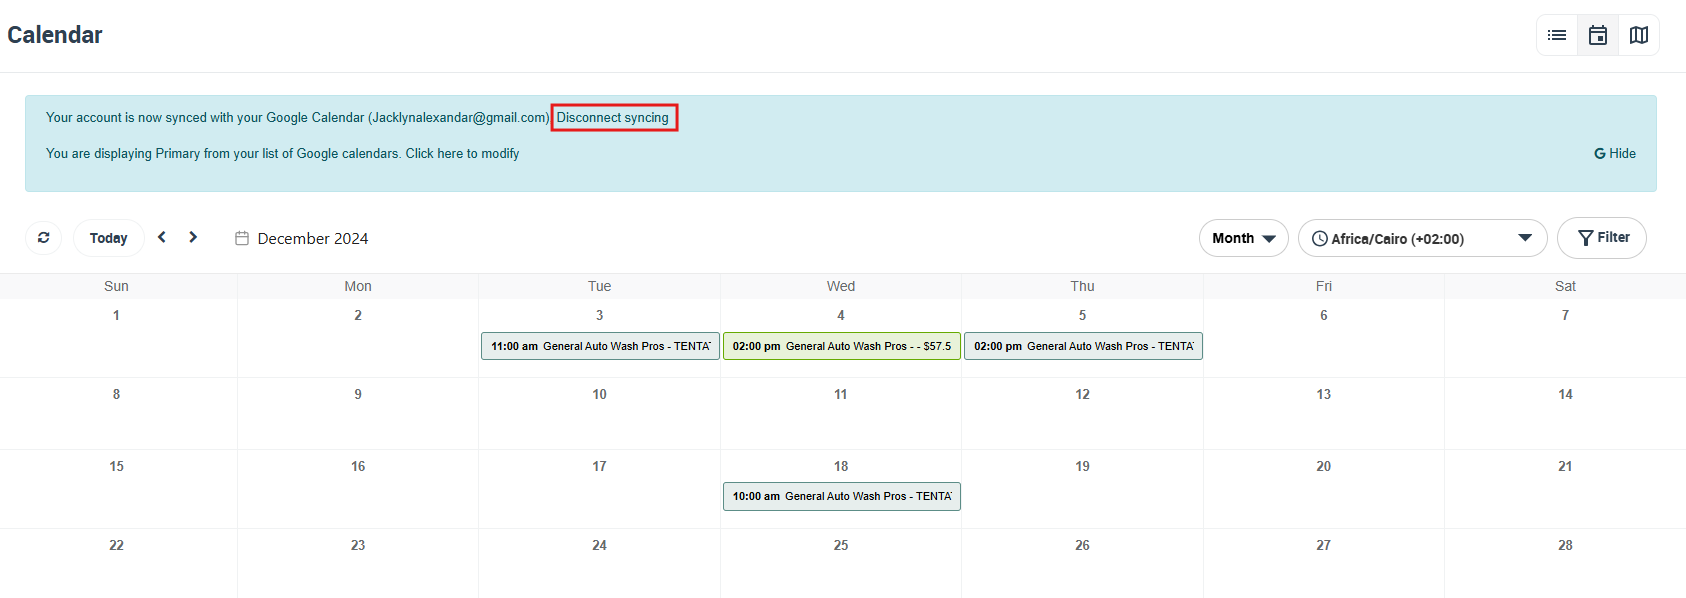
Once the process is complete, the connected Google email address appears at the top of the fieldworker’s OctopusPro calendar page. In the fieldworker’s Google Calendar, a new calendar is generated using your company name.
The first synchronization may take a few minutes. After that, calendars under My calendars in the fieldworker’s Google account can be imported into OctopusPro.
Connect a fieldworker’s Google Calendar as an admin
As an admin, you can also help fieldworkers connect their Google Calendar from either the fieldworker profile or the calendar page.
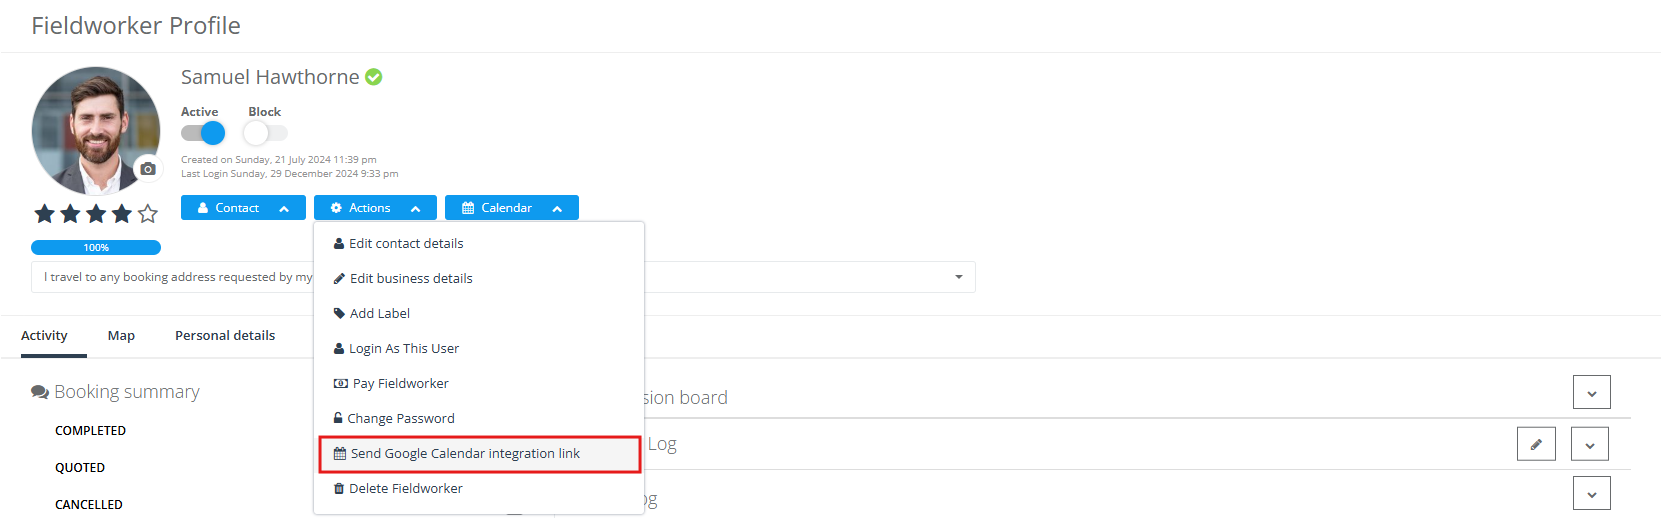
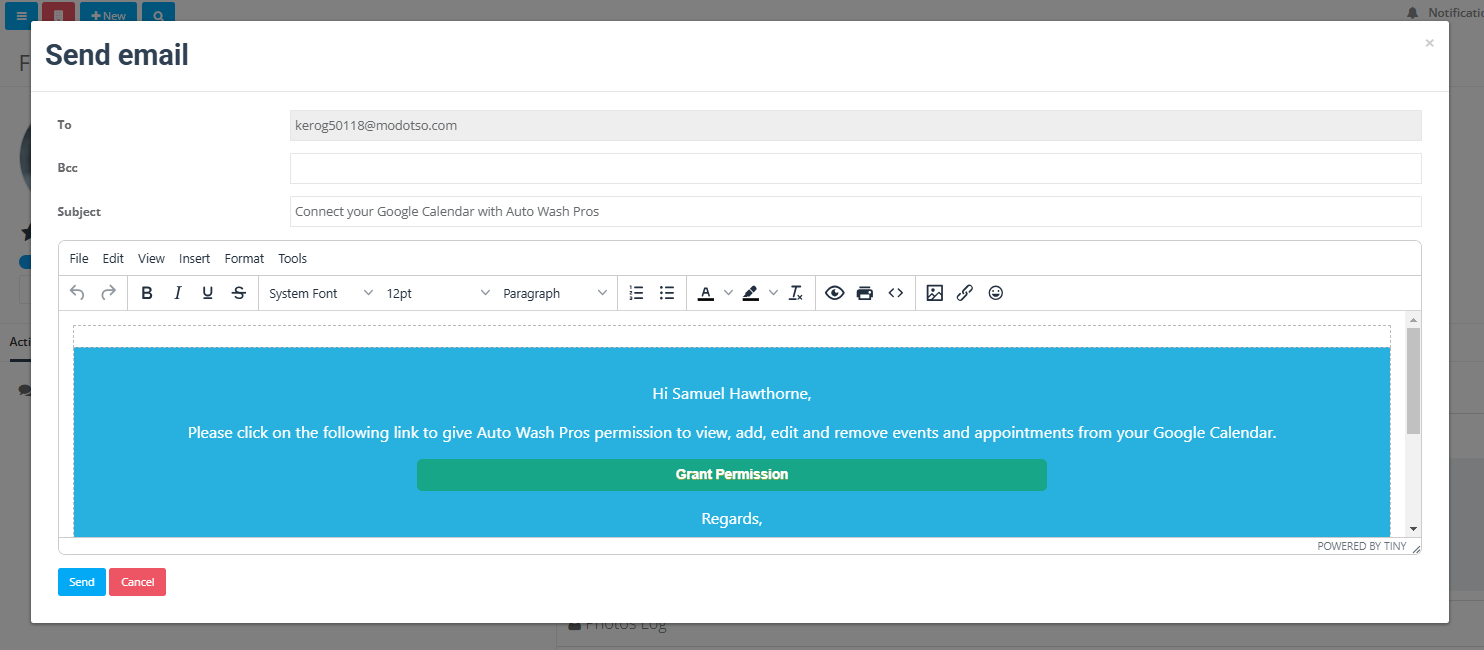
Send the authorization email from the fieldworker profile
- Go to Fieldworkers.
- Open the relevant fieldworker profile.
- Click Actions.
- Select Send Google Calendar authorization email or Send Google Calendar integration link.
- Send the email.
- The fieldworker clicks Grant Permission to complete the connection.
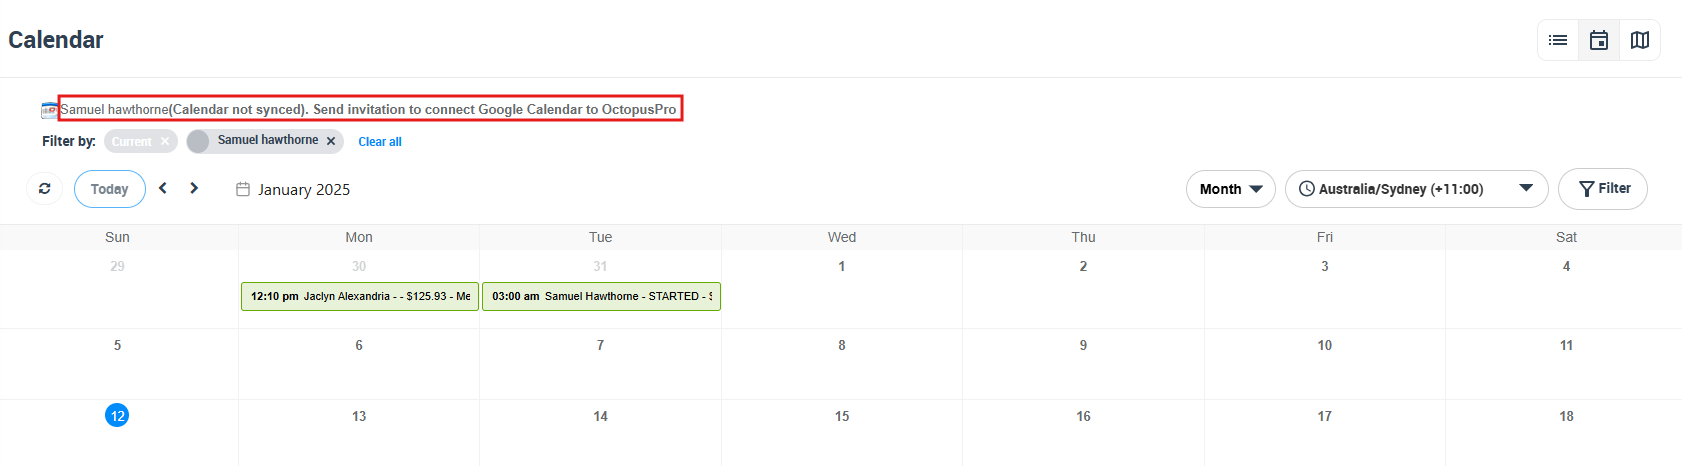
Send the authorization email from the Calendar page
- Go to Filter Calendar by Fieldworker.
- Select the fieldworker and click Filter.
- Click Send invitation to connect Google Calendar to OctopusPro.
- Send the email invitation.
- The fieldworker clicks Grant Permission to complete the connection.


As an admin, it is good practice to follow up with fieldworkers, check whether synchronization was successful, and monitor the sync initially to make sure bookings and availability are appearing correctly.
Disconnect Google Calendar sync
Fieldworkers can disconnect Google Calendar syncing at any time from the top of their Calendar page using the Disconnect syncing link.
After clicking the link, a confirmation prompt appears. The fieldworker must confirm the action to stop synchronization between their OctopusPro calendar and Google Calendar.
Troubleshooting
I do not see Google Calendar events in OctopusPro
- Confirm the fieldworker completed Grant Permission.
- Open Calendar, reselect the fieldworker in Filters, then reapply the filter.
- Remember that Google events appear as busy or unavailable blocks, not bookings.
I edited an OctopusPro booking event in Google Calendar, but it did not update in OctopusPro
- OctopusPro booking changes are one-way from OctopusPro to Google Calendar for booking edits.
- Edit the booking in OctopusPro to keep both systems aligned.
Bookings are not appearing in a fieldworker’s Google Calendar
- Confirm the fieldworker is connected and authorized.
- Confirm the relevant booking status has Push to Google Calendar enabled.
- If the booking was assigned before the fieldworker connected, use the manual push option from the booking.
Old or past Google events are not syncing
- OctopusPro syncs future events between Google and OctopusPro calendars to reduce sync load.
The event time looks wrong
- Check your OctopusPro date and time configuration.
- Confirm the correct timezone is selected where relevant in your calendar views.
Best practices
- Use the OctopusPro Google API unless you specifically need a private Google Workspace setup.
- Tell fieldworkers to expect the authorization email so they can approve it quickly.
- Only push the right booking statuses so tentative or draft work does not clutter calendars.
- Use unavailable blocks consistently to keep real availability accurate.
- Use OctopusPro as the source of truth for bookings and Google Calendar as a synced calendar layer.
- Check your date and timezone settings so calendar times appear correctly across systems.
- Allow a few minutes for the first sync before troubleshooting.
Related guides
- Sync Google Calendar With OctopusPro
- View Fieldworker Google Calendar from OctopusPro
- Manually Push Bookings to Google Calendar
- Managing Booking Statuses
- Calendar General Overview
- Filter Calendar by Fieldworker
- Filter Calendar by Booking Status
- Filter Calendar by Area
- Block Unavailable Dates & Times in the Calendar
- Date & Timezone Configuration
- Fieldworker Calendar & Availability
- Third-Party Integrations, Open API & Webhooks
To stay updated, please subscribe to our YouTube channel.