
Custom Fields – The Key to Smooth Bookings
Custom Fields let you add extra questions—such as “Property Size,” “Vehicle Type,” or “Special Instructions”—to any service, inquiry form, or website widget in OctopusPro. Customers complete these fields while booking, so you capture the precise details needed to price the job, assign the right technician, and deliver exactly what was promised.
By collecting key data up‑front, Custom Fields eliminate back‑and‑forth calls, cut admin time, and reduce errors. Fieldworker availability can be filtered automatically (e.g., show only pet‑friendly cleaners), and surcharges or discounts can be applied instantly based on customer selections (e.g., “Large Home” adds 30 min and $50). The result is faster quotes, accurate schedules, and a smoother experience for everyone.
Choose from multiple input types—text, dropdowns, checkboxes, toggles, signature pads, and more—then decide who sees each field (admin, fieldworker, customer) and where it appears. Link any combination of Custom Fields to a service or inquiry form to collect exactly the information you need the first time, every time.
Table of contents:
- When should you use custom fields?
- Difference between Custom Fields and Forms & Checklists
- How do custom fields improve work efficiency?
- How do custom fields help generate accurate quotes?
- Adding a new custom field
- Field label
- How does the field label appear for the admin user while creating/editing (bookings/quotes)
- How field label appears for admin user while reviewing (bookings/quotes)
- How does the field label appear for the fieldworker app while creating/editing (bookings/quotes)
- How does the field label appear in the fieldworker app while reviewing (bookings/quotes)
- How field label appears in the customer portal for customers
- Helper Text
- Hiding Custom Fields from the Customer Portal
- Hiding Custom Fields from the Inquiry Form
- Hidden from invoice breakdown
- Display pricing on the view service page
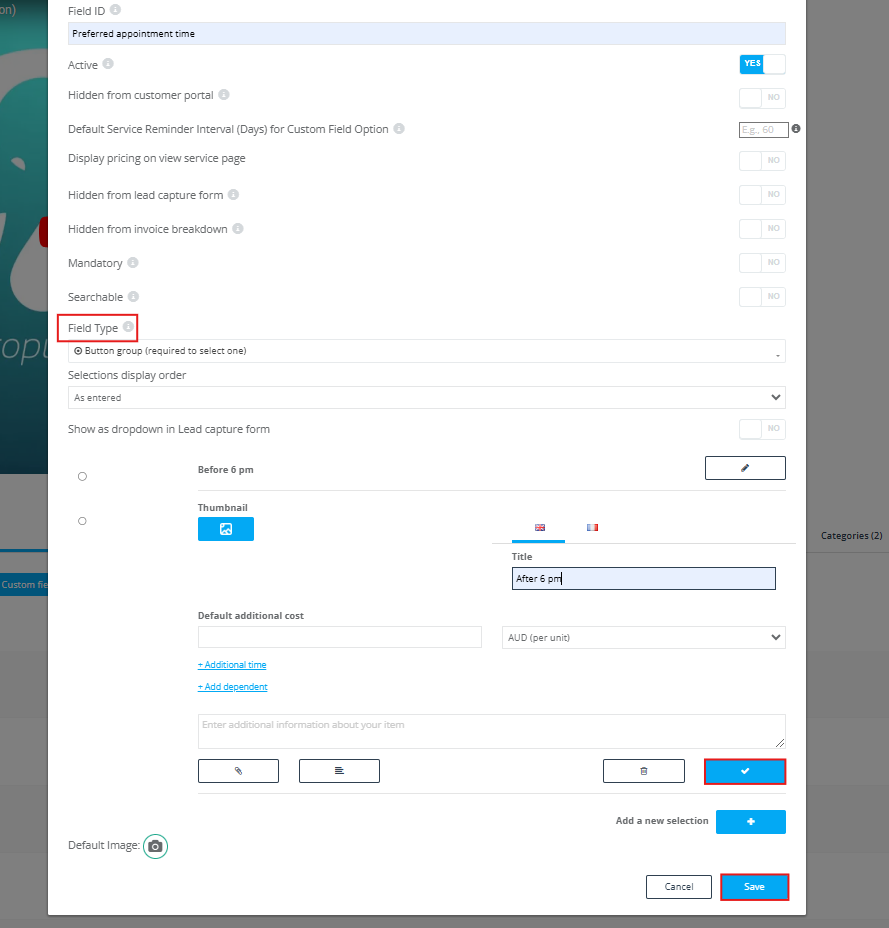
- Field Types
- Linking custom fields to service
- Drag and Drop Custom Field Order
- Field label
What are Custom Fields?
Custom Fields are extra form inputs—text boxes, dropdowns, toggles, check‑boxes, etc.—that you attach to a service, inquiry form, or website widget. Customers complete these fields while booking, so you capture the exact details (e.g., vehicle type, number of children, special instructions) needed to quote accurately, schedule the right team, and deliver the job without follow‑up calls.
How Custom Fields Link Across OctopusPro
Custom Fields aren’t limited to services. You can attach them to services, lead-capture / inquiry forms, customer profiles, and fieldworker profiles. For a “Childcare Session,” a service-level field like “How many children?” appears every time that service is booked or requested through a lead-capture form—so you never create duplicate services for minor variations.
At the customer level, fields such as “Allergies” or “Preferred Contact Method” stay with the client and pre-fill future bookings. On fieldworker profiles, skill- or equipment-based fields (“First-Aid Certified,” “Owns Steam Cleaner”) let OctopusPro auto-filter eligible staff when matching a booking’s requirements.
This multi-link approach keeps data in one place, cuts admin time, and ensures the right information flows to the right screen at the right moment—whether it’s a public inquiry form, a booking checkout, or the scheduler assigning a job.
When to Add Custom Fields
Add Custom Fields whenever a service has variable options or requirements—property size, equipment type, add‑on extras, certification needs, and so on. Instead of listing “Car Detailing – Sedan,” “Car Detailing – SUV,” and “Car Detailing – Truck” as separate services, create one “Car Detailing” service with a “Vehicle Type” Custom Field. The result is a cleaner catalogue and an instant, self‑service booking flow for customers.
Custom Field Input Types
Choose the input type that best captures the information you need from customers. Below are the most common field types you can add, each with a practical example to show when to use it.
| Input Type | What It Collects | Real‑World Service Example |
|---|---|---|
| Single‑line Text (Short Text) |
A brief, open response. | Pet‑sitting: “Pet Name”. |
| Paragraph Text (Long Text) |
Detailed notes or instructions. | Cleaning: “Anything we should avoid or pay special attention to?”. |
| Date Picker | A calendar date. | Gardening: “Preferred Visit Date”. |
| Time Picker | A specific time. | Mobile beauty: “Preferred Start Time”. |
| Number Stepper (± buttons / quantity) |
A positive number. | Childcare: “Number of Children”. |
| Toggle Switch (On/Off) |
Yes / No choice. | House cleaning: “Do you have pets?”. |
| Button Group (Single‑choice buttons) |
One of several preset options shown as buttons. | Car detailing: “Vehicle Size – Sedan / SUV / Van / Truck”. |
| Radio Buttons | One option from a longer list. | Pest control: “Type of Pest – Ants / Termites / Rodents / Other”. |
| Dropdown List | One selection from a collapsible menu. | Tutoring: “Subject” (Math, English, Science…). |
| Single‑select List | One option from a scrollable list. | Event hire: “Chair Colour – White / Black / Gold / Silver”. |
| Checkboxes (Multi‑select) |
Any combination of options. | Lawn care: “Add‑ons – Edging / Weed Control / Fertiliser”. |
| Checkbox Button Group (Multi‑select) |
Multi‑select shown as buttons for quick tapping. | Mobile grooming: “Extras – Nail Trim / Ear Clean / Teeth Brushing”. |
| Signature Pad | A digital signature for consent or waivers. | Electrical work: Customer signs off on safety disclaimer before job start. |
Custom Fields vs. Forms & Checklists — What’s the Difference?
| Feature | Custom Fields | Forms & Checklists |
|---|---|---|
| Primary Goal | Capture service‑specific details before a job is confirmed. | Record information or verify tasks during or after the job. |
| When Used | Shown to the customer (or admin) in the booking / inquiry form. | Shown to fieldworkers or customers on‑site or post‑service (e.g. safety checklist, customer feedback). |
| Scope | Linked to each instance of a service. If the same service is added twice, the questions appear twice. | Linked to the entire booking / job. The form appears once, even if multiple services are in the booking. |
| Impact on Fieldworker Availability | Yes. Options can auto‑filter eligible fieldworkers (e.g. “Pet‑friendly cleaner only”). | No. Does not change which fieldworkers are shown as available. |
| Impact on Pricing | Yes. Choices can add surcharges or change rates (e.g. “5+ bedrooms” adds 30 min & $50). | No. Pricing remains unchanged. |
| Typical Content | Property size, vehicle type, special requirements, add‑ons, certification needed, etc. | Job checklists, safety inspections, before‑/after photos, customer sign‑off, satisfaction survey. |
Key Takeaway
Use Custom Fields to gather details that affect who can do the work and how much it costs at the time of booking. Use Forms & Checklists for operational or compliance tasks once the job is underway or complete. Mixing them up leads to pricing errors, wrong staff assignments, and extra admin work—so always place critical booking questions in Custom Fields.
How Custom Fields Improve Work Efficiency
Custom Fields collect every job‑critical detail at the moment of booking—property size, vehicle type, add‑ons, special instructions—so admin staff never need to chase missing information. Because each answer can be linked to a skill, region, or piece of equipment in a fieldworker’s profile, OctopusPro automatically filters the roster to show only qualified staff, preventing mis‑assignments. Pricing rules tied to each option update the total instantly, eliminating manual calculations and post‑booking price disputes. All responses are stored as structured data, giving managers rich insight for trend analysis and service optimisation.
How Custom Fields Deliver Accurate Quotes
Each selectable option in a Custom Field can carry a price, surcharge, or multiplier. As customers make choices—“Large SUV,” “After‑hours,” “Eco‑friendly products”—OctopusPro builds a real‑time, line‑item quote they can understand and trust. The same logic guarantees price consistency across bookings and lets you adjust rates in one place instead of maintaining multiple service variants. Transparent, data‑driven pricing means quotes are correct the first time, boosting customer confidence and protecting your margins.
Adding a new custom field
- To add a new custom field, go to Settings > Service Settings > Custom fields, then select “create new” custom field.
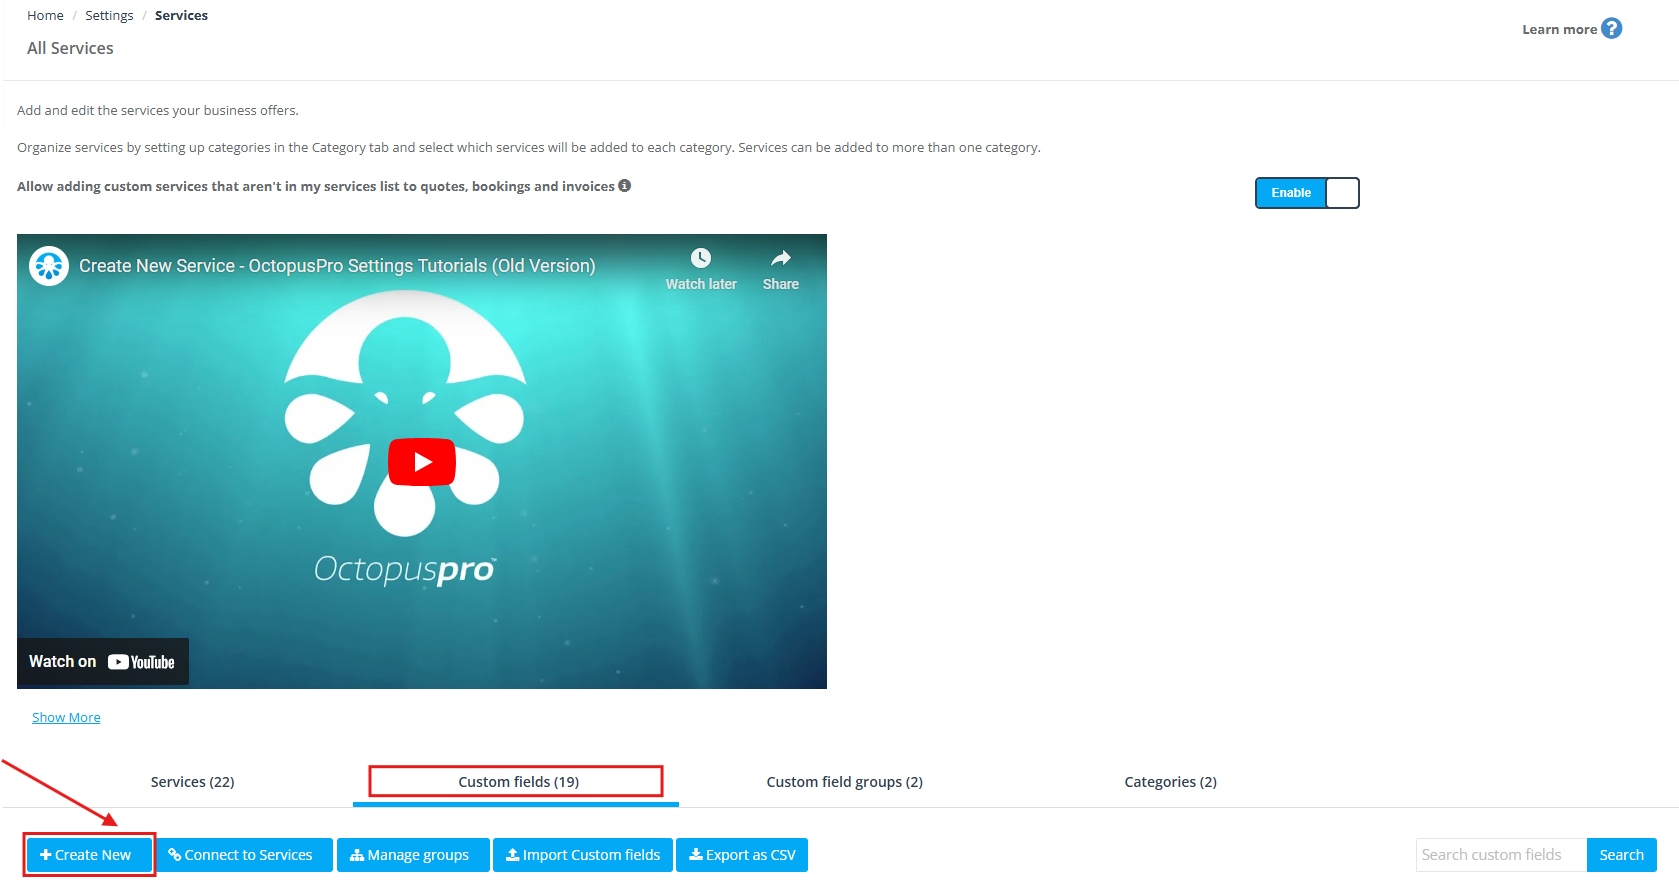
- A pop-up window will appear to create a new custom field.
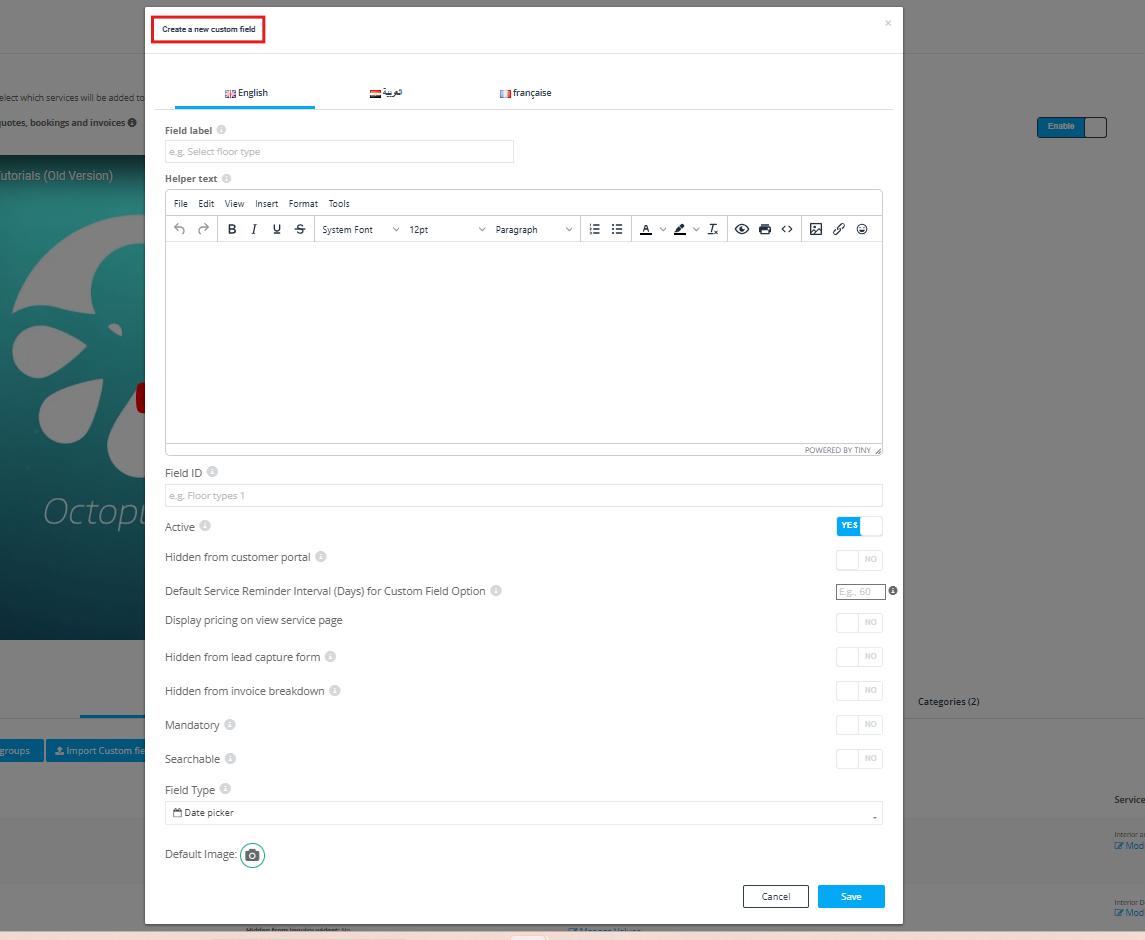
Field label
A field label is visible to the user and can be a single word, short sentence, or a question. For example “Make and Model” or, “Specify your car’s make and model”.
How does the field label appear for the admin user while creating/editing (bookings/quotes)
- While creating a new booking/ quote, after selecting a service by clicking on “Add service”, a pop-up window will appear to select your service.
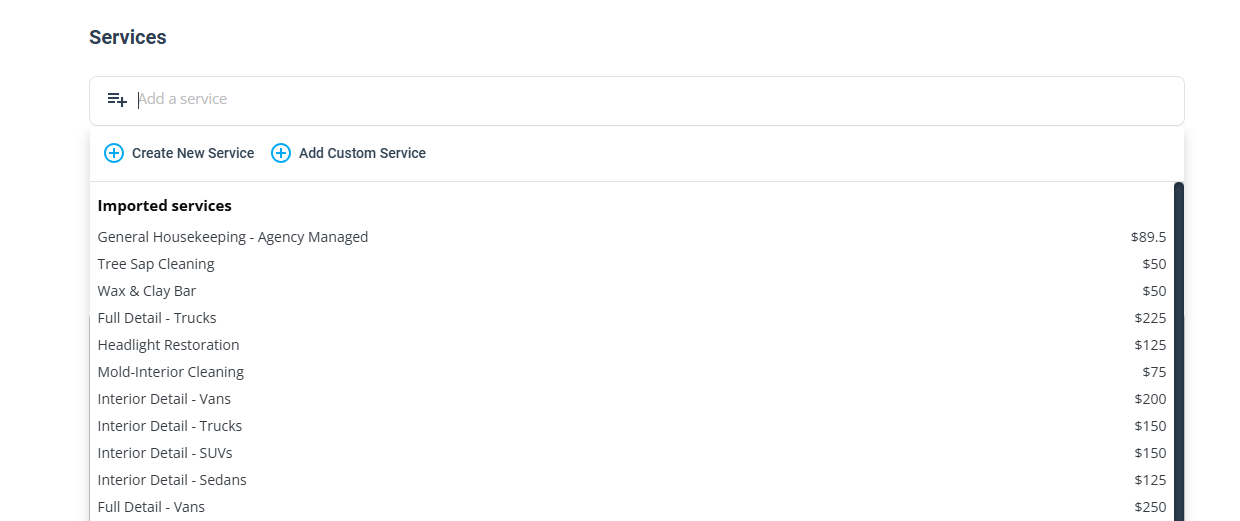
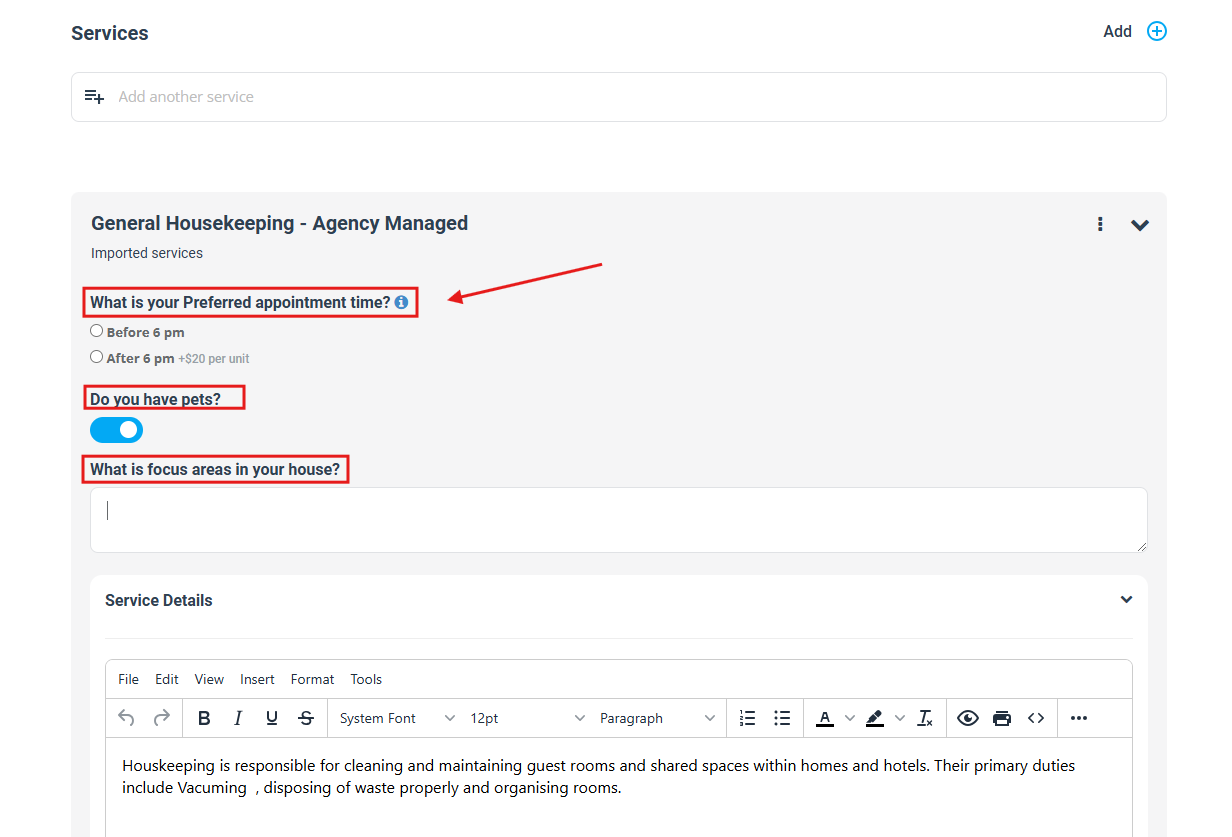
- After selection, your selected service will appear under the “Booking Address/Quote Address”, showing the service with the field label of the added custom field to select from them.
- This process will be the same if you edit your bookings/quotes.
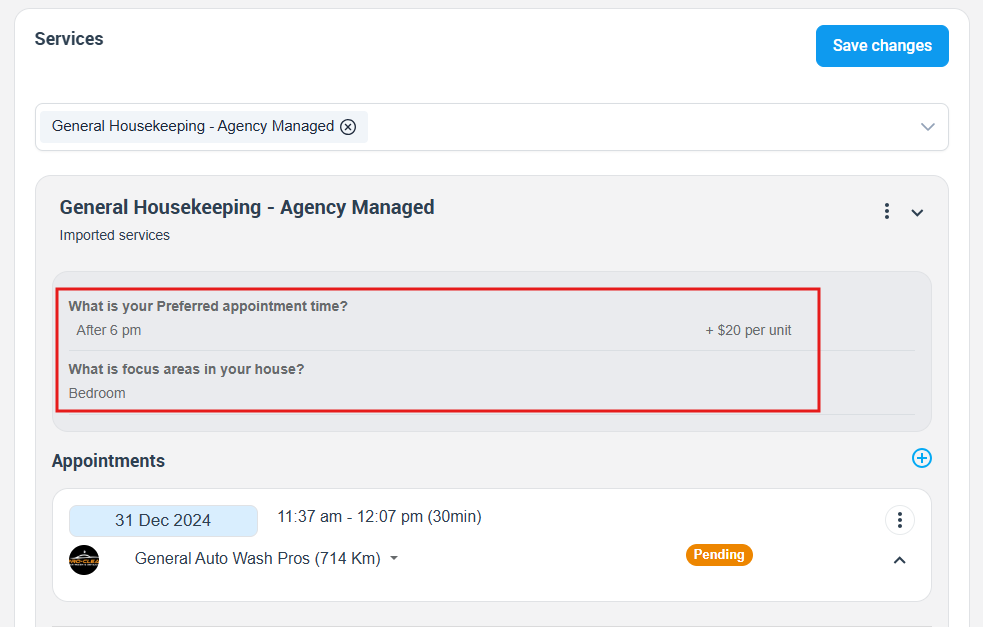
How field label appears for admin user while reviewing (bookings/quotes)
- Go to your bookings/quotes, select a booking/quote then click on the ‘view booking’ button.
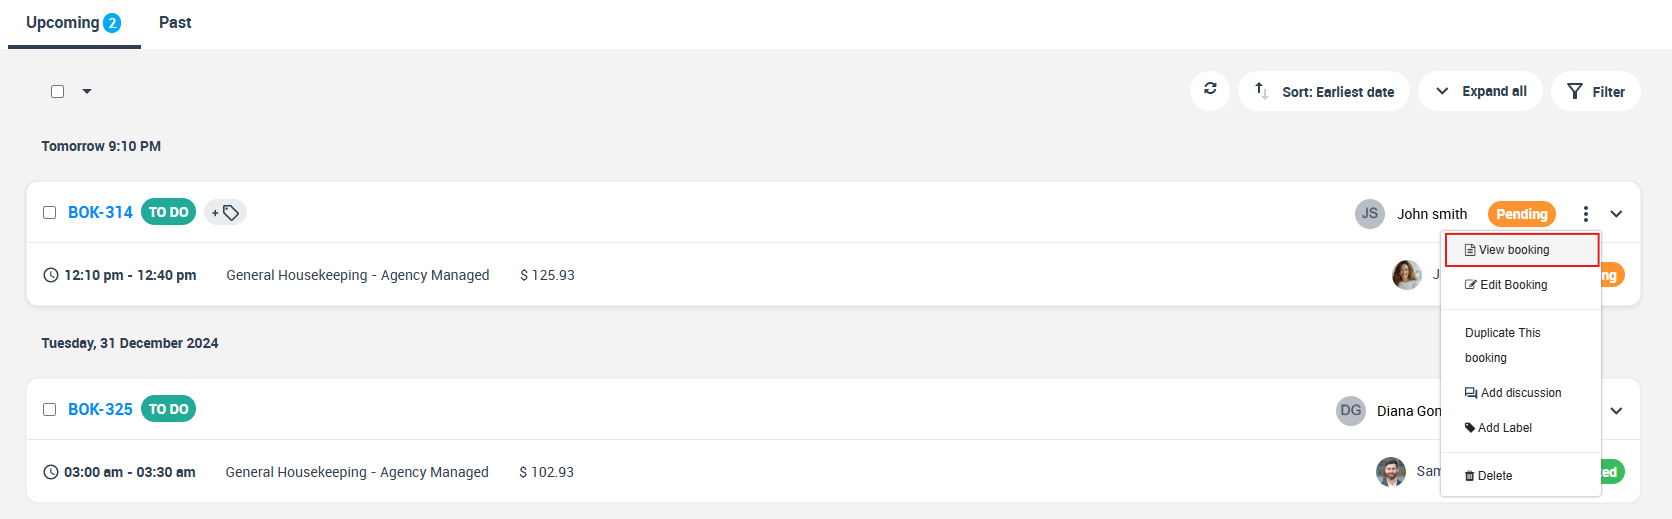
- You will be directed to the booking/quote view page, at the bottom of the page, under the ‘services section’ the field label and the type of service will be displayed there.
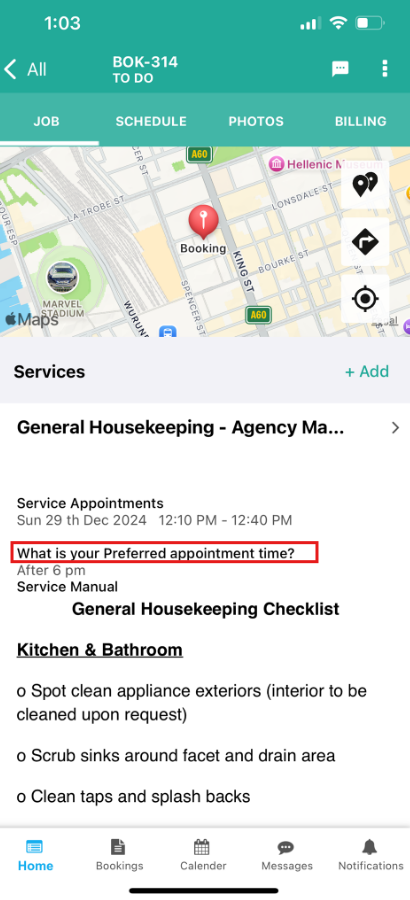
How does the field label appear for the fieldworker app while creating/editing (bookings/quotes)
- In the fieldworker app, when your fieldworker is creating or editing a new booking/quote and after selecting a service, the field label will be displayed during the booking process as follows:
How does the field label appear in the fieldworker app while reviewing (bookings/quotes)
- In the fieldworker app, when your fieldworker review a booking/quote, the field label will be displayed in the booking/quote view page as follows:
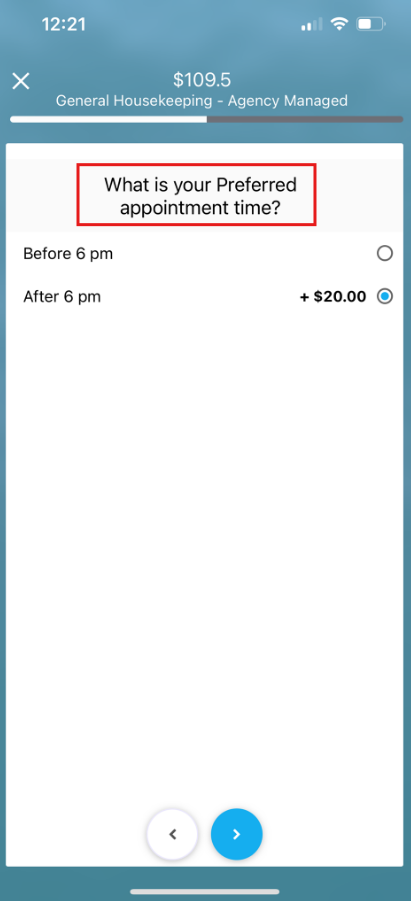
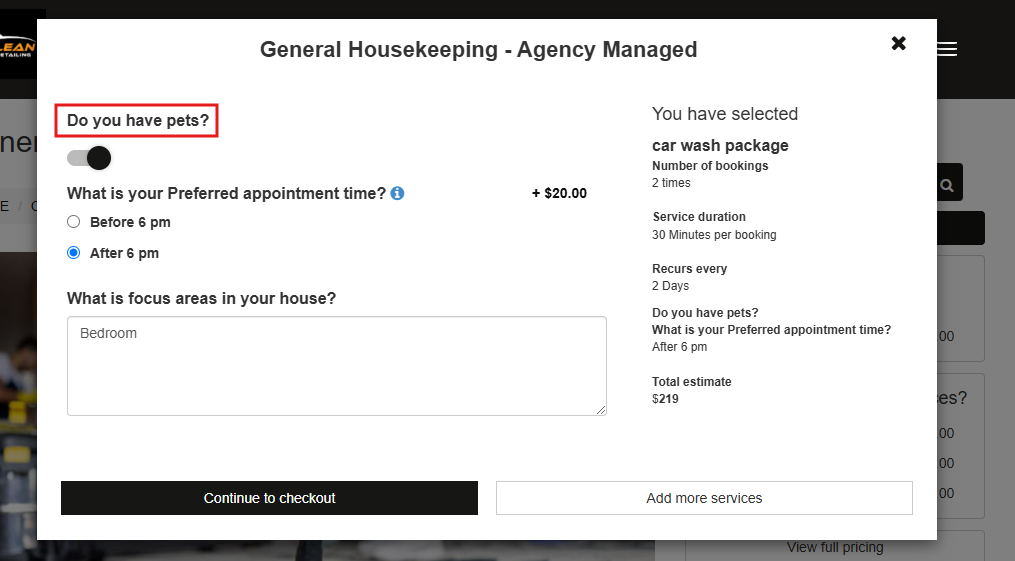
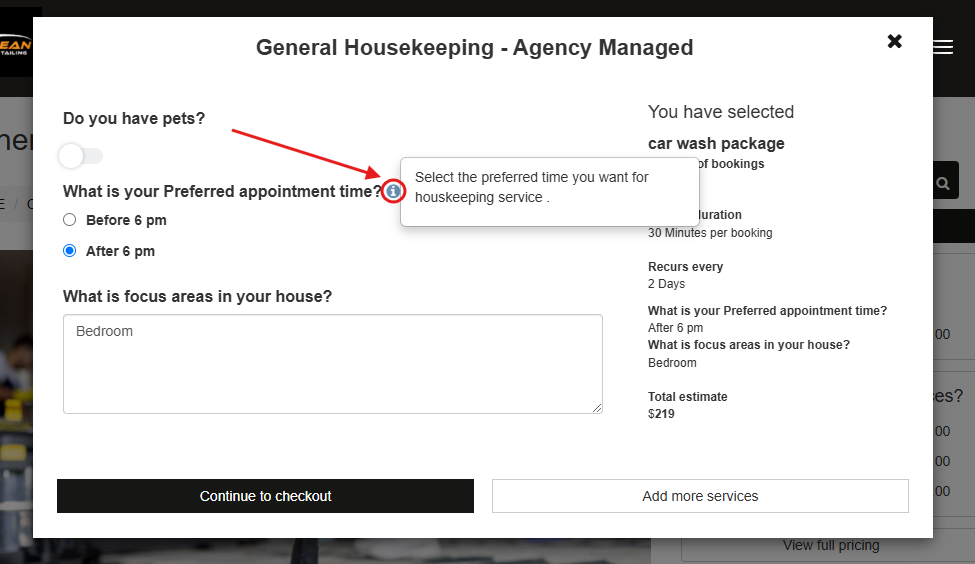
How field label appears in the customer portal for customers
- When customers schedule appointments, they’ll need to select from the custom fields associated with their chosen service. The field label will be displayed accordingly to guide them through this process.
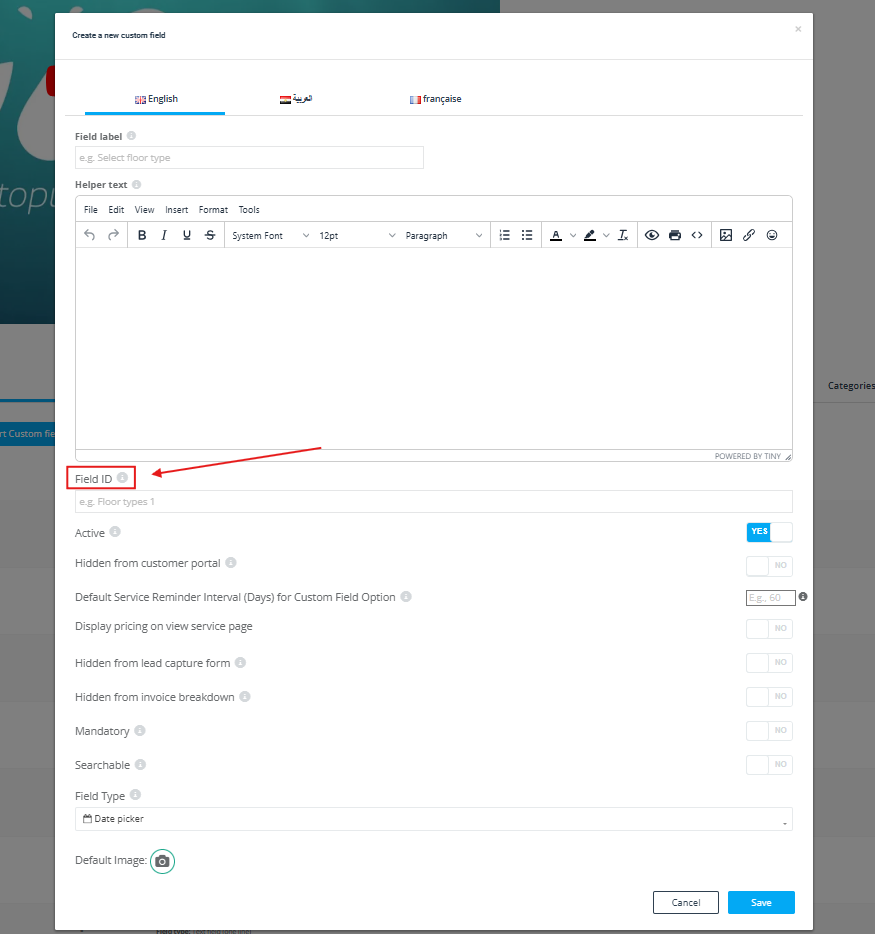
Field ID
- A Field ID serves as a unique identifier to differentiate custom fields with identical labels. This ID is exclusive to you and won’t be visible to customers or fieldworkers.
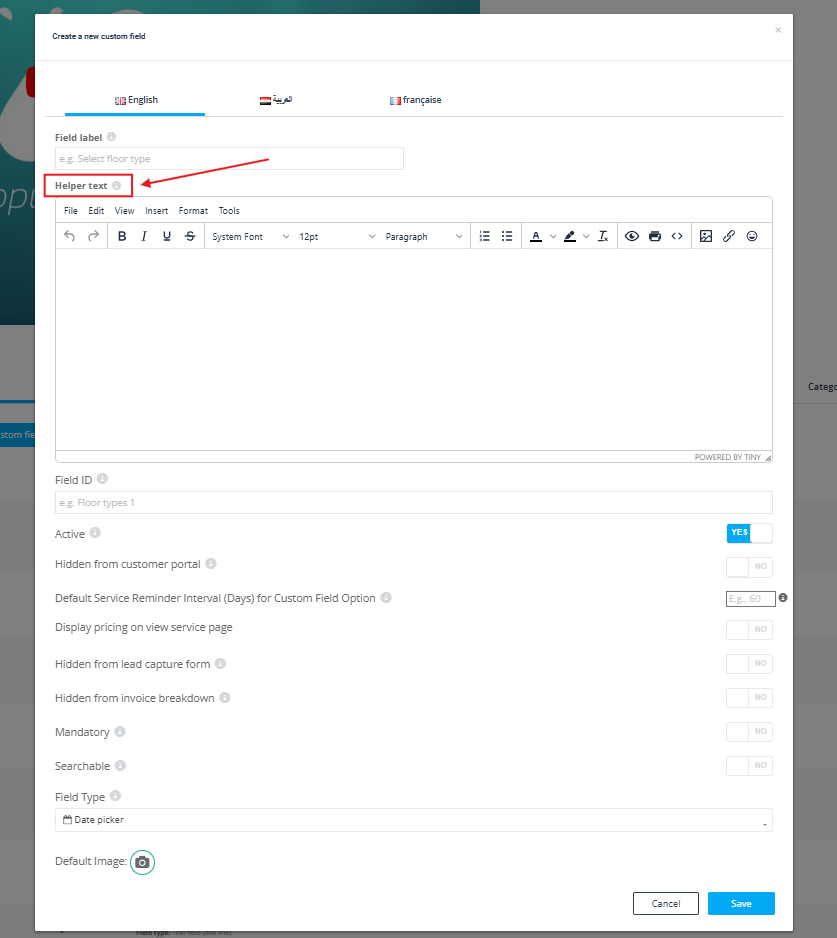
Helper Text
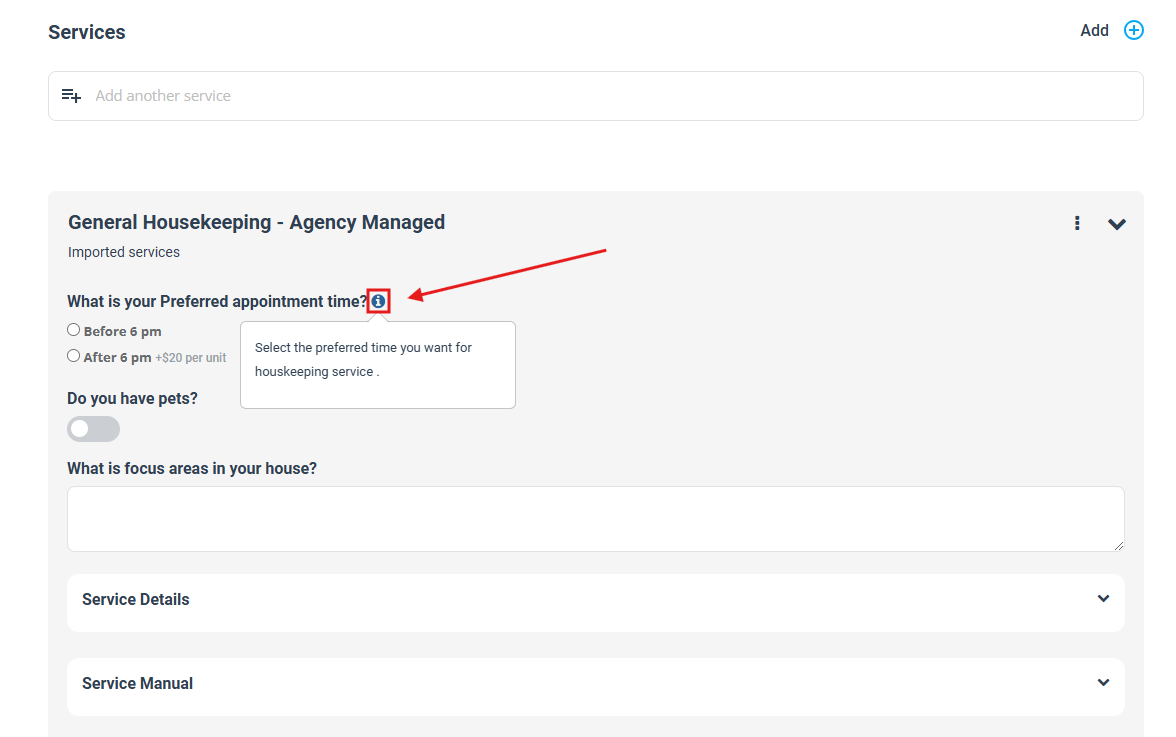
- Helper text offers additional context or clarification for each custom field. It appears when users hover their mouse over the field during appointment scheduling.
How it appears for admin users
- When creating a booking, the helper text is displayed alongside the service’s custom fields under the service section on the booking page.
How it appears for Fieldworker (in the fieldworker app)
- A helper text will appear to fieldworkers in the app while scheduling an appointment after selecting a service. It will be displayed as follows:
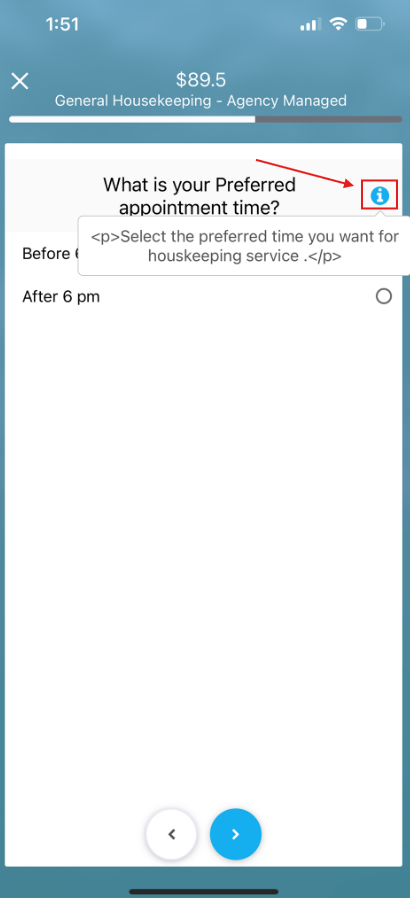
How it appears to customers
- Customers will encounter the helper text while scheduling appointments after they’ve chosen a service.
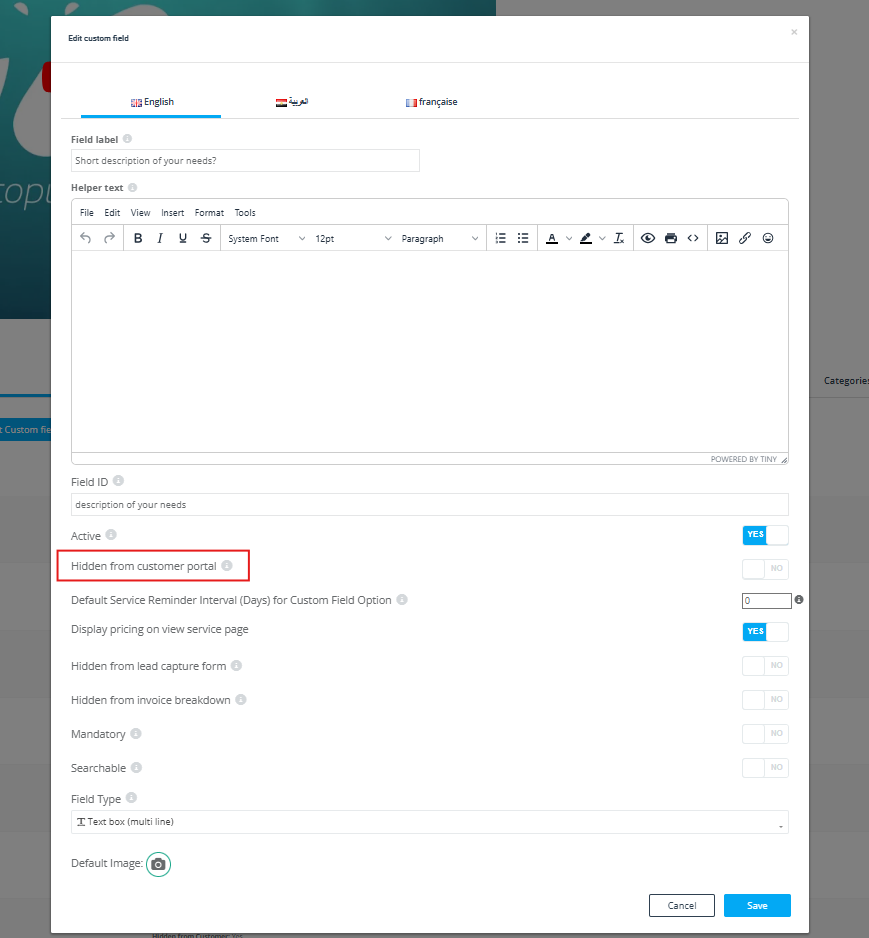
Hidden from the customer portal – Custom Field Visibility in Customer Portal and Branded App
- You can decide whether a custom field should be hidden or visible to customers. If the custom field is intended for admin use only and doesn’t require customer input, enable the “Hidden” flag. If customers need to view or interact with the custom field when booking, keep it disabled.
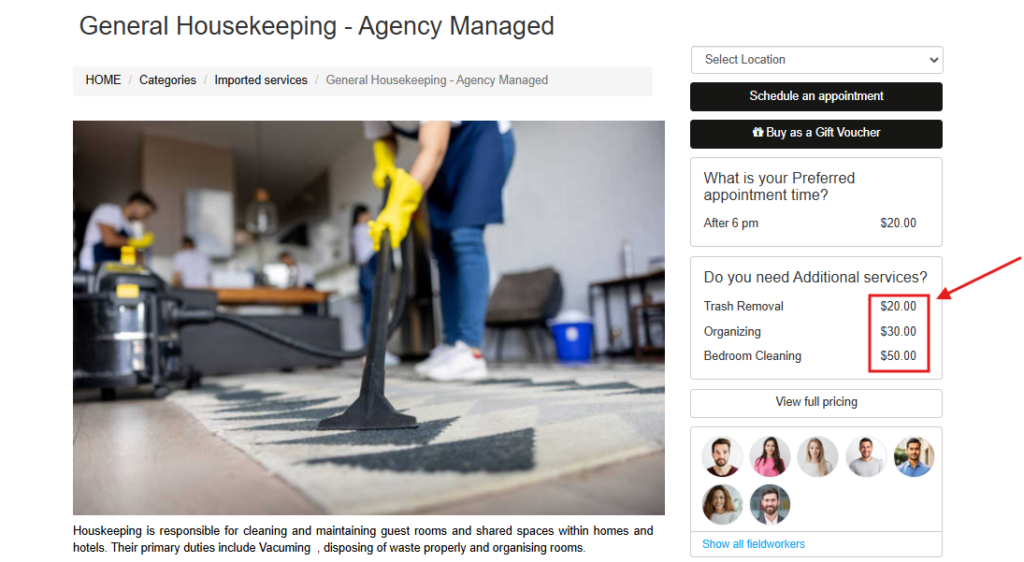
Display pricing on the view service page
- To show custom field pricing on the service view page, enable this option. Customers will see the pricing when selecting a service to book through the customer portal.
Hidden from the inquiry widget – Custom Field Visibility in Inquiry Widget
- Control the visibility of custom fields in the inquiry form generated by the inquiry widget. If customers are only allowed to submit inquiries rather than book services directly, disable the toggle to display the custom field in the inquiry widget.
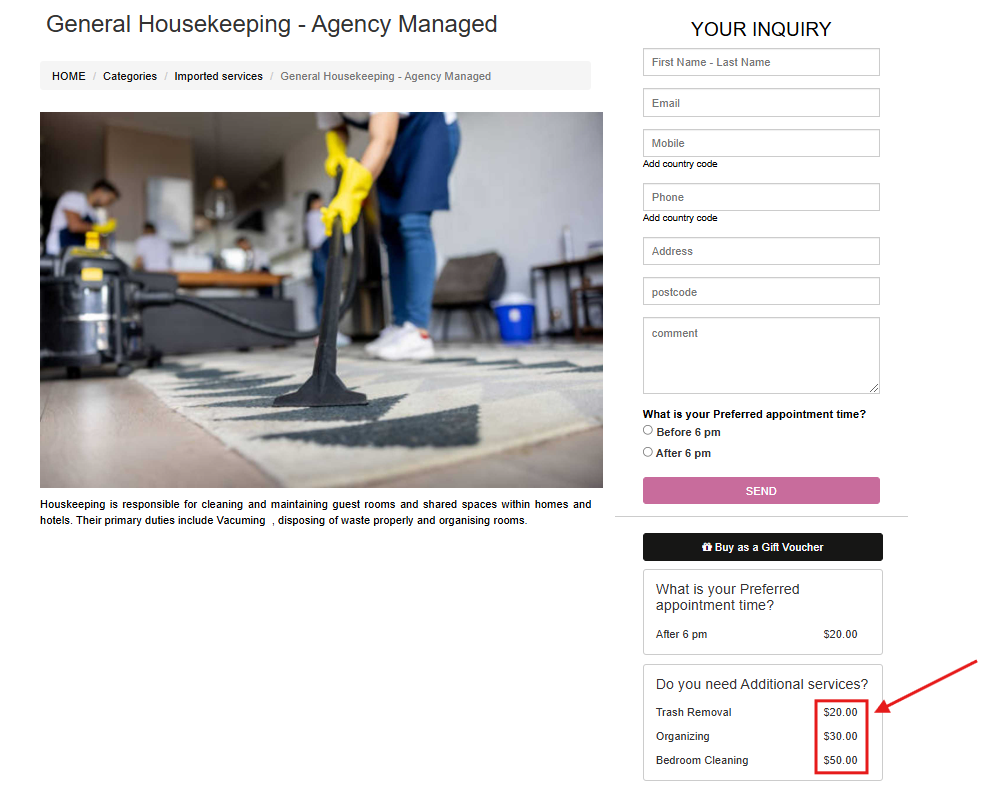
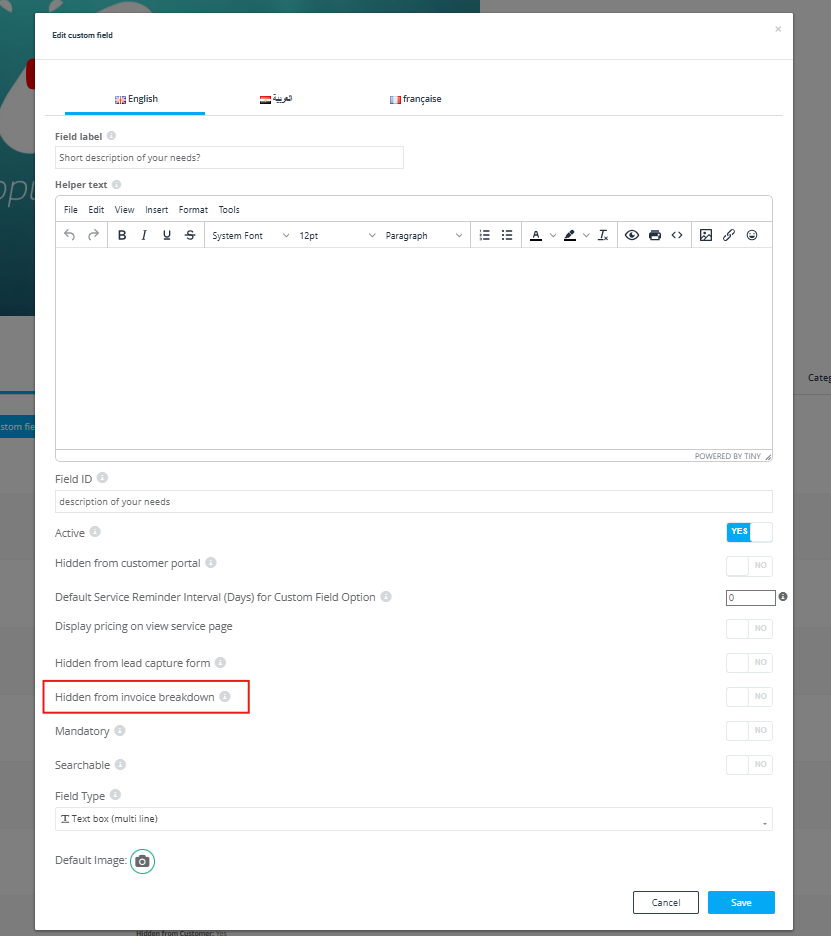
Hidden from invoice breakdown – Custom Field Visibility in Invoice Breakdown
- Choose whether a custom field should be hidden or visible in the invoice breakdown. Enable this flag if the custom field is for booking purposes only and shouldn’t appear on invoices. Disable it if the custom field must be displayed on invoices.
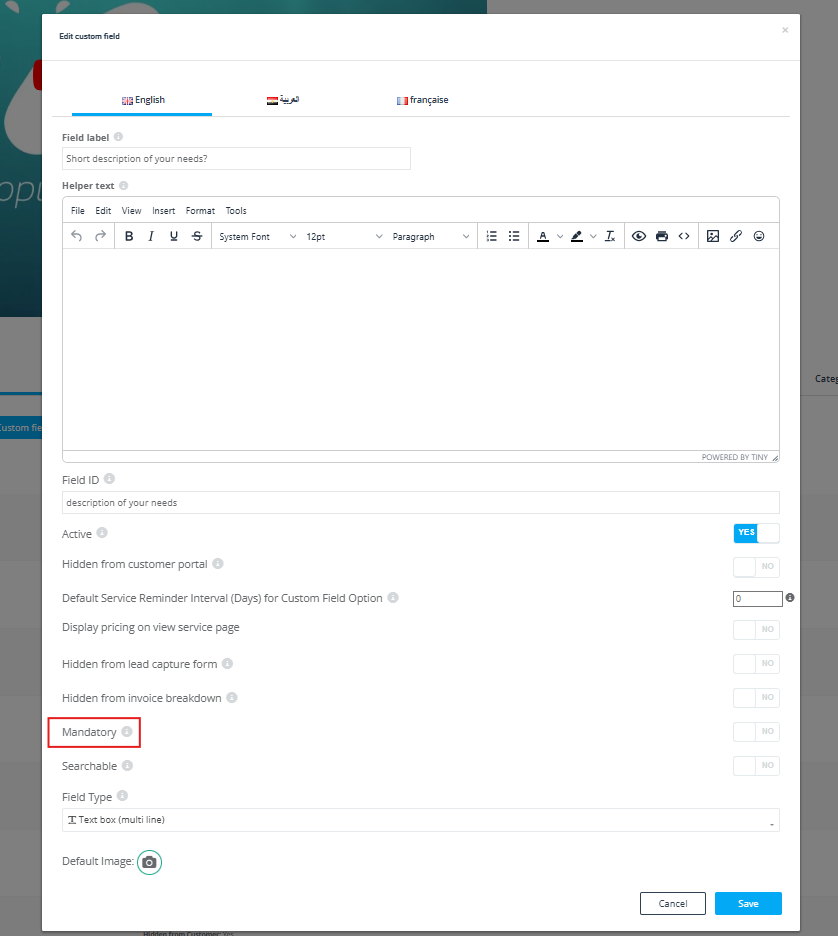
Mandatory – Custom Field Mandatories
- Decide whether answering a custom field should be mandatory or optional during the appointment scheduling process.
Searchable – Enhanced Searchability for Custom Fields
- Activating the ‘Searchable’ feature enables you to quickly and efficiently locate specific information within your custom fields. This can be achieved through both quick search and advanced search functions. However, it is important to consider the potential impact on system performance before enabling this feature.
- By default, the ‘Searchable’ option is turned off to maintain optimal system speed. It is advisable to keep this setting disabled unless it is crucial for your workflow. For instance, you may need to search for unique identifiers such as car registration numbers or machine serial numbers frequently. In such cases, enabling the ‘Searchable’ feature can significantly enhance your productivity and overall experience.
- To maintain a balance between system performance and search efficiency, carefully evaluate the necessity of enabling this feature for each custom field. Remember, while searchable fields can greatly improve your ability to locate specific information, they can also slow down your system if used excessively.
Tip: An accurate custom‑field setup means fewer service variations, smoother bookings, and precise pricing. If you find yourself creating multiple near‑identical services, stop and add custom fields instead. It keeps your service list tidy and prevents frustration for customers and staff alike.
Selecting the appropriate field type is crucial when gathering data from your customers, as it determines how the information will be displayed and collected. Here are the various field types available in OctopusPro:
- Date Picker: Enables customers to select a specific date related to their service when booking. Find out more >
-
Time Picker: Allows customers to choose a preferred time associated with a custom field in the service. Find out more >
- Text Box (multi-line): Offers space for users to enter a large amount of text. Find out more >
- Text Field (one line): Provides a single line for users to input a small amount of text. Find out more >
- Toggle Button: Enables customers to select a custom field option by switching the button on or off when scheduling a booking. Find out more >
- Dropdown: Allows users to choose one value from a list of pre-filled options provided by the admin. Find out more >
- Button Group: Similar to the radio button but differs in appearance, this field type allows users to select only one option. Find out more >
- List: Provides users with a list of options configured by the admin, allowing them to select one. Find out more >
- Checkbox: Indicates a “yes” or “no” selection for an item. Find out more >
- Signature: Gives users the ability to input their signature when confirming a selection during their booking. Find out more >
Each field type serves a unique purpose, ensuring that the data collected from your customers is accurate and relevant to your services.
Enhancing Custom Field Options with Default Images for Improved User Experience and Efficiency
- In addition to gathering necessary details, you can also include a default image for the custom field to provide a visual cue for the customer. This can be particularly useful when dealing with complex services that require additional explanation or clarification.
- For example, if you are offering a customized home cleaning service, you may want to include a custom field that allows customers to select specific cleaning materials or products they want to be used in their home. By including a default image of the cleaning product, customers can easily identify the product and understand what they are selecting.
- Additionally, including a default image can be beneficial for customers with visual impairments or other accessibility needs. By providing a visual cue, you can help ensure that everyone can easily access and understand the information being collected through the custom field.
- Overall, including a default image for your custom fields can help improve the user experience and ensure that customers are providing accurate and informed selections. It can also help to reduce errors or misunderstandings and improve overall efficiency in the booking process.
Adding Custom Field Values
Custom fields in OctopusPro are a powerful feature that enables you to collect unique information that is pertinent to your business and the services you offer. By creating and adding custom field values, you can enhance your service booking process by providing customers with a range of options tailored to their needs, improving customer satisfaction, and streamlining your internal processes. Let’s dive into some examples, benefits, and potential applications of this feature.
Use Cases and Examples
- Consider a home cleaning business. You might need to know whether the customer has pets, or if there are specific areas of the house they want you to focus on. By creating a custom field such as “Do you have pets?” with a “yes/no” toggle button, or “Focus areas in your house” with a multi-line text box, you can gather this information efficiently.
- Or perhaps you run a lawn care service and need to know the size of a customer’s yard to accurately quote and schedule the service. A custom field with a numerical +/- input option can capture this information effectively, directly impacting your service cost calculation.
- Another use case could be a beauty salon offering personalized treatments where customers can choose their preferred beauty products. Here, a dropdown custom field displaying the available product options could be an ideal solution.
Benefits
-
Customization: Custom fields let you tailor the service booking process to match your specific business needs. This leads to a more personalized interaction with your customers, boosting their engagement and overall satisfaction.
-
Automation: With custom field values impacting service prices, you can automate cost calculation based on customers’ inputs, reducing manual work and improving accuracy.
-
Efficiency: By collecting relevant and specific information upfront, you can enhance your service planning and delivery, reducing back-and-forth communication and increasing efficiency.
-
Insight: The information collected via custom fields can provide valuable insight into customer preferences and behaviors, helping you make data-driven decisions to grow your business.
Applications
Custom fields can be applied in a variety of ways across different industries:
- Event planners can use custom fields to ask about the event type, preferred date, and number of attendees.
- Fitness trainers could use them to gather information about a client’s fitness level or specific goals.
- Catering services could use them to find out about dietary restrictions or specific menu preferences.
In conclusion, custom fields and their values are an integral part of a modern, customer-centric booking process. They not only enhance the overall customer experience but also play a critical role in shaping your services according to your customers’ specific needs. The guide provided will help you understand how to add custom field values/options in OctopusPro effectively, making your services more personalized and efficient.
Creating and adding custom field values in OctopusPro is a straightforward process that can significantly enhance your service offering. By providing more details and options in your booking form, you can give your customers the power to personalize their service, which can increase customer satisfaction. Here’s a detailed guide on how to add custom field values/options:
- Step 1: Open the Settings Firstly, you need to open the “Settings” tab located in your dashboard’s main navigation menu.
- Step 2: Navigate to Service Settings In the settings, look for the “Service Settings” option and click on it to access the service settings page.
- Step 3: Access Custom Fields Within the service settings, select the “Custom Fields” option. This will open up a page that allows you to create and manage your custom fields.
- Step 4: Create Custom Field On the custom fields page, find the “Create Custom Field” button and click on it. This will open up a form for you to fill in the details of your new custom field.
- Step 5: Fill in Custom Field Details In the form, fill in the fields with your custom field details.
- Step 6: Choose Custom Field Type Choose the custom field type that you want. After you choose a type, additional fields may appear for you to fill in, depending on the type of field you have chosen.
- Step 7: Enter Custom Field Values Enter the custom field values that will be available for users to choose from. These values will be the options that appear in a dropdown, button group, radio button, checkbox list, or any multi-select field.
- Step 8: Repeat the Process If you have more than one value to add, repeat the process until you have added all the values available for users for this custom field.
- Step 9: Save Your Changes Finally, press the “Save” button to finalize your changes. This will create your new custom field with the values you have input.
Dependent Custom Fields – Setting Up Custom Field Option Dependencies
OctopusPro takes custom fields a notch higher with the dependent field functionality. This feature ensures your booking process remains dynamic, intuitive, and user-friendly, tailoring the booking process based on customer choices.
Let’s delve deeper into how this feature can be harnessed.
- A prime example of using dependent custom fields could be the question, “Who is this service for?”. Typically, you’d provide two options: ‘Myself’ or ‘Someone else’. Depending on what the customer selects, another related custom field can appear.
- If a customer chooses ‘Someone else’, they would likely need to provide more information about this third party to ensure the service is tailored to their needs. In this scenario, the system can present a new custom field, like “Please specify the gender of the person for whom the service is intended.” This follow-up question allows your company to gather the necessary information to provide the most suitable service.
- To create this setup in OctopusPro, while defining a custom field value (‘Someone else’, in this case), you’ll find an option named ‘Add dependent’. Clicking this will allow you to select another custom field that will appear based on this choice.
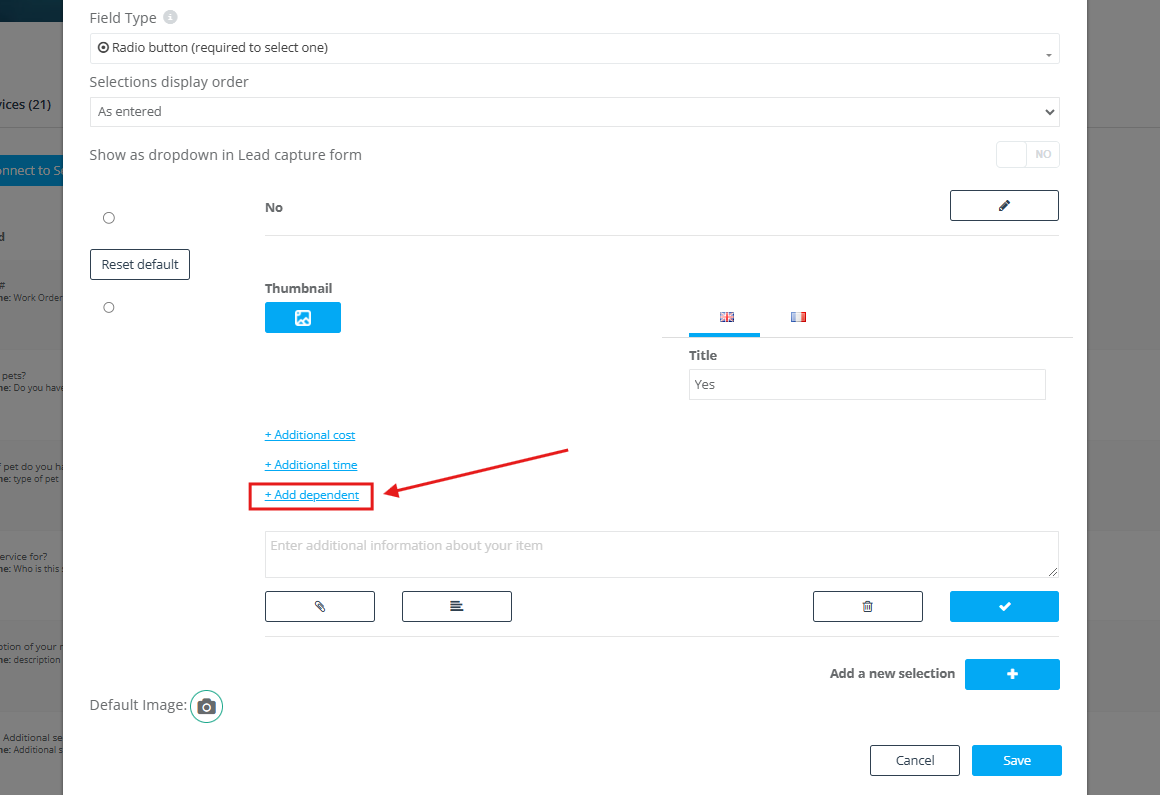
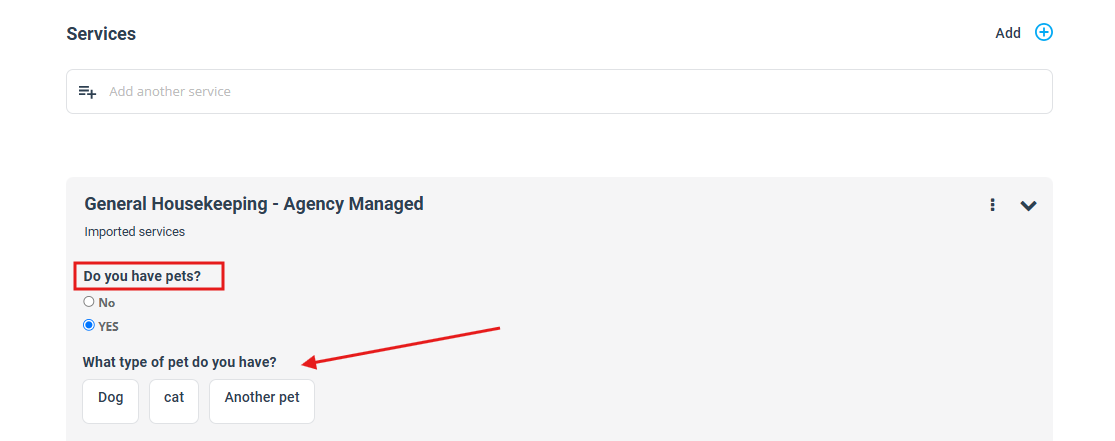
- This feature is not limited to this example, of course. There are countless other ways to utilize dependent custom fields. For instance, if you run a pet grooming service, a custom field could ask, “What type of pet do you have?”. If a customer chooses ‘Dog’, you can present a dependent custom field asking for the dog’s breed.

- The idea is to create an interactive, dynamic booking process that adapts to your customers’ needs, gathering relevant information at each step. This ensures that each booking captures all the necessary details, leading to a more efficient and effective service delivery.
- By fully utilizing the dependent custom fields feature, you can transform your booking process into a seamless conversation with your customers, ensuring each service is as personalized and efficient as possible.
Adding a Custom Field Value Price to a Service
For some custom fields, you may want to add an additional cost. For instance, if a custom field value alters the price of a service, you can input the additional cost. Here’s how to do that:
- Step 1: Go to Service Settings Navigate to the “Service Settings” under the “Settings” tab.
- Step 2: Select Services Click on the “Services” option to open the services page.
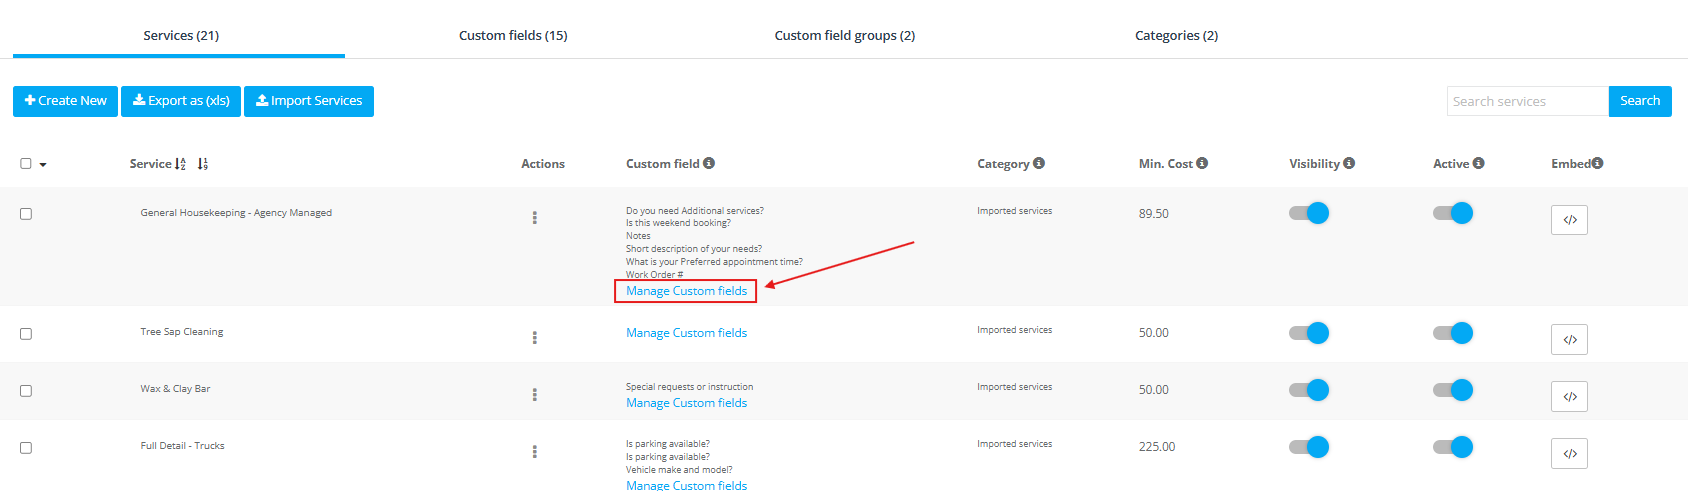
- Step 3: ‘Manage Custom Field’ Find the service you want to modify and click on the “Manage Custom Field” option beside it.

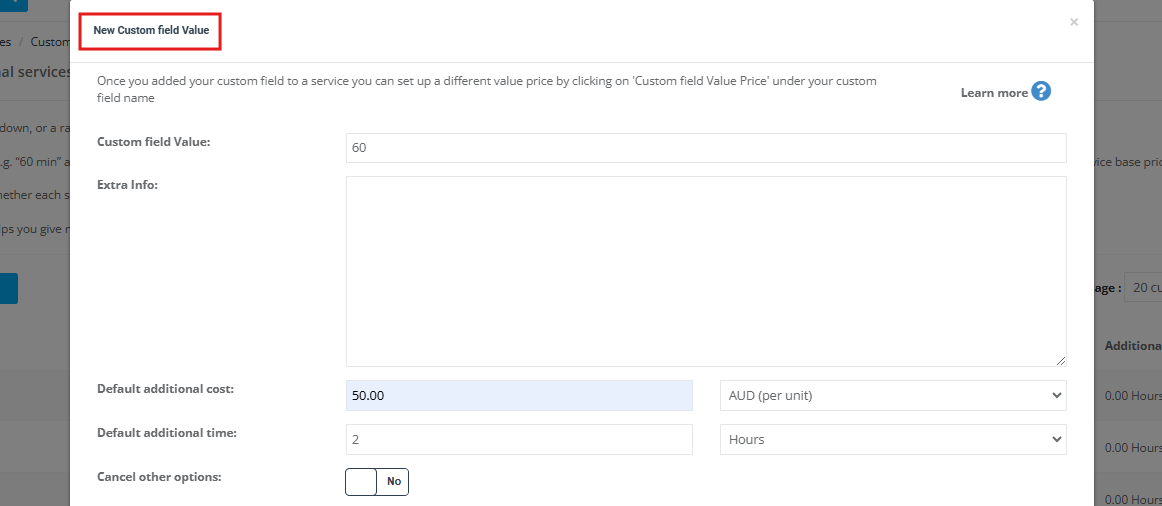
- Step 4: Open Value Prices Underneath the relevant custom field, click on the “Manage Values” option from custom field page.

- Step 5: Create New Service Custom Field Value Price On the next page, find and click on the “New Custom Field Value” button.

- Step 6: Select a Value and Enter a Price From the dropdown list, select the custom field value you want to add a price to, and enter the price in the field provided.
- Step 7: Save Your Changes Finally, press the “Save” button to finalize your changes.
- Remember to carefully consider the type of custom field that will be most useful for each piece of information you’re trying to collect. The right field type will make it easy for customers to input their information and for you to collect and interpret that information.
- These instructions should provide you with a comprehensive understanding of how to add custom field values/options in OctopusPro. If you have any further questions or need more assistance, feel free to ask.
Connecting Custom Fields to Services
It is essential to link the appropriate custom fields to the corresponding services. You can connect multiple custom fields to a single service and connect the same custom field to various services, allowing for a versatile and reusable many-to-many relationship between custom fields and services.
To link a custom field to a service, follow these steps:
- Navigate to Settings > Service Settings > Custom Fields to access the custom fields page.
- Select the checkbox next to the custom field you wish to ‘connect to a service’.

- Click the “Connect to services” button, and a pop-up window will appear.
- In the pop-up window, select the services you want to link the custom field to.
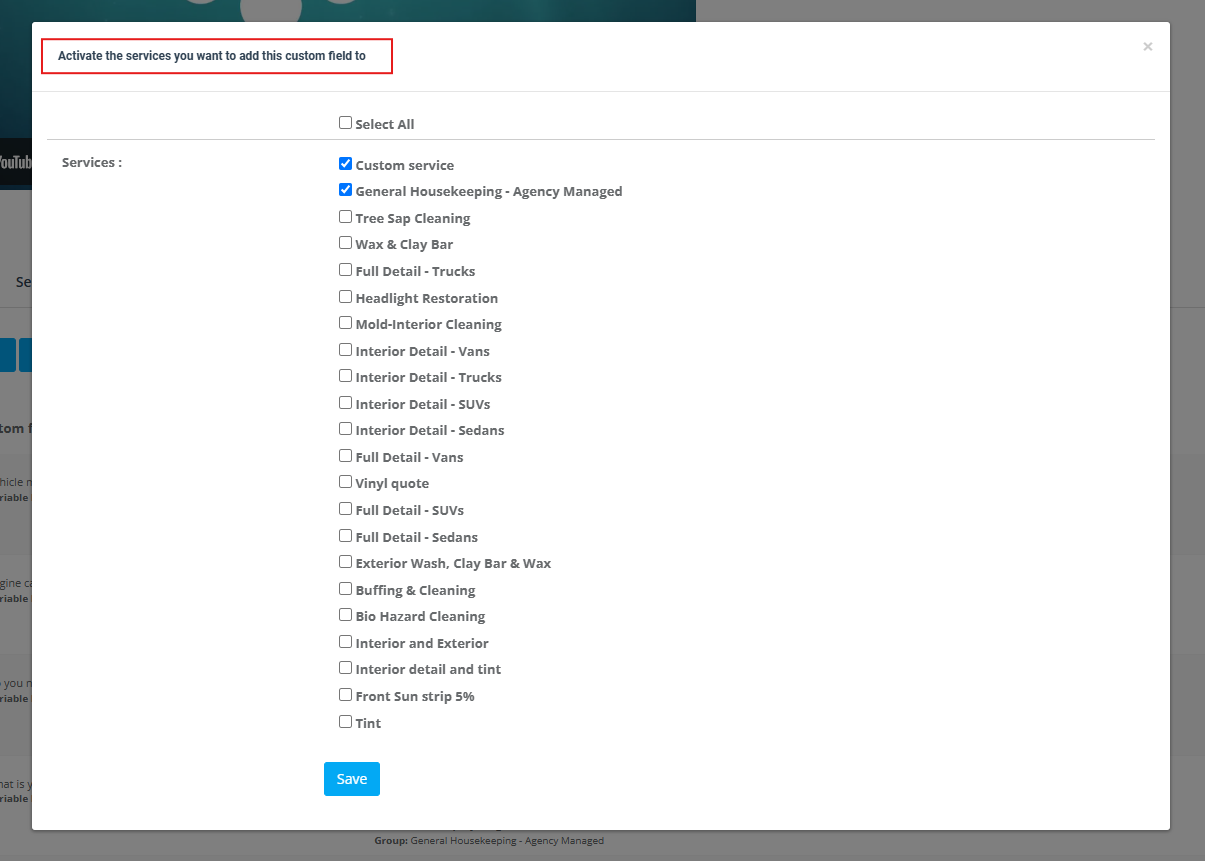
If you need to modify the connection later, simply click the “Modify Services” checkbox on the far right of the custom field. Learn more >
Reordering Custom Fields Using Drag and Drop
You can easily change the order in which custom fields are displayed to your customers when scheduling bookings. Simply drag and drop the custom fields into the desired order.
To reorder your custom fields, follow these steps:
- Go to Settings > Service Settings > Services.
- Locate the service with the connected custom fields and click on “Manage Custom Fields.
- You’ll be directed to the edit page, click on the custom field tab and you can ‘drag and drop’ your custom fields.
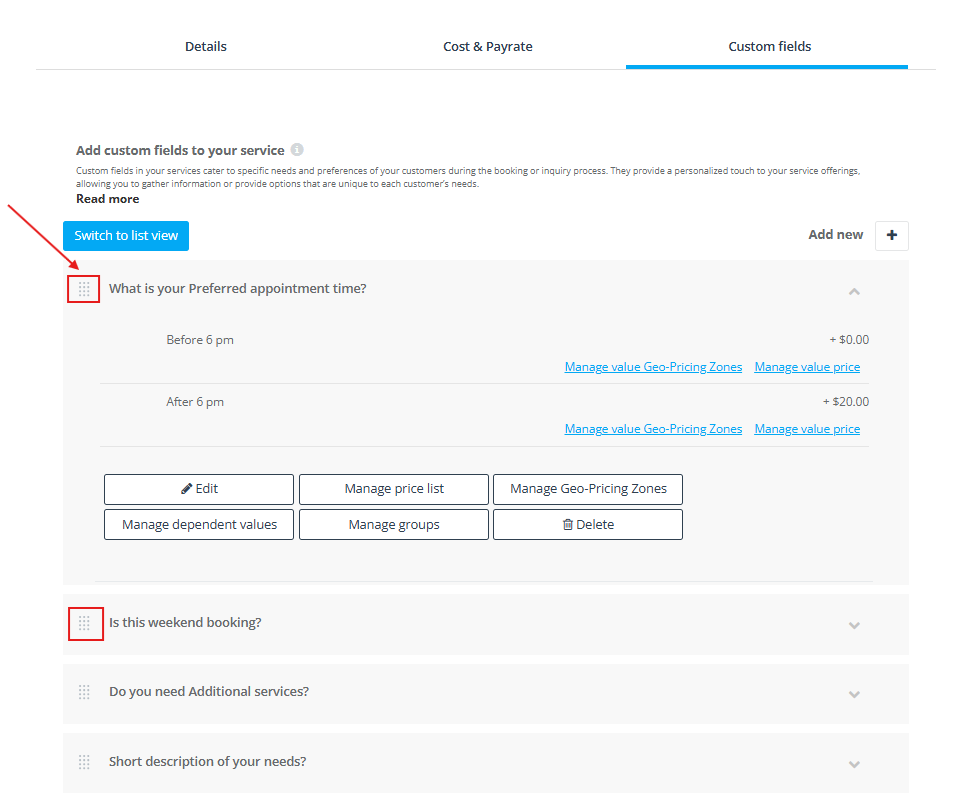
- You can also edit the custom field from here and you can change the Group, review the Price List, change the Value Dependents, change the Price Zones, edit the Custom Field detail, or delete that custom field.
For more information please visit the OctopusPro user guide, and subscribe to our YouTube channel.