OctopusPro Calendar – Efficient Scheduling and Dispatching
When a booking is made through the system, it automatically appears on the calendar, notifying admin users that the fieldworker is now unavailable for other bookings. This feature helps you keep track of your upcoming appointments and allows for simple rescheduling directly from the calendar in case of any issues on the day of the booking.
OctopusPro’s integrated calendar streamlines the booking process, enabling you to quickly and easily manage your fieldworkers’ availability. With a simple drag-and-drop interface, you can conveniently schedule and reassign jobs on the calendar overview, ensuring a well-organized and efficient calendar.
Table of Contents
- How to use the month view, week view, day view, and list view in your OctopusPro calendar.
- View fieldworker label on the calendar day view
- How to add a new booking to the calendar?
- How to add an unavailable time slot for a specific fieldworker or multiple fieldworkers on your calendar?
- How to add an unavailable event to the calendar for your company?
- How to change an assigned fieldworker in day view by dragging and dropping the booking between fieldworkers?
- How to view unavailable time for each fieldworker in day view?
- How to view unavailable time for each fieldworker when filtering by a fieldworker?
- How to view scheduled bookings on a specific date?
- How to view a Fieldworker’s Calendar?
- How to directly contact a fieldworker from the calendar?
- How to duplicate a booking directly from the calendar?
- How to add a label to a booking from the calendar?
- How to filter bookings on your calendar by service?
- How to filter bookings on your calendar by booking status?
- How to filter bookings on your calendar by location?
- How to filter bookings on your calendar by a fieldworker’s status?
- How to filter bookings on your calendar by fieldworker?
- How to filter bookings on your calendar by customer label?
- How to filter bookings on your calendar by fieldworker label?
- How to filter bookings on your calendar by assignment status?
- How to sync OctopusPro calendar with google calendar?
Here is a list of some of the functionalities related to scheduling and managing appointments in the OctopusPro Calendar:
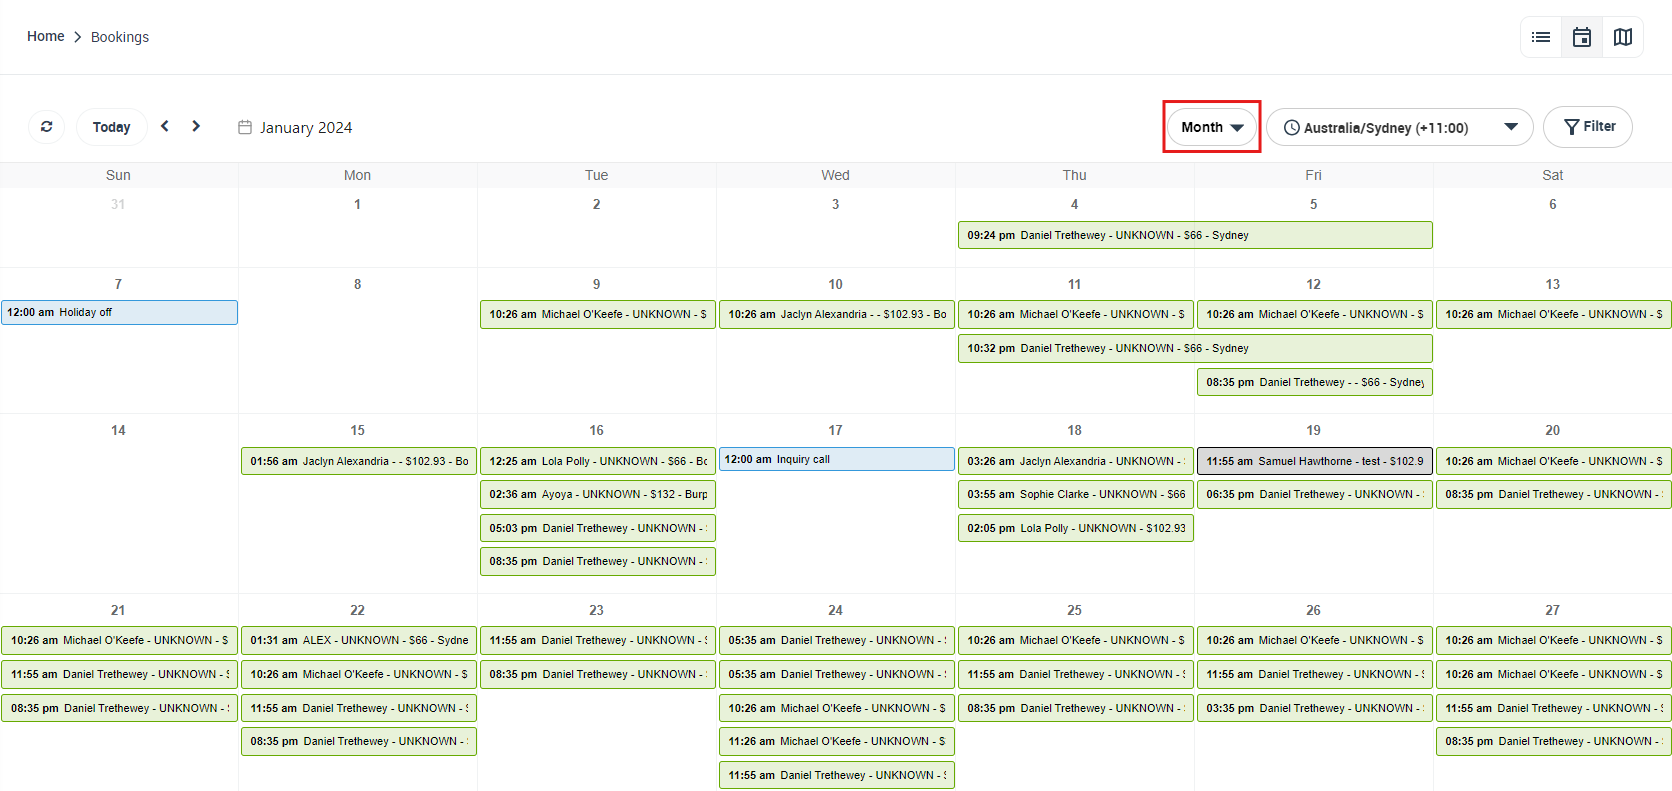
- Month View: Plan and view your entire month at a glance with OctopusPro’s robust Month View feature. This comprehensive display gives you a bird’s-eye view of all your bookings, appointments, and events spread across the entire month. Never miss an appointment or double-book a slot again. The Month View provides a color-coded representation for easy identification, ensuring you stay on top of your game every day of the month.
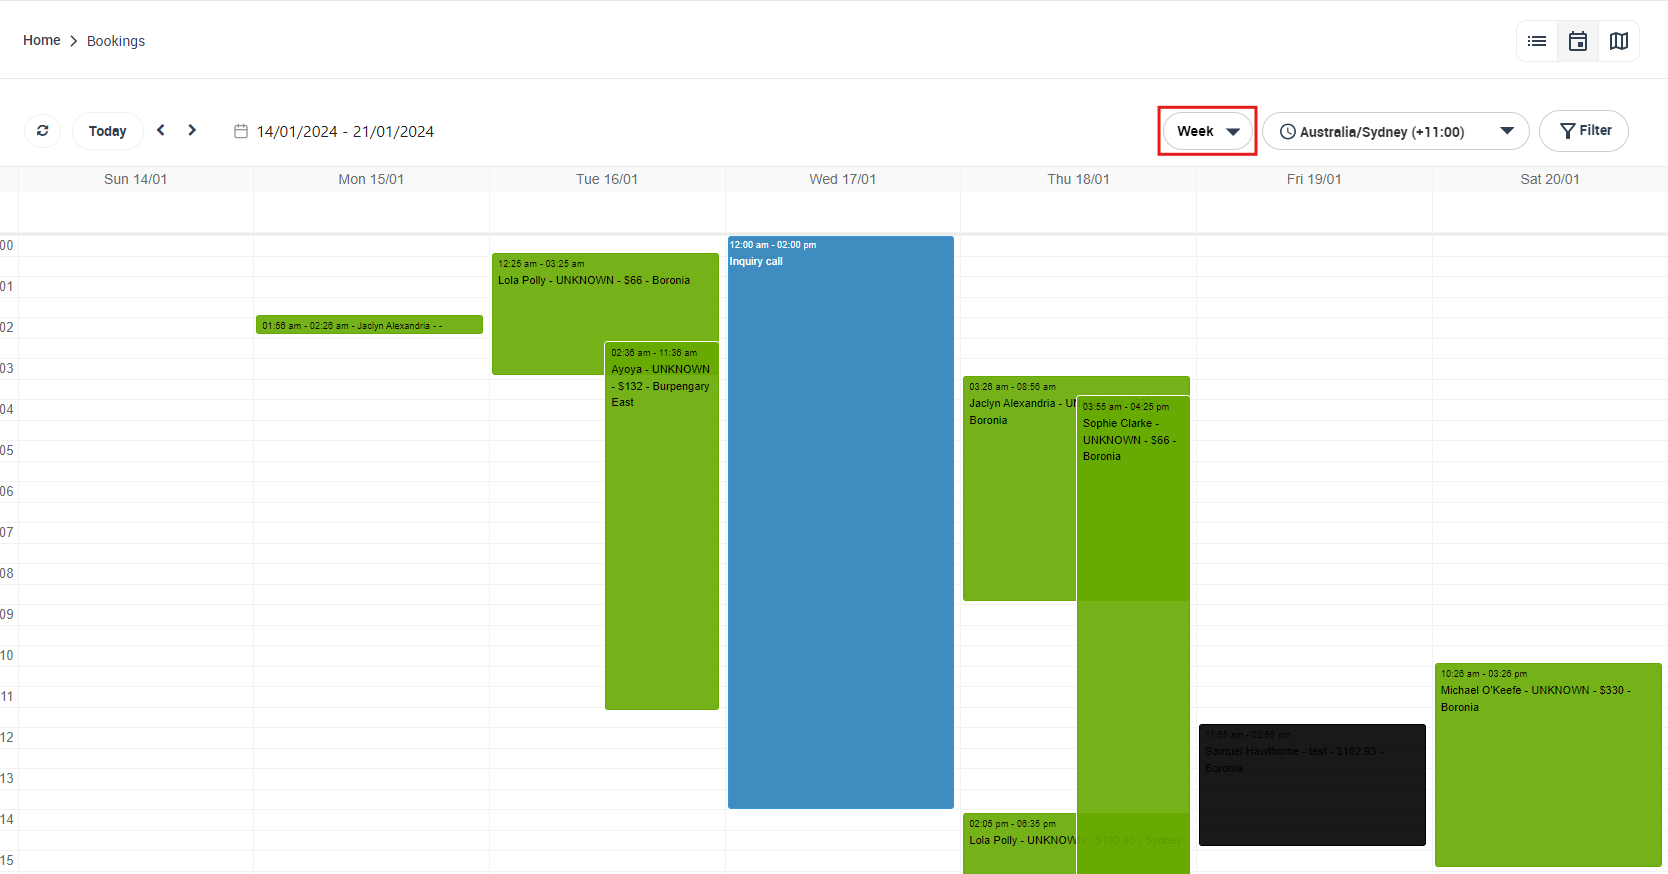
- Week View: Dive deeper into your schedule with OctopusPro’s detailed Week View. Offering a weekly snapshot of your appointments, the Week View helps you manage your operations with enhanced precision. You’ll see a day-by-day breakdown of your week, allowing for meticulous planning and efficient execution of your tasks. Let OctopusPro’s Week View be your personal scheduling assistant, making your week’s work easier to manage and execute.
- Day View: Get into the nitty-gritty of your daily operations with OctopusPro’s intuitive Day View. Each day’s schedule is laid out in an easy-to-read, hourly format, ensuring that every appointment, every task, and every to-do is right at your fingertips. It’s designed for those bustling days when every minute counts, ensuring you stay organized, punctual, and productive.
- List View: For those who prefer a streamlined, minimalist approach, OctopusPro offers the List View. This feature presents your bookings, tasks, and appointments in a simple, orderly list. The List View prioritizes clarity and ease of use, allowing you to easily scroll through your schedule and view each booking in detail. Stay focused and efficient with OctopusPro’s List View, where simplicity meets functionality.
- Filtering Appointments: The OctopusPro Calendar provides a filtering feature that lets you streamline your bookings. You can set various criteria such as service type, booking status, location, fieldworker status, and payment status. After applying the filters, only the bookings matching your selected criteria will be displayed.
- Adding a New Booking to the Calendar: OctopusPro’s interactive calendar is your all-in-one solution for scheduling bookings with just a few clicks. Whether it’s an appointment made by you or your customers, the system automatically adds it to your calendar, providing you with a real-time overview of your schedule. If you want to add a booking manually, OctopusPro offers an intuitive, user-friendly interface to create and schedule bookings directly from the calendar page. So, whether it’s an on-the-spot booking or a well-planned appointment, OctopusPro’s calendar is your dynamic tool for scheduling, managing, and keeping track of your bookings effortlessly.
- Blocking Unavailable Dates and Times: Enhance your productivity and workflow with OctopusPro’s feature to block out unavailable dates and times on your calendar. This feature acts as an automatic gatekeeper for your schedule, allowing you to control your availability or that of your fieldworkers with precision and ease. Whether it’s for personal time off, company-wide meetings, or recurring non-working hours, the Block Unavailable function ensures that your schedule is clear, organized, and free from overbookings. This contributes to efficient schedule management, improved transparency, and a superior user experience. With OctopusPro, it’s all about you and your availability.
- Adding Notes to Calendar Dates: OctopusPro’s powerful calendar management system empowers you to stay on top of your business operations by allowing you to add personalized notes to specific calendar dates. Whether you want to remind yourself of important events, set to-do lists, or simply keep track of your workday, the Add Note feature is your ultimate scheduling assistant. The notes are easily distinguishable, helping you seamlessly manage and organize your daily tasks alongside your bookings. Stay ahead, be organized, and never forget any details with OctopusPro’s comprehensive note-adding functionality.
- Scheduling Appointments Without Specific Time: OctopusPro offers flexibility in scheduling by allowing you to book appointments without specifying an exact time. You can select a ‘part of the day’ (morning, afternoon, or evening) during the booking process, which is useful for tasks that do not require strict timing.
- Viewing ‘Part of the Day’ Appointments: Once an appointment with a ‘part of the day’ specified is saved, it will be displayed in the list view under the appropriate part of the day. This feature allows you to easily see which part of the day each booking is allocated to, aiding in effective workload management.
- Reordering Appointments Using Drag and Drop: In OctopusPro, you can adjust the order of your bookings using a drag-and-drop feature. This feature is available for bookings that do not have a specific time set. You can move these bookings within their designated part of the day, but cannot change their order with time-specific bookings.
- Changing the Order of “Part of Day” Bookings on the Same Day: OctopusPro allows you to change the order of “Part of Day” bookings that are scheduled for the same day. You can drag and drop these bookings to a different position within the same part of the day. However, the system prevents you from moving these bookings to a different part of the day to maintain the natural flow of your schedule.
- Setting ‘All Day’ Appointments: If you have an appointment that spans the entire day, you can set the booking time to ‘All day’. This will make the booking appear in the list view marked as ‘All day’, offering an at-a-glance understanding of your availability for the day.
- Changing the Order of “All Day” Appointments on the Same Day: Just like ‘part of the day’ bookings, you can rearrange ‘All day’ bookings within the same day using drag and drop. However, you cannot reorder these bookings in relation to bookings with specific times.
- Moving “All Day” Appointments Between Different Days: OctopusPro does not permit moving “All Day” appointments between different days within the list view. If you need to change the date of an “All Day” appointment, you would have to manually edit the booking or switch to a different calendar view, such as a week or month view.
- Google Calendar Integration: OctopusPro also enables you to synchronize your personal calendar with the OctopusPro calendar, allowing for seamless management of both schedules without the need to switch between multiple calendars.
How to use the month view, week view, day view, and list view in your OctopusPro calendar.
OctopusPro gives you the flexibility to view your work the way that fits you best, with various calendar view types to suit your preferences:
Month view:
The month view displays all bookings for the current month in blocks, providing a general overview of your monthly calendar. Use the arrows in the top left corner to navigate between months.
Week view:
To display bookings in the week view, navigate to your Calendar and select “Week” on the right side of the page. This view provides a more detailed look at your schedule, displaying each day of the week and hourly appointments.
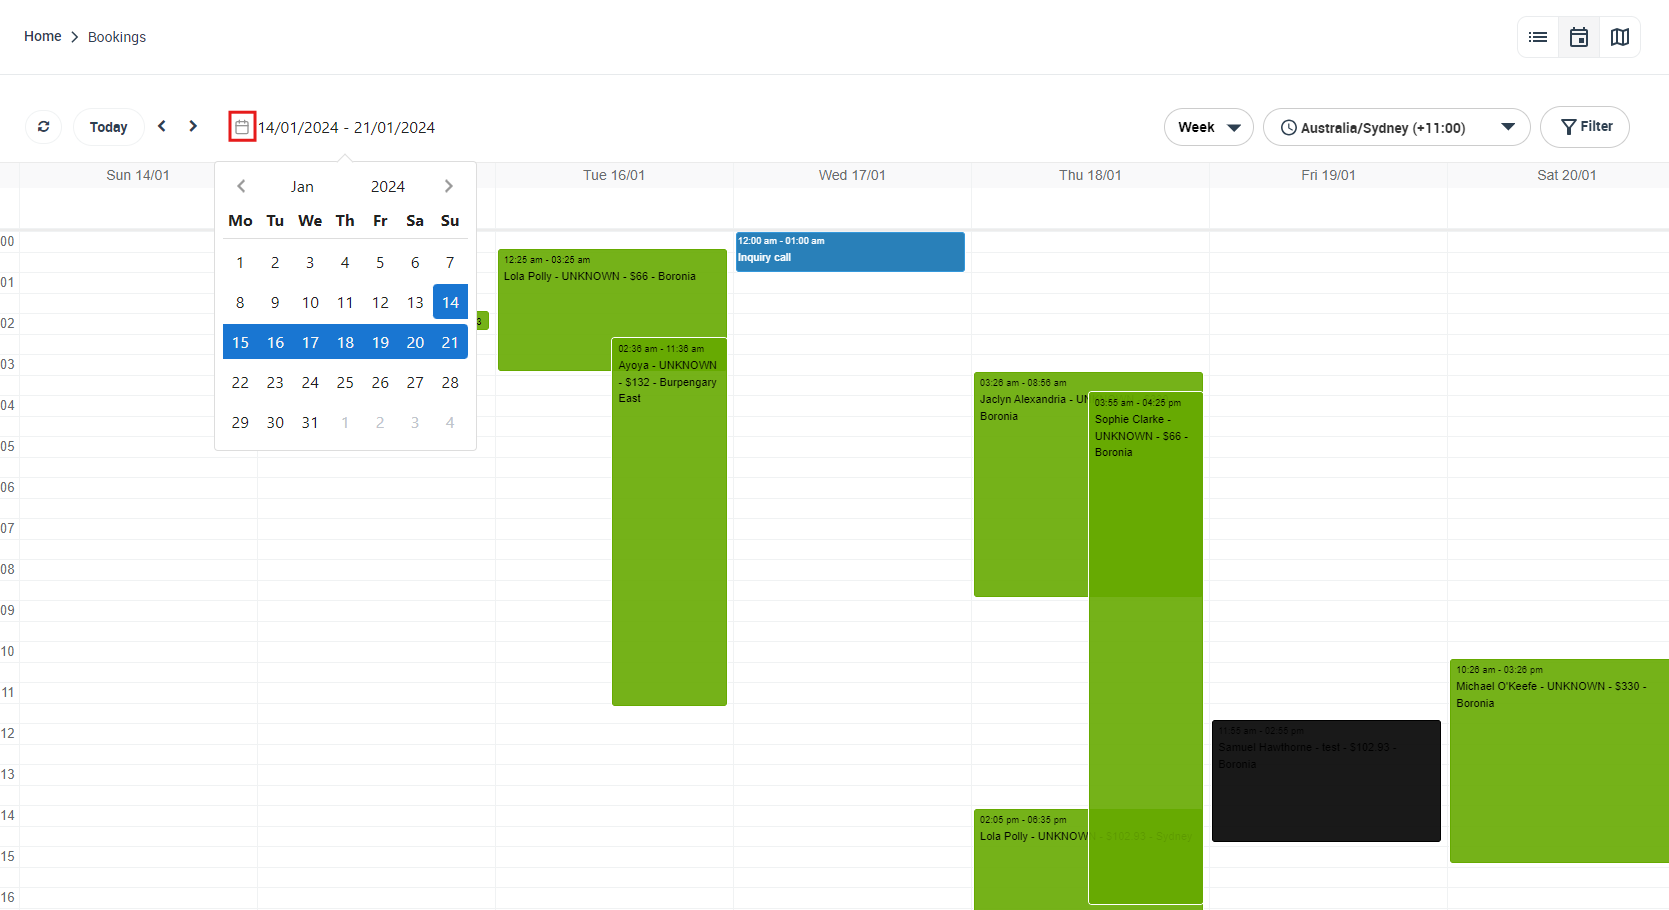
Use the arrows to move between weeks or click the calendar icon to select a specific day, month, or year to view upcoming bookings.
Day view:
To display bookings in the day view, navigate to your Calendar and select “Day” on the right side of the page. This view offers an even more detailed perspective, showcasing hourly appointments and fieldworkers assigned to bookings on that day. Use the arrows to move between days or click the calendar icon to select a specific day and view upcoming bookings and assigned fieldworkers.
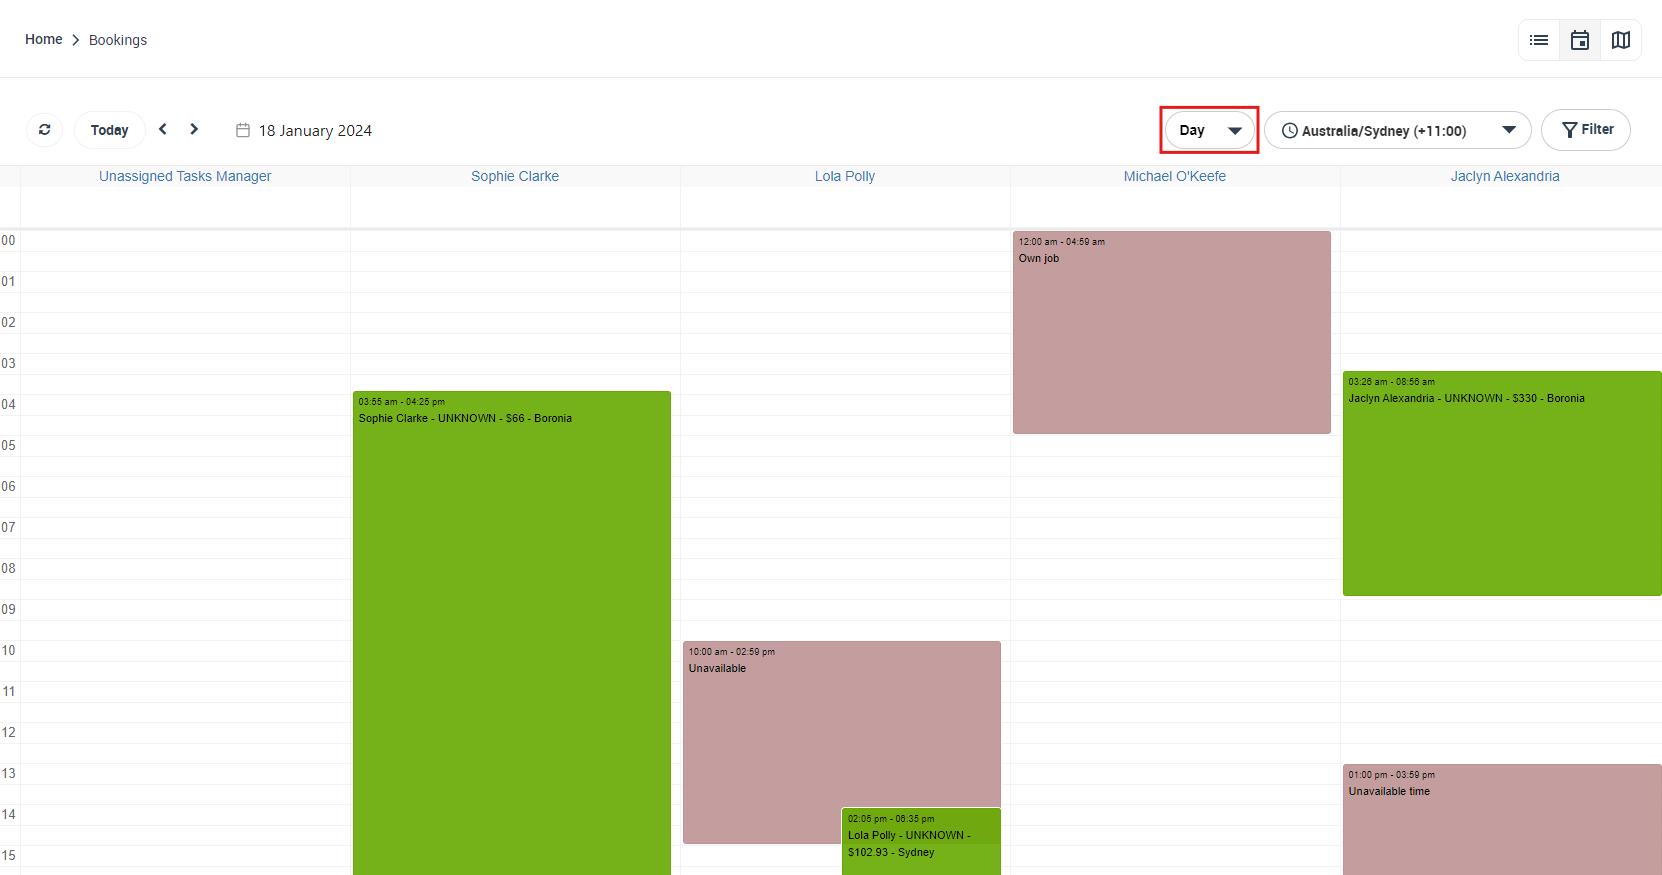
Use the arrows to navigate between future and past appointments, or click the calendar icon to select a specific day, month, and year to view scheduled bookings.
View fieldworker label on the calendar day view
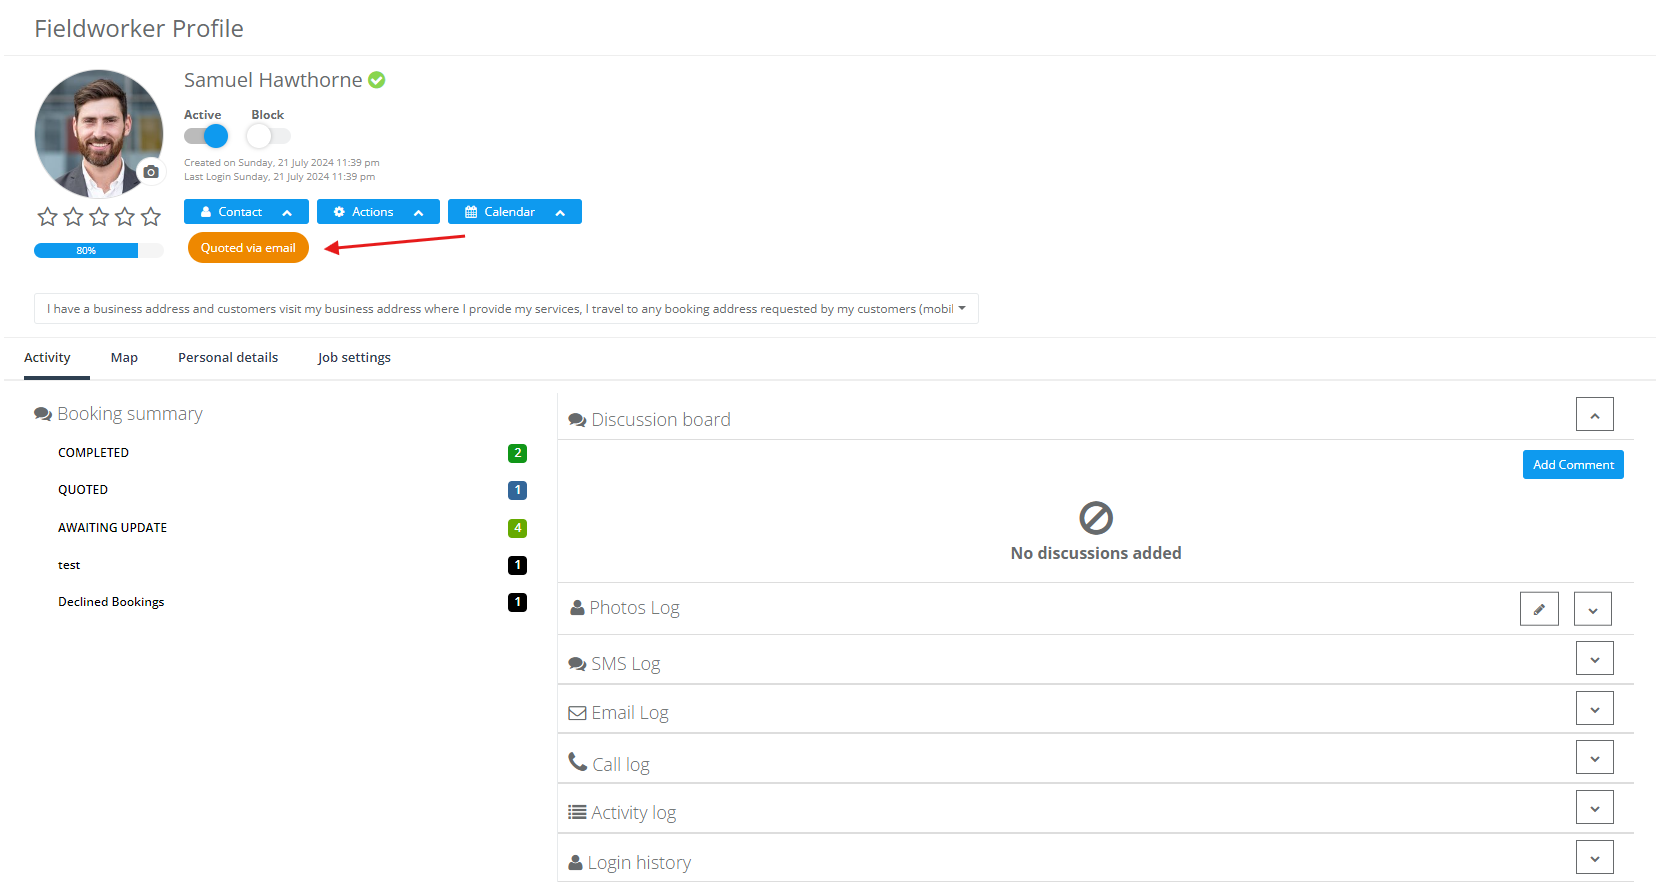
- On your calendar day view, you can easily view all your fieldworkers, with their added labels. So, if your fieldworker has labels added to their profile, they will appear in the calendar under their name, as shown below.
- So, if your fieldworker has a label or many labels added to their profile, you can view it/them on your calendar day view under their display name.
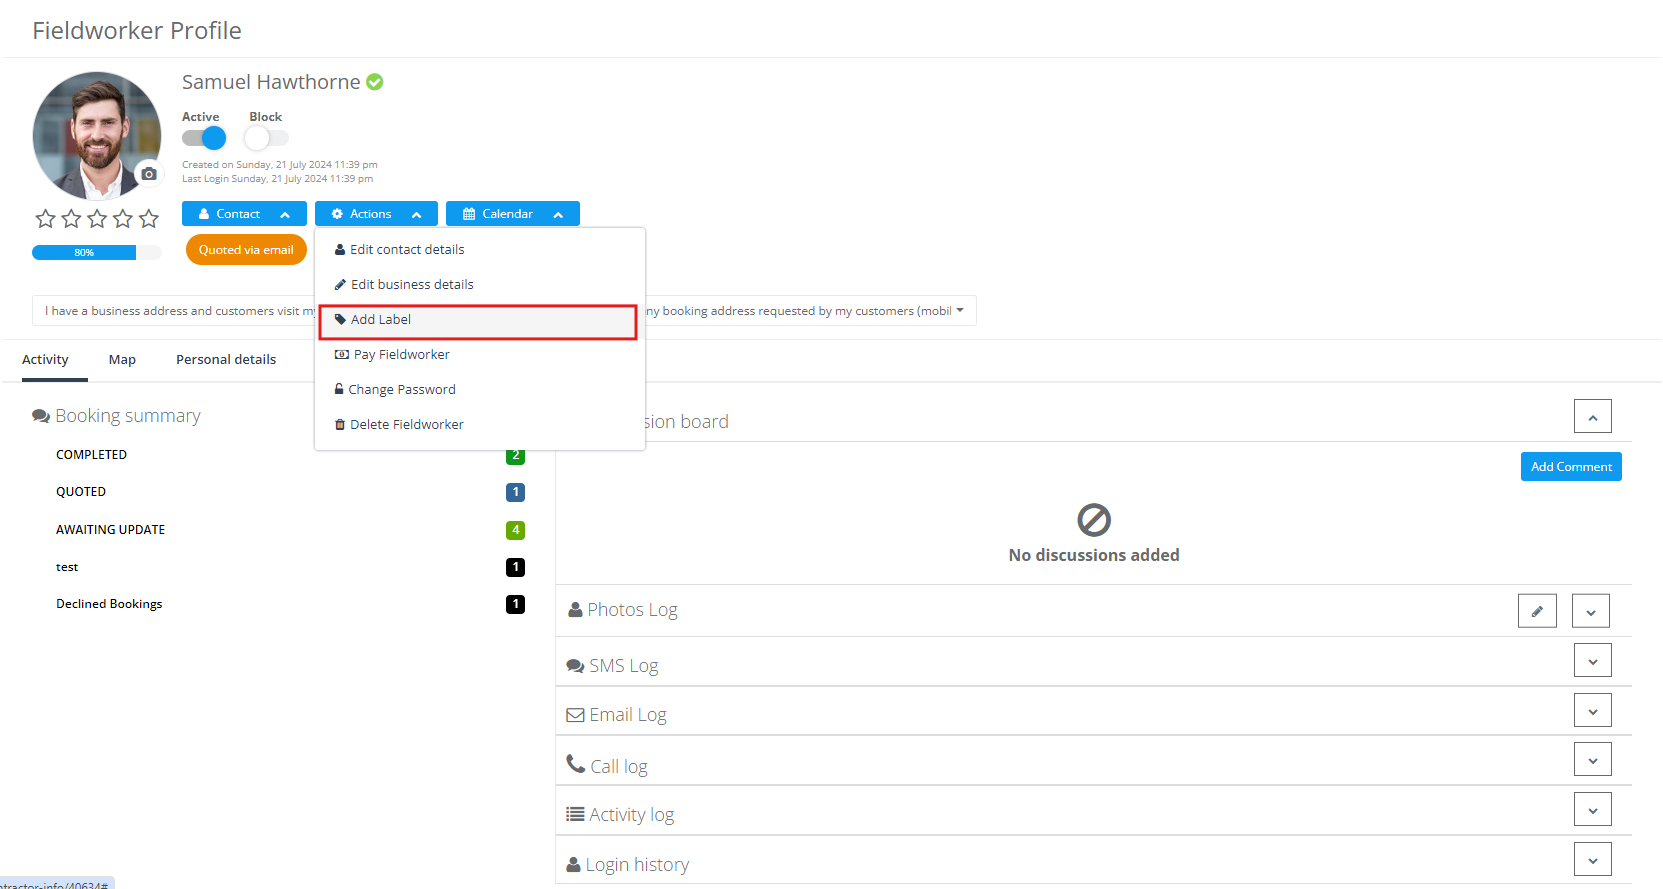
- To add a new label to your fieldworker profile, click on the ‘Actions’ button, then click on “Add label”. You can add an existing label or create a new one. To learn more about adding a label to a fieldworker, click here.
How to add a new booking to the calendar?
- On your calendar overview, click on the date you want to schedule a booking.
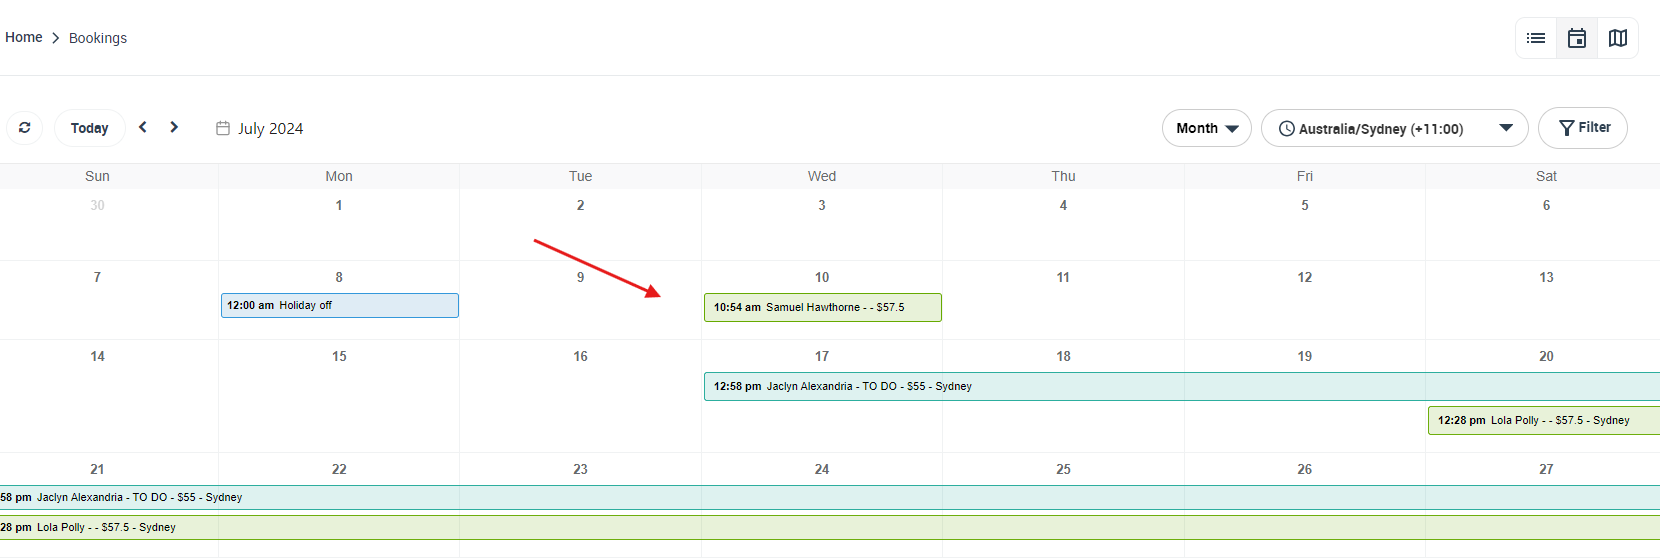
- A popup window will appear, click on “Add Booking”. You will be redirected to the create a new booking page, to enter your booking details and schedule a booking appointment.

How to add an unavailable time slot for a specific fieldworker or multiple fieldworkers on your calendar?
- On your calendar overview, click on the date you want to mark as unavailable for your fieldworker.
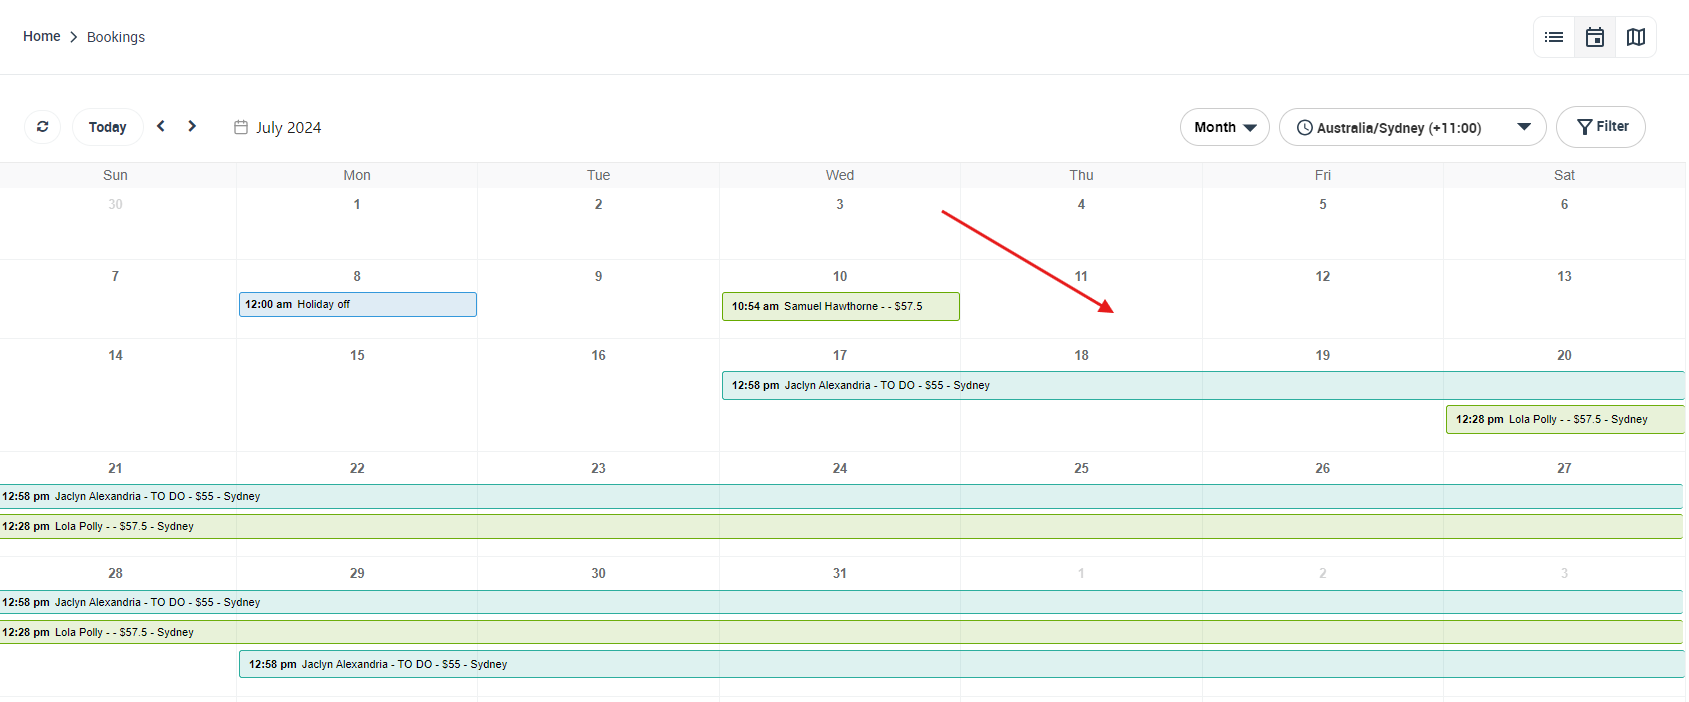
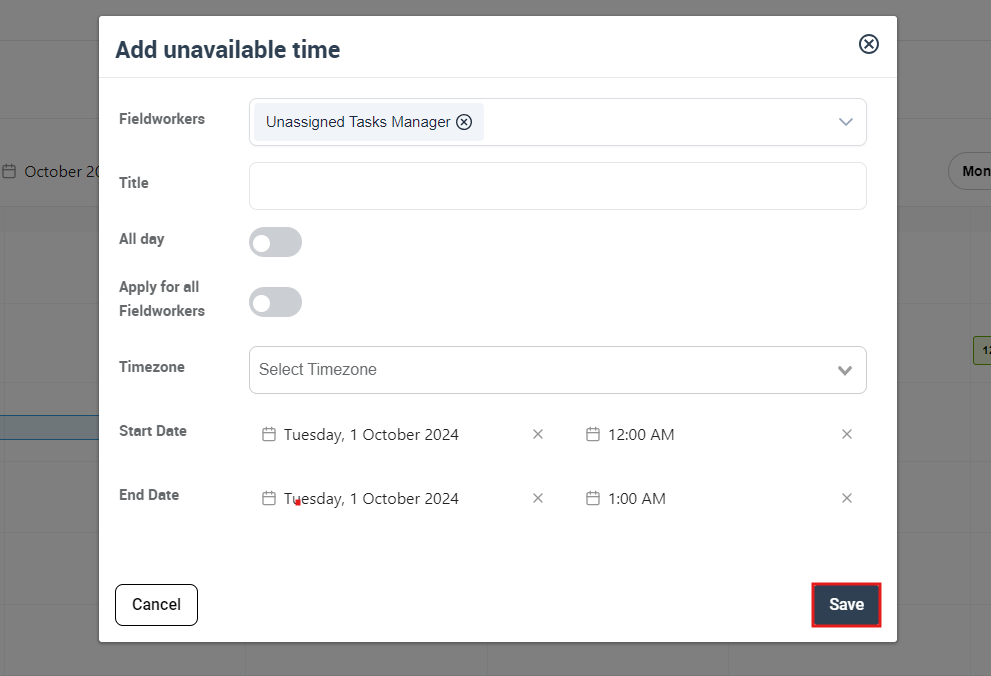
- A popup window will appear, click on “Add unavailable time”.
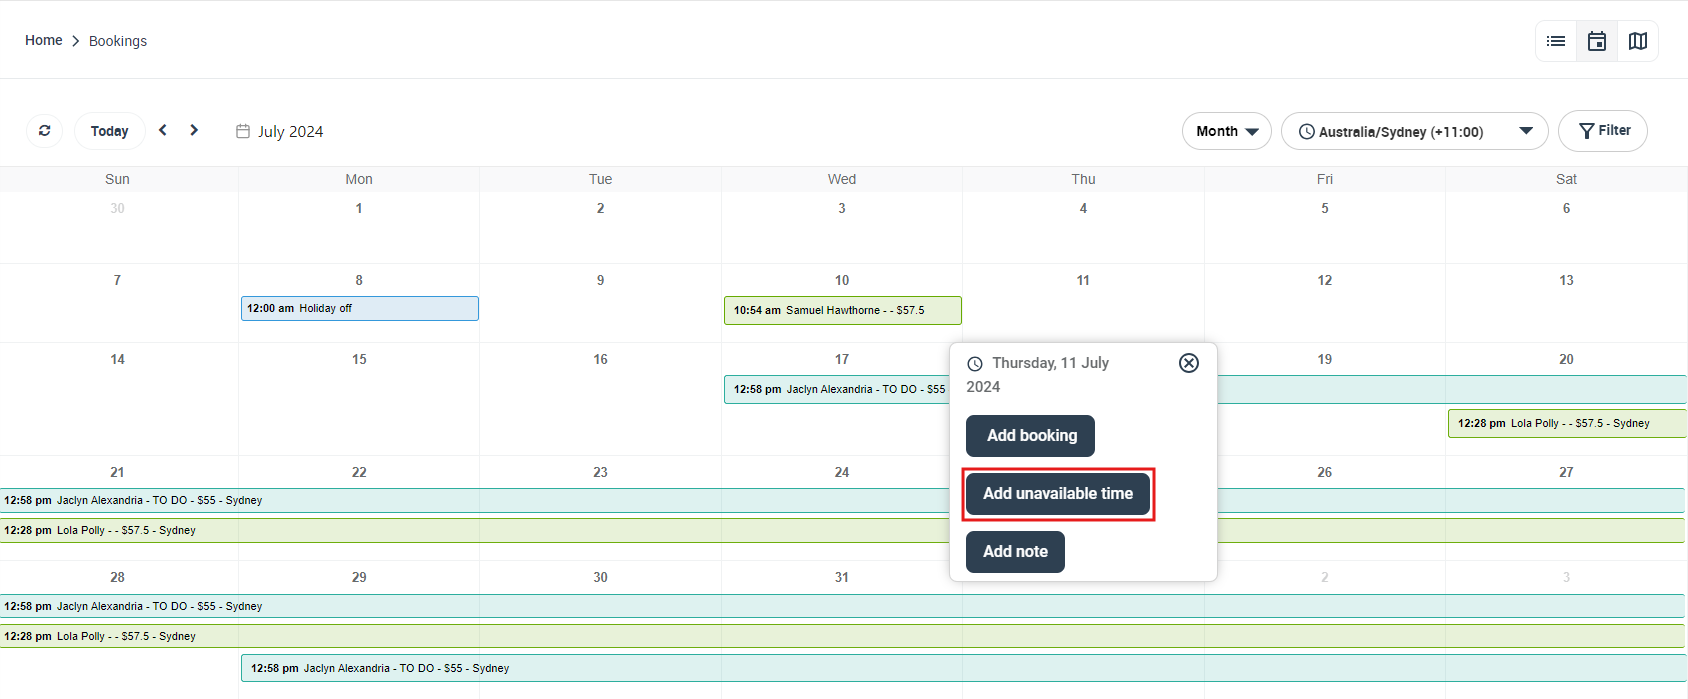
- Another pop-up window will appear to add all the details. Select a fieldworker from the dropdown list, enter the hours of the day the fieldworker will be unavailable, or you can switch the toggle button to ‘All day’ if the fieldworker will be unavailable all day.
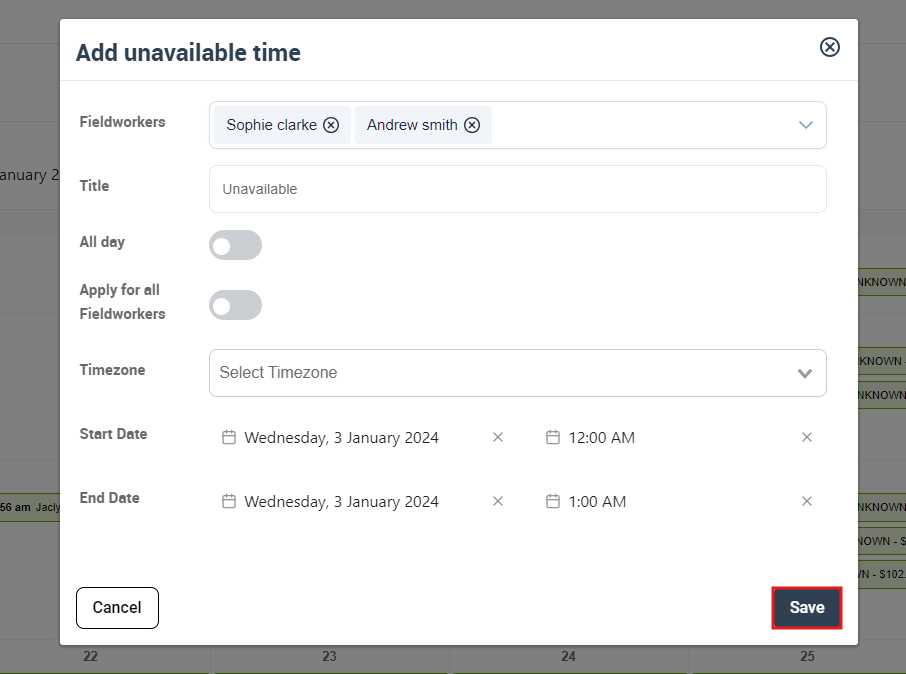
- Click “Save” to add the unavailable time event for your fieldworker to your calendar.
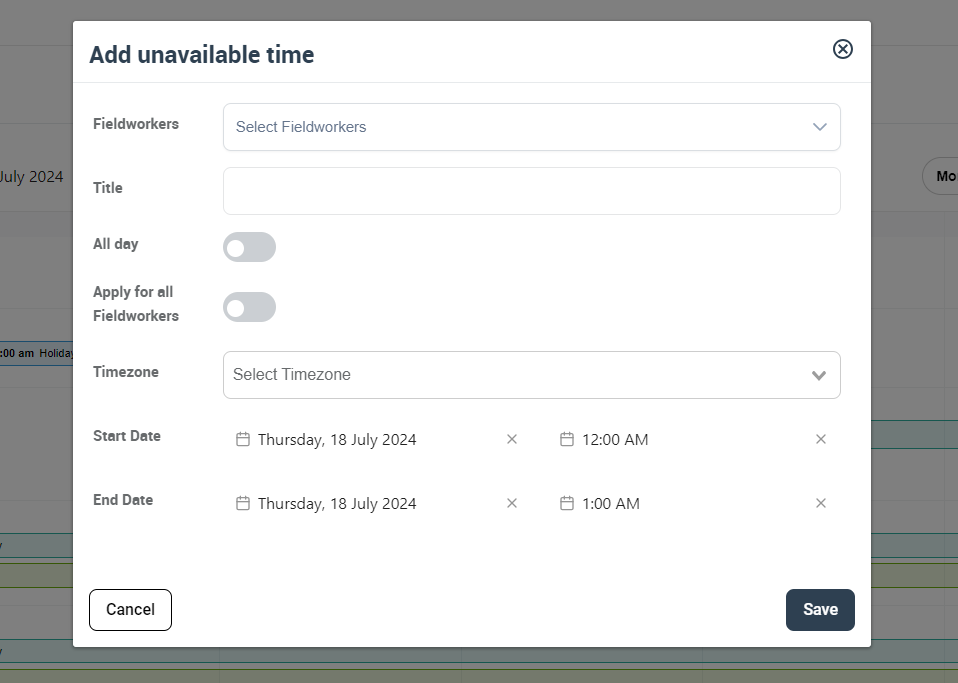
You can also add an unavailable event on the calendar for two fieldworkers or more. To do that:
- On your calendar overview, click on the date you wish to schedule an unavailable time slot or the day you wish to mark as unavailable for more than one fieldworker.

- A popup window will appear, click on “Add unavailable time”.

- Another pop-up window will appear to add all the details. Select the fieldworkers from the dropdown list, and enter the hours of the day the fieldworkers will be unavailable, so pick the time range, or you can switch the toggle button to ‘All day’ if the fieldworkers will be unavailable all day.
- Click “Save” to add the unavailable time for your fieldworkers on your calendar.
How to add an unavailable event to the calendar for your company?
You can add unavailable hours of the day for your company, which means no bookings will be scheduled during these hours, or you can add an unavailable day for your company. To do that:
- On your calendar overview, click on the date you want to mark unavailable hours, or the day you wish to mark as unavailable for your company.

- A popup window will appear, click on “Add unavailable time”.

- Another pop-up window will appear to add all the details. Select your general fieldworker from the dropdown list, as your general fieldworker calendar acts as the default calendar for your business. Enter the hours of the day your company will be unavailable, so pick the time range, or you can switch the toggle button to ‘All day’ if your company will be unavailable all day.
- Click “Save” to add the unavailable time for your company or business to your calendar.
How to change the appointment scheduled time in the day view?
You can easily change the scheduled time for your bookings. On your calendar overview, make sure it’s on the daily view. Click on the booking you wish to reschedule the time of, and on the same column, simply drag the booking to the other available time slot.
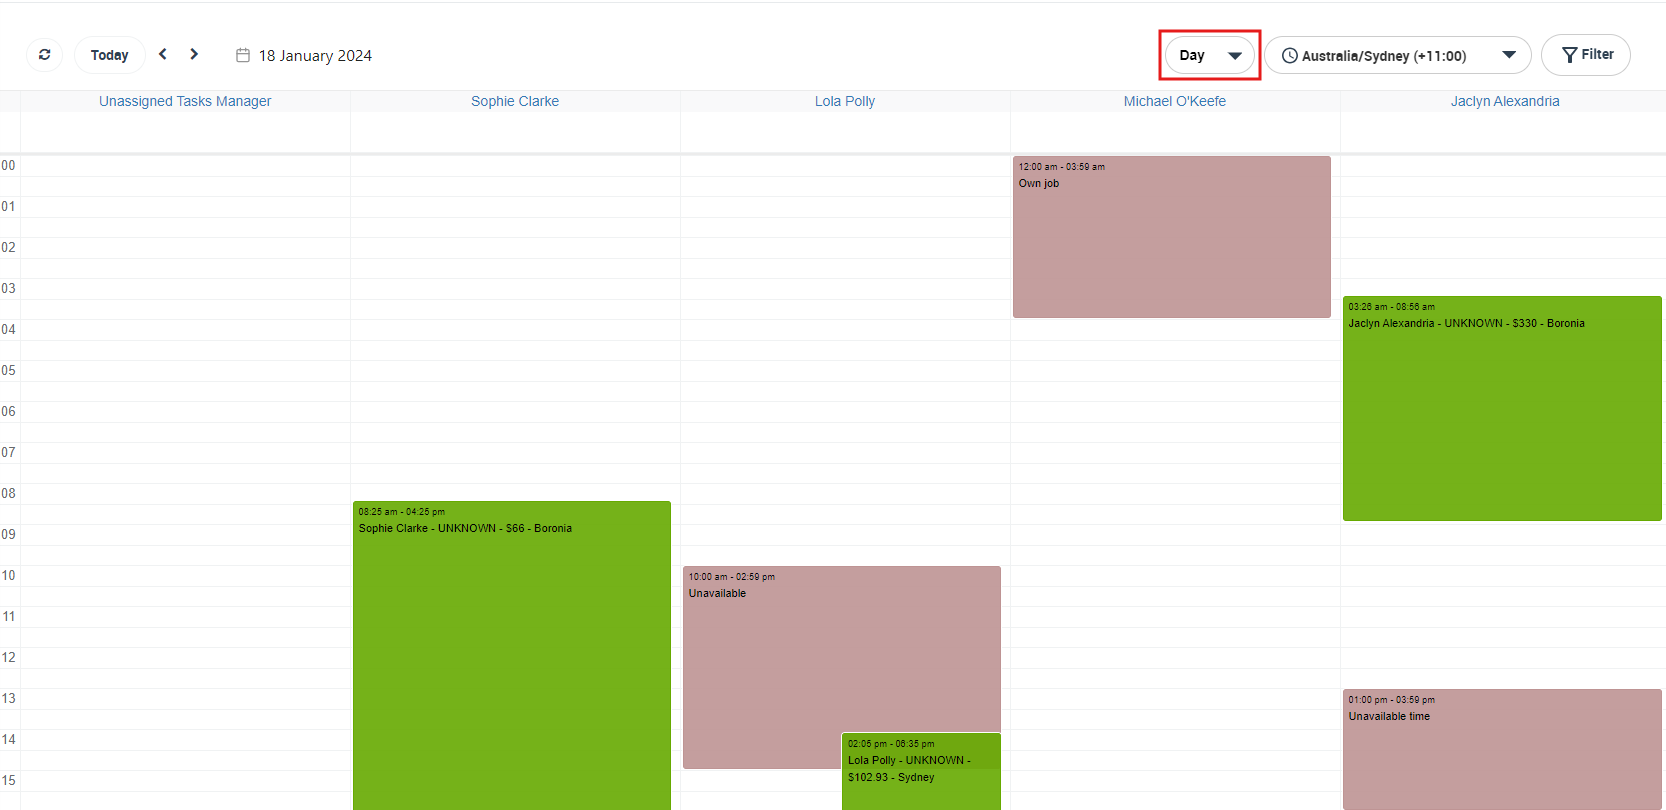
The booking will be rescheduled, and the calendar will be automatically updated.

Your customer will then receive an email, informing them that their booking has been rescheduled.
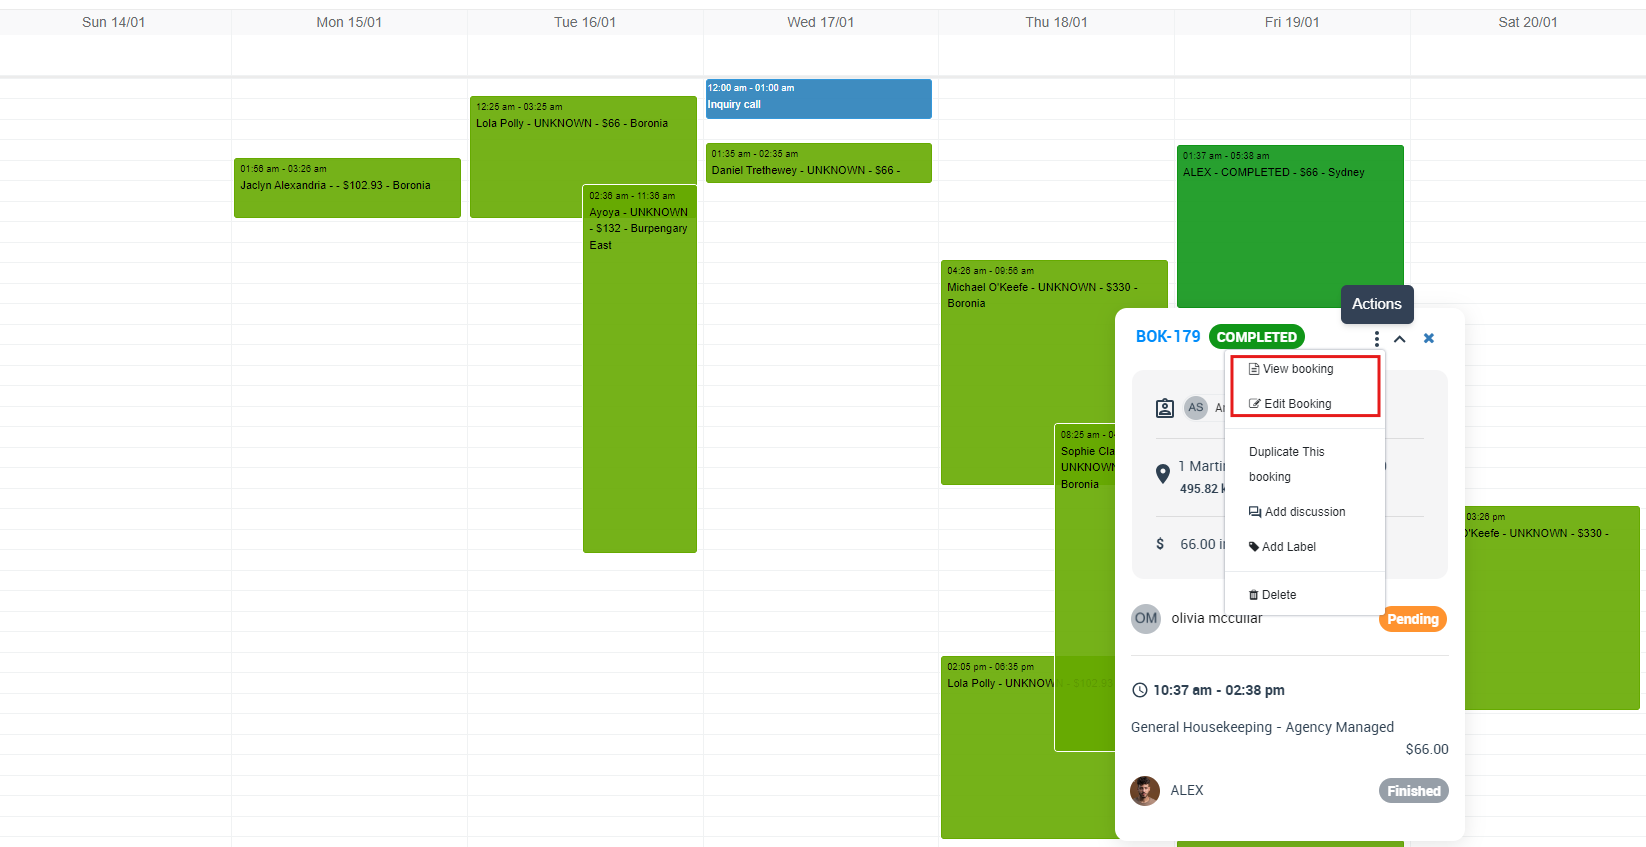
- To view the booking information on the calendar, simply click on the scheduled booking. A popup window will appear and all the booking details including the fieldworker assigned, the booking number, status, start and end time, the customer name, address, the service booked, and the price of the booking.
- From “Actions” button you can also click on ‘Edit booking’, to be redirected to the edit booking page, to edit any of the booking details. Or, click on ‘View booking’ to be redirected to the booking view page.
How to change an assigned fieldworker in day view by dragging and dropping the booking between fieldworkers?
You can easily reassign a booking to a different fieldworker directly from your calendar. To do that:
- on your calendar overview, make sure you have the day view selected. You will be able to view all fieldworker’s assigned bookings on the current day.
- To change the assigned fieldworker to a booking to a different fieldworker, click on the scheduled booking, drag, and place the booking on the column of your different selected fieldworker.
- The fieldworker must be available during the booking scheduled hours to accept the booking.
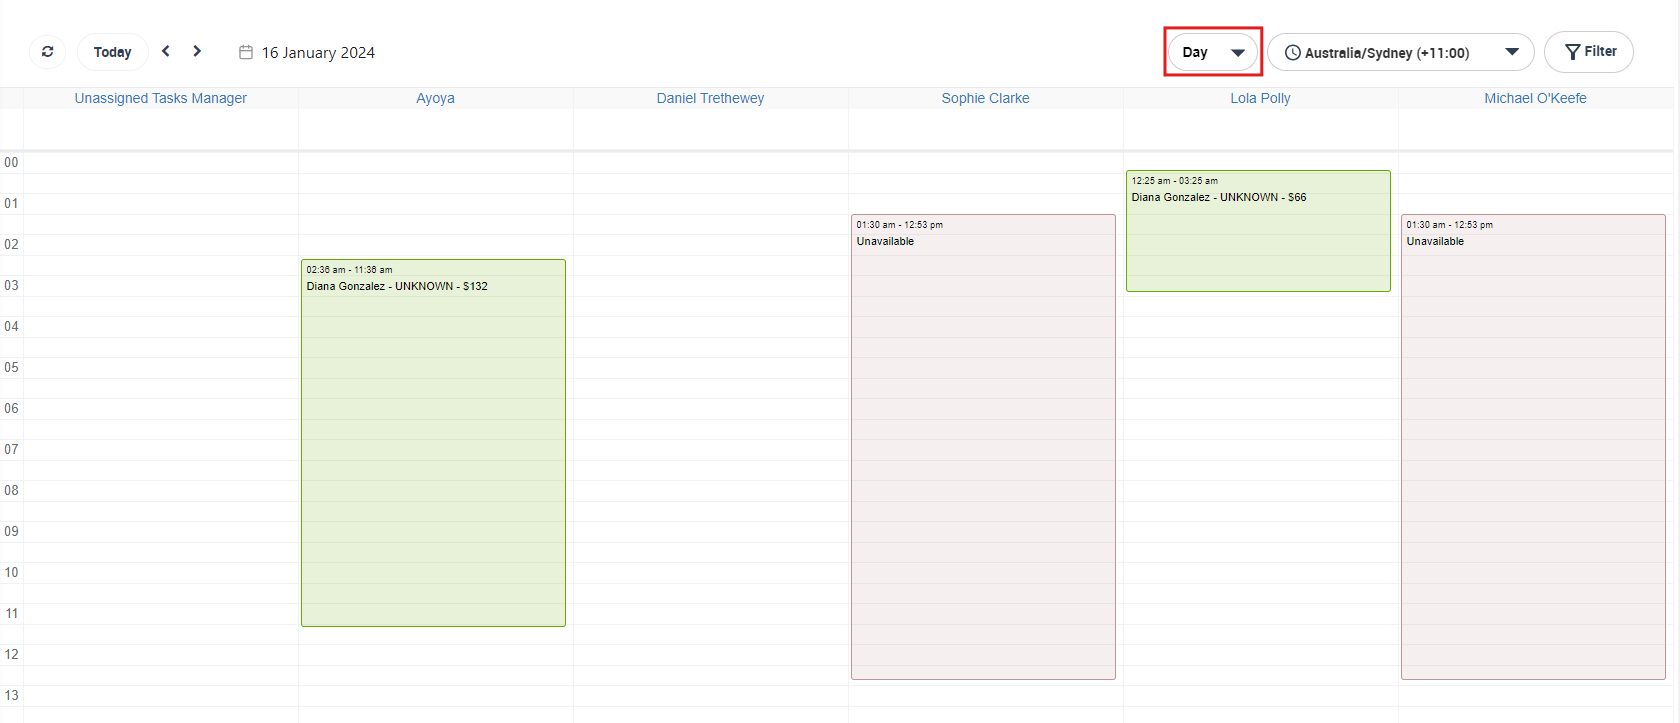
- After dragging and dropping the scheduled booking appointment to the other fieldworker’s column, the booking will automatically be reassigned to the other fieldworker, and the calendar will be updated.
- For the booking to be reassigned successfully, the selected fieldworker must be available during the scheduled booking hours and must be able to provide the selected service for this booking.

How to view unavailable time for each fieldworker in day view?
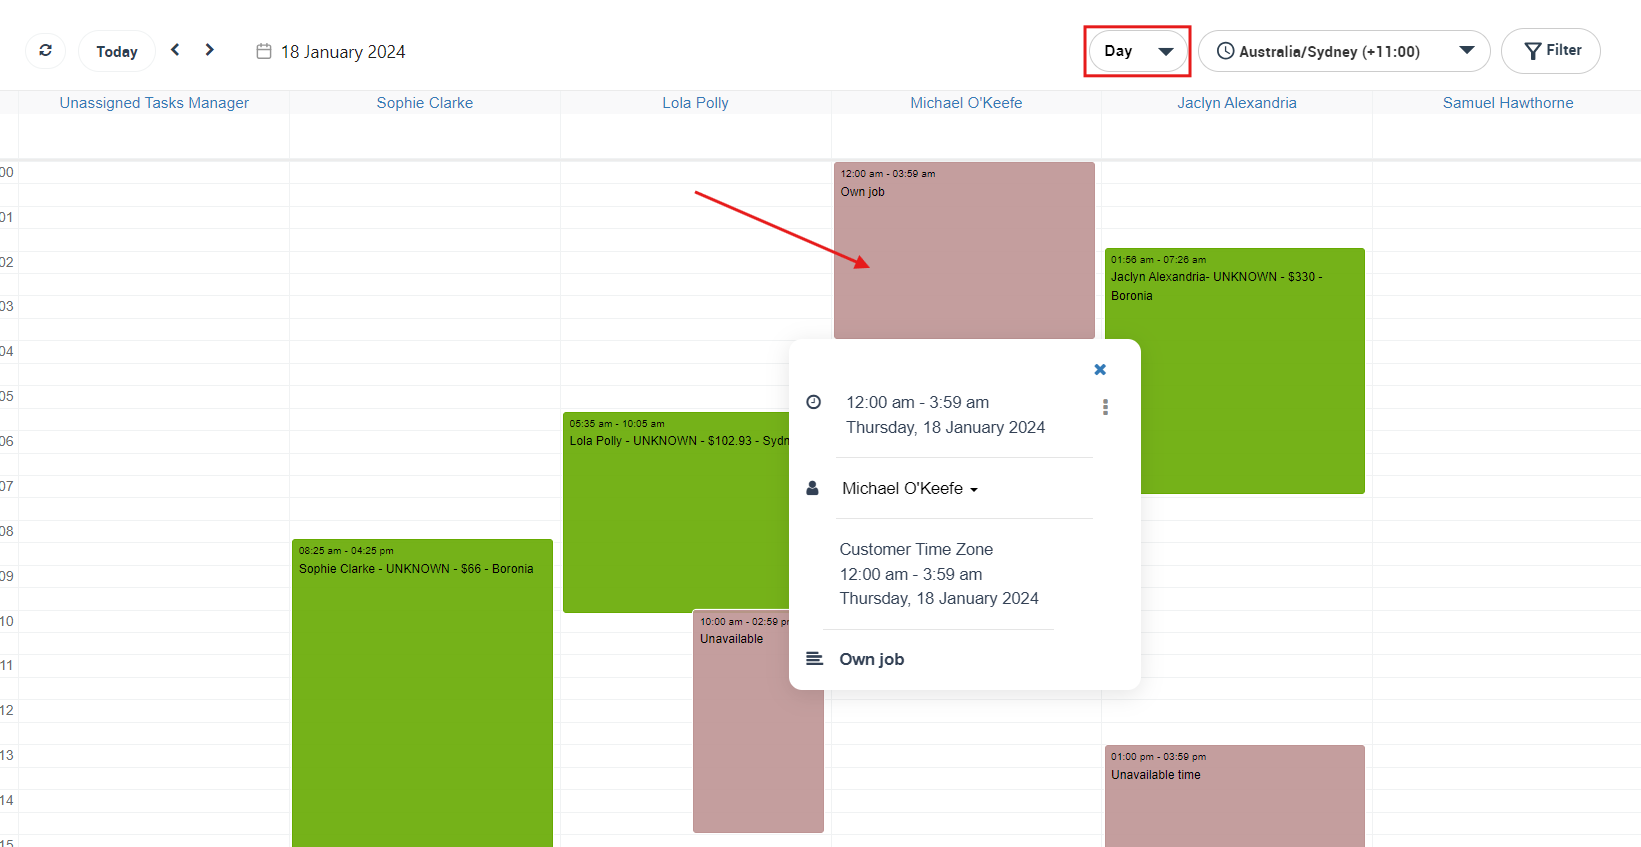
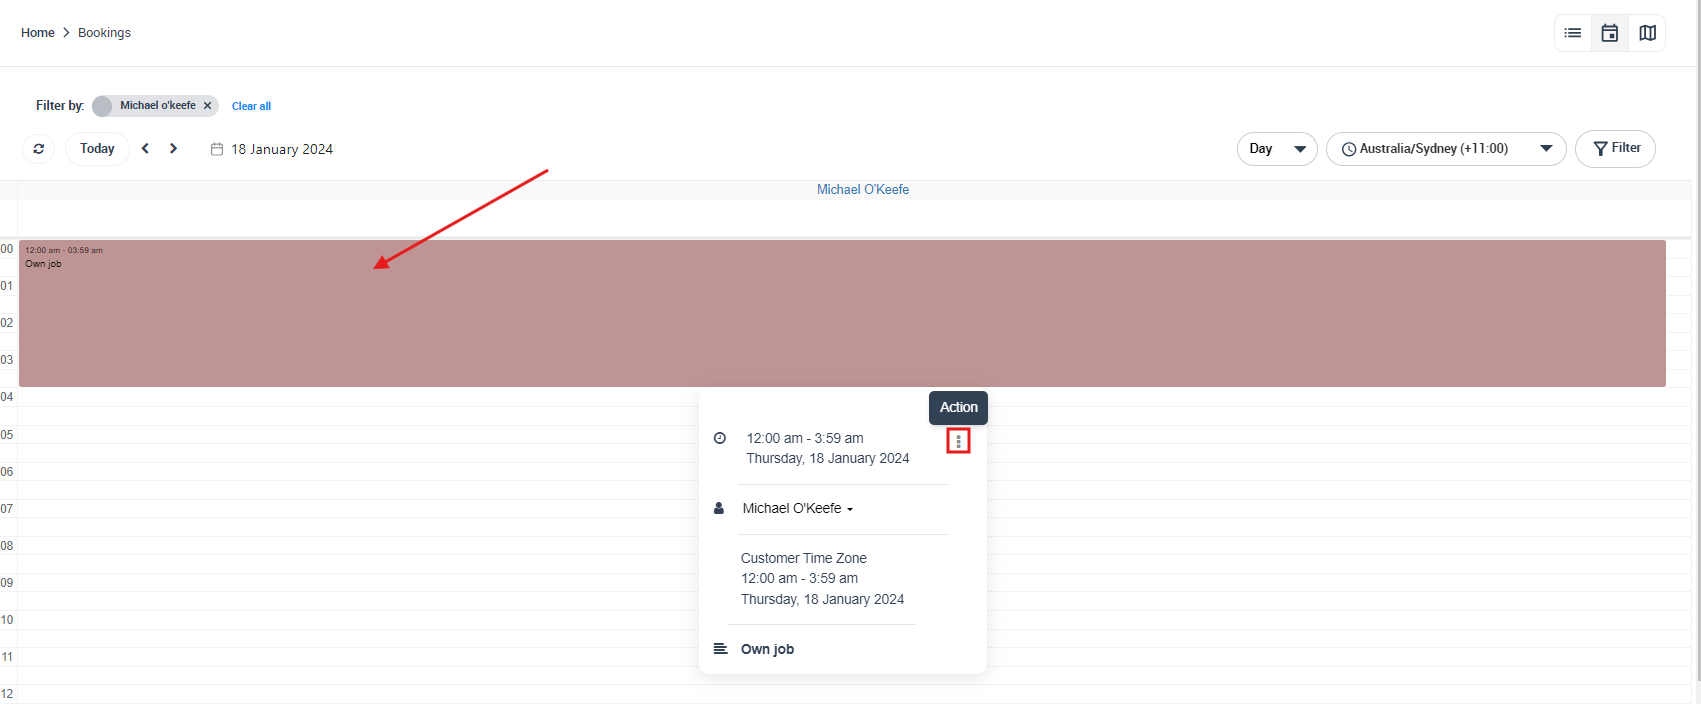
- You can view unavailable time for each fieldworker in the day view, all unavailable times will be listed on the calendar under each fieldworker’s column, click on the highlighted time slot to view more details about the unavailable time for each fieldworker. Upon clicking on it, a popup window will appear, viewing the unavailable times, and date, the reason if available, and the day the added unavailable hours were created.
- As an admin user, you have the ability to ‘edit’ or ‘delete’ it.
How to view unavailable time for each fieldworker when filtering by a fieldworker?
On your calendar, you can filter which bookings you only want to display. To do that:
- From your calendar day view, on the top right side of the page click on “Filter”.
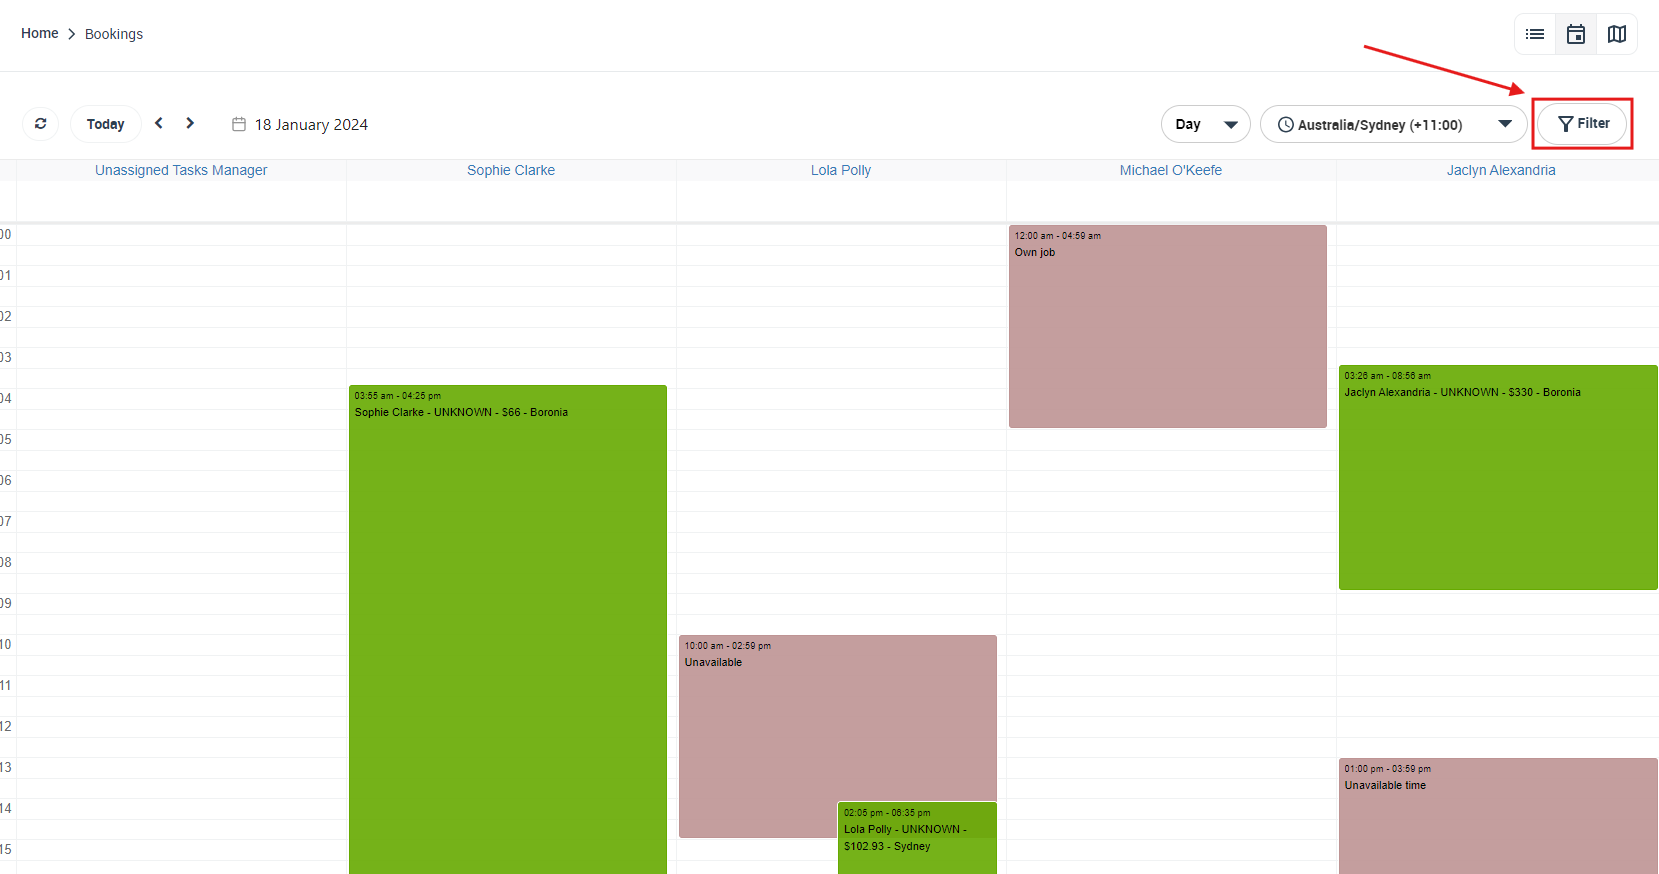
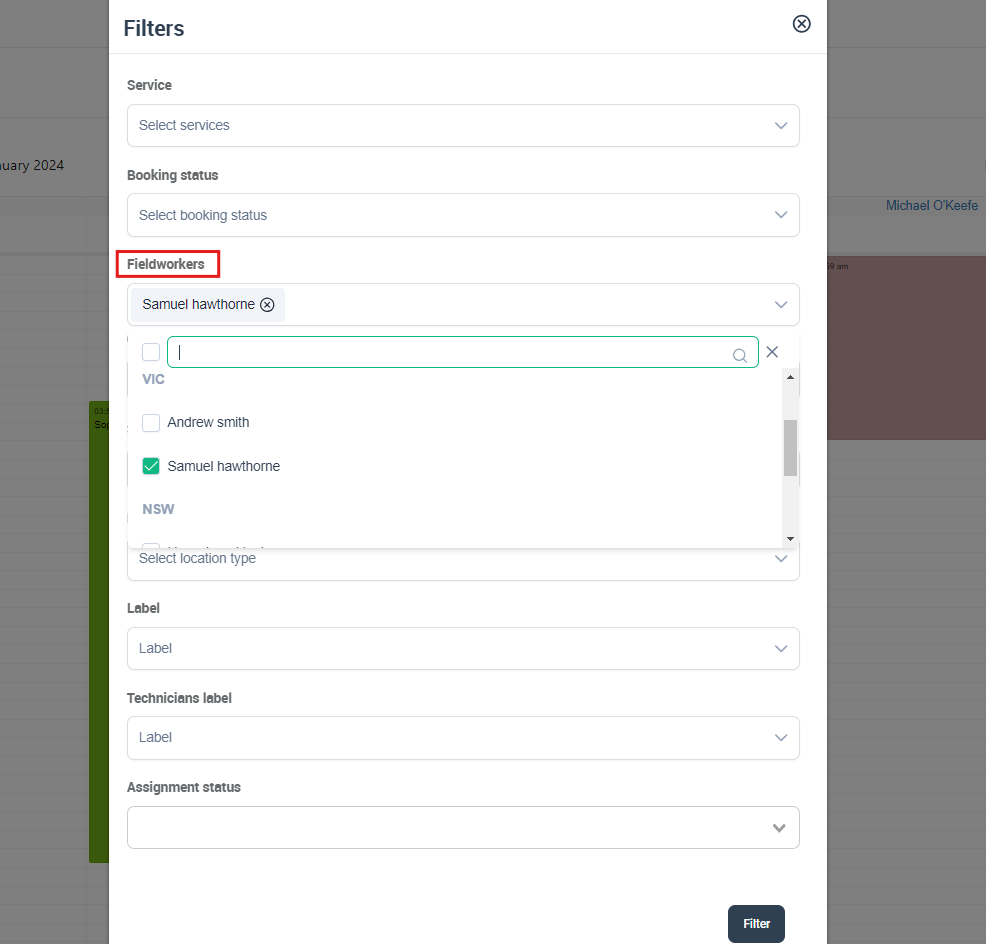
- A popup window will appear, select the fieldworker you want to view their unavailable times, you can search by typing in their name, or scrolling down through the dropdown list. After selecting a fieldworker, click “Filter”.
- You will be able to view all the unavailable hours of the day for the fieldworker you have selected.
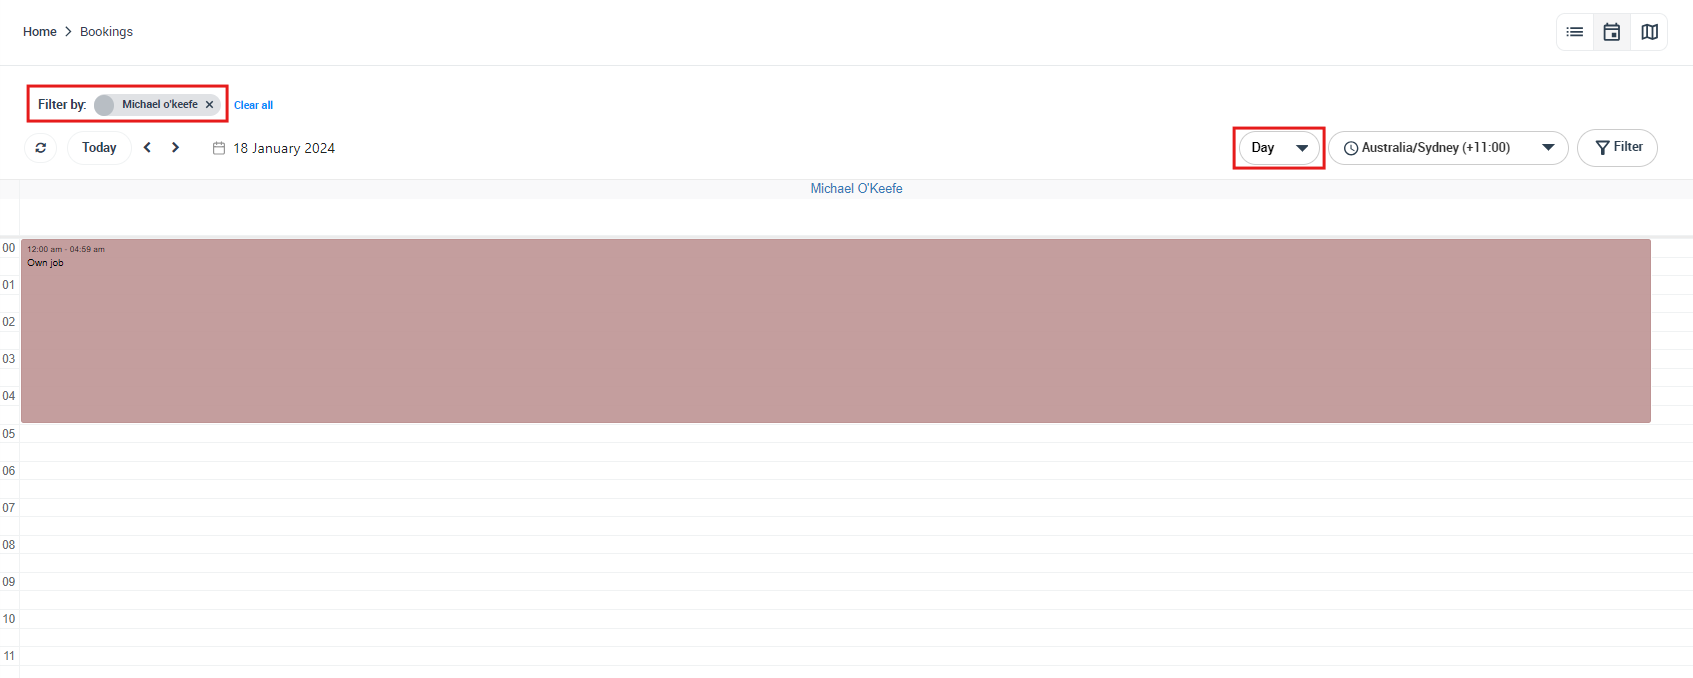
- Click on the highlighted unavailable hours to view more details. Upon clicking on it, a popup window will appear including the full date and day hours when the fieldworker will be unavailable for bookings, the reason the fieldworker will be unavailable during these hours, and the date the unavailable time was created. As an admin user, you are able to ‘edit’ or ‘delete’ it from the “Actions” button.
How to view scheduled bookings on a specific date?
You can pick a specific date to view all bookings held on that day. To do that:
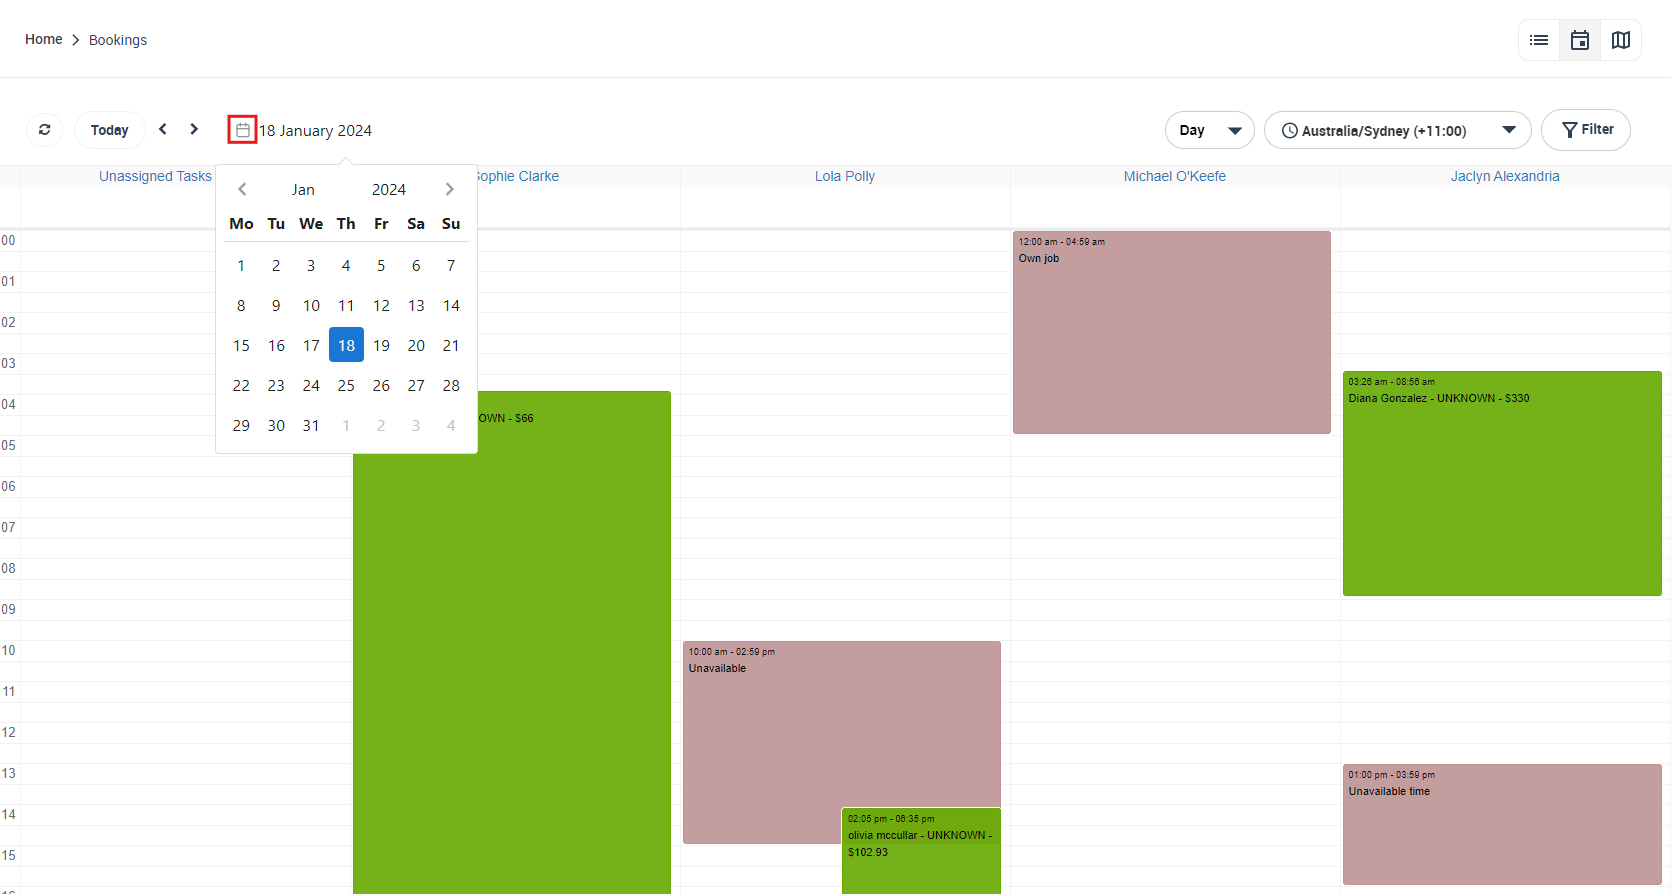
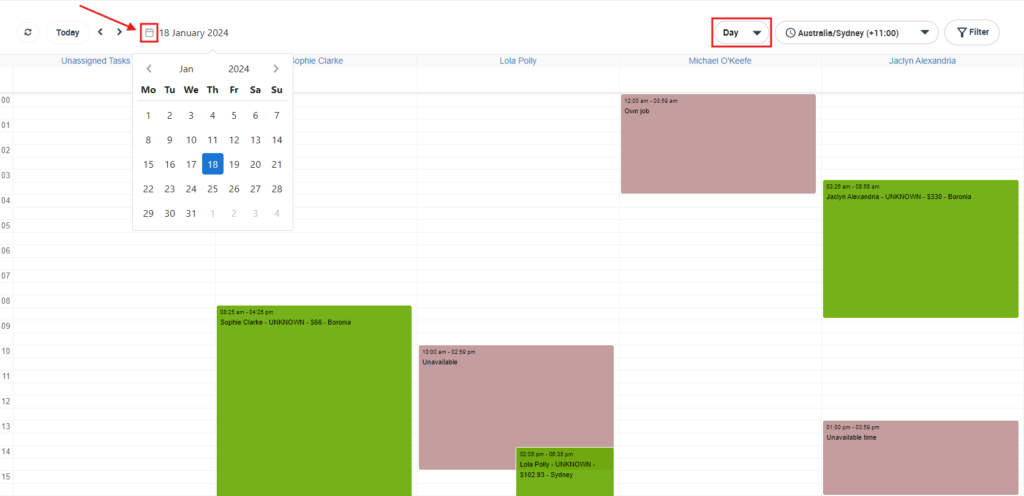
- On your calendar on the day view, click on the ‘calendar’ icon, and use the small arrows to go forward or backward a month, you can even click on the year to pick a specific year, then pick the day you want to view the scheduled bookings on.
- Your calendar will view all bookings scheduled on the date you have picked and each fieldworker assigned with bookings on that day.
How to view a Fieldworker’s Calendar?
A fieldworker’s calendar shows their availability and bookings. You can view any fieldworker’s calendar easily from the ‘Fieldworkers’ page. To do this:
- From the main menu, go to “Fieldworkers”.
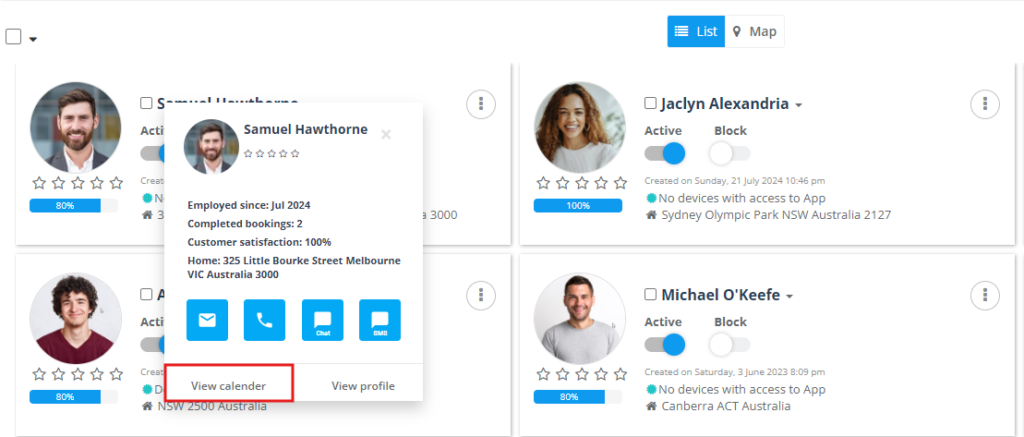
- On the profile of the fieldworker whose calendar you want to view, hover over their display name.
- Click on “View Calendar”.
How to directly contact a fieldworker from the calendar?
You can contact your fieldworkers directly from your OctopusPro calendar. To do that,
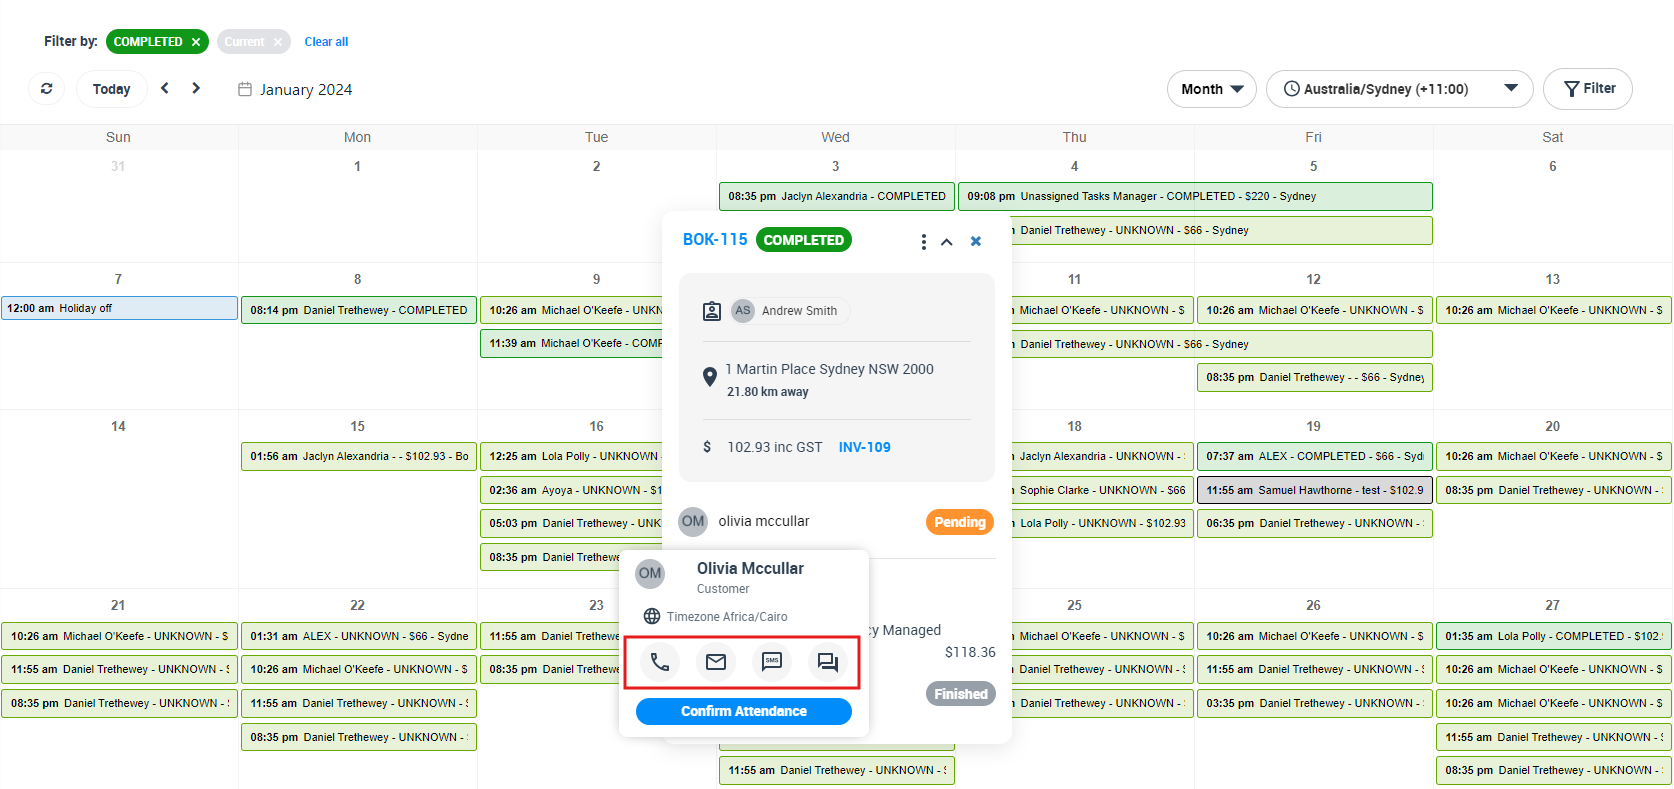
- go to your calendar and click on any booking, you will be able to view the fieldworker assigned to the selected booking, click on the fieldworker’s display name, and a popup window will appear, including the fieldworker’s details, you can view their calendar, or you can view their profile.
- From the calendar popup, you can also contact your fieldworker via SMS or Email or even directly call them.
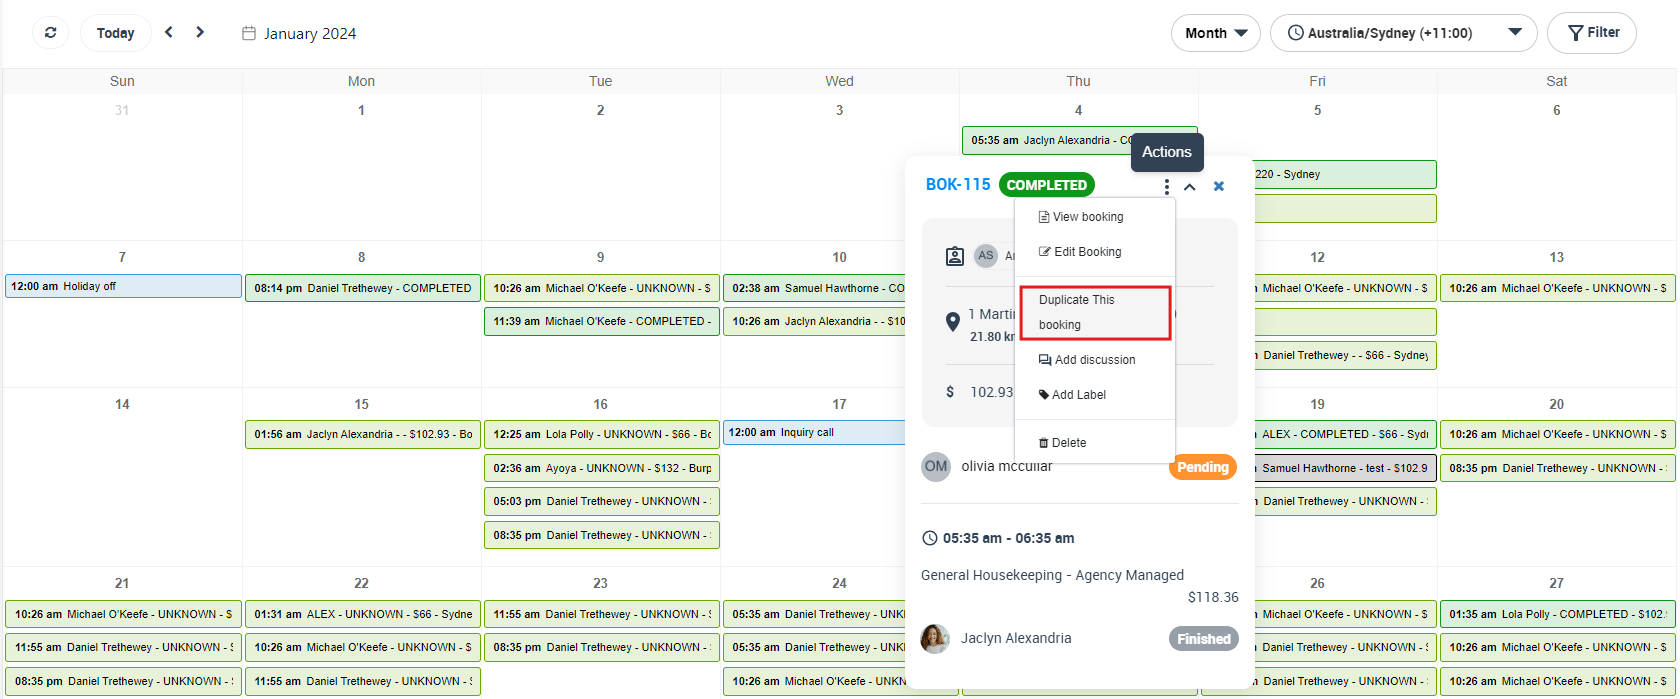
How to duplicate a booking directly from the calendar?
You can duplicate bookings directly from your calendar. To do that:
- go to your calendar, click on any booking, then click on the “Actions” button on the calendar pop-up, to duplicate the selected booking, Select “Duplicate this booking”.
- Upon clicking on “Duplicate this booking”, you will be redirected to the add a new booking page, to verify the booking details, and click on save to duplicate the booking.
How to add a label to a booking from the calendar?
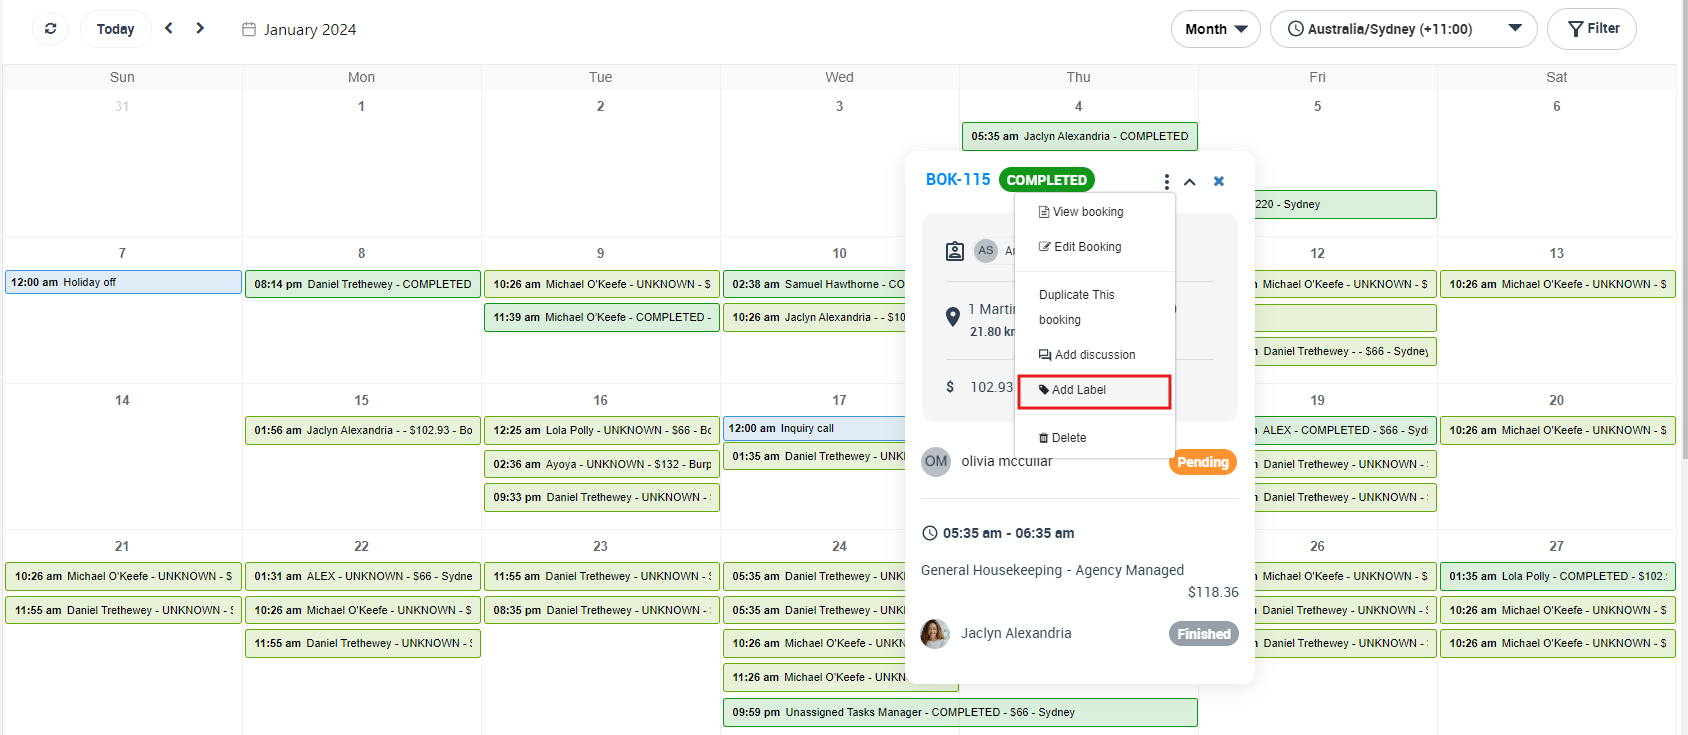
You can add labels to your bookings directly from the calendar. To do that:
- go to your calendar, click on your desired booking, then click on the “Actions” button from your calendar popup, to add a label to the selected booking, click on “Add label”.
- A popup window will appear, you can add a label to the booking by selecting one from your existing labels or create a new one by clicking on “Add Label”.
How to filter bookings on your calendar by service?
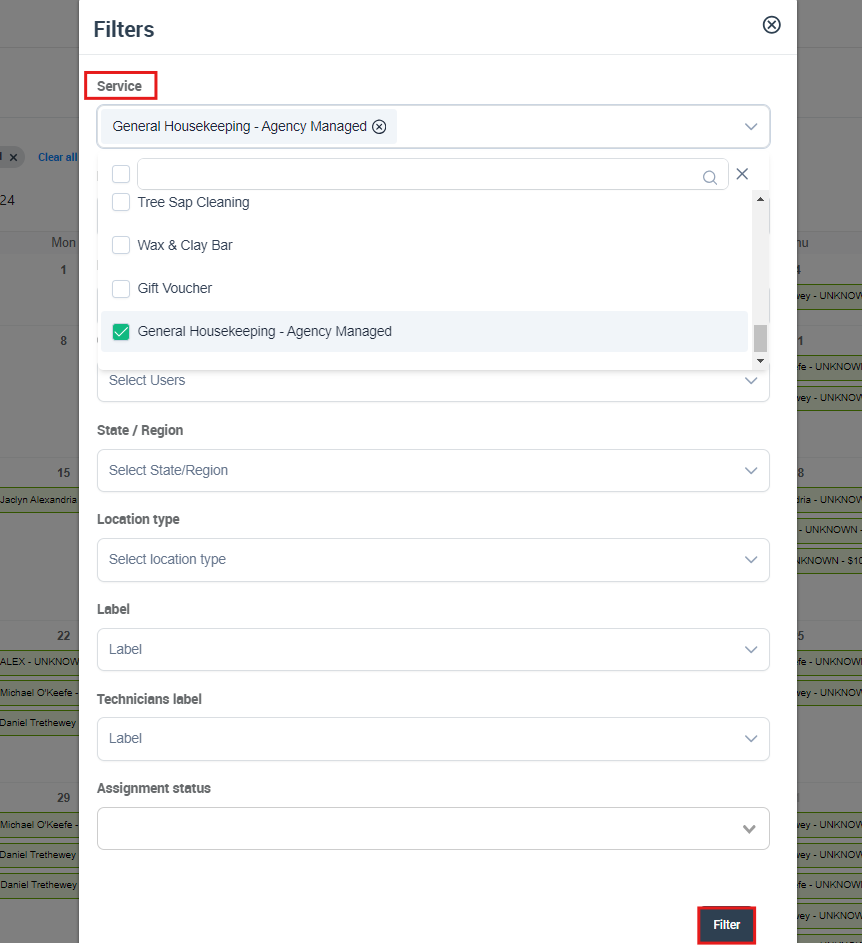
On your calendar, you can filter the displayed bookings by services. To do that:
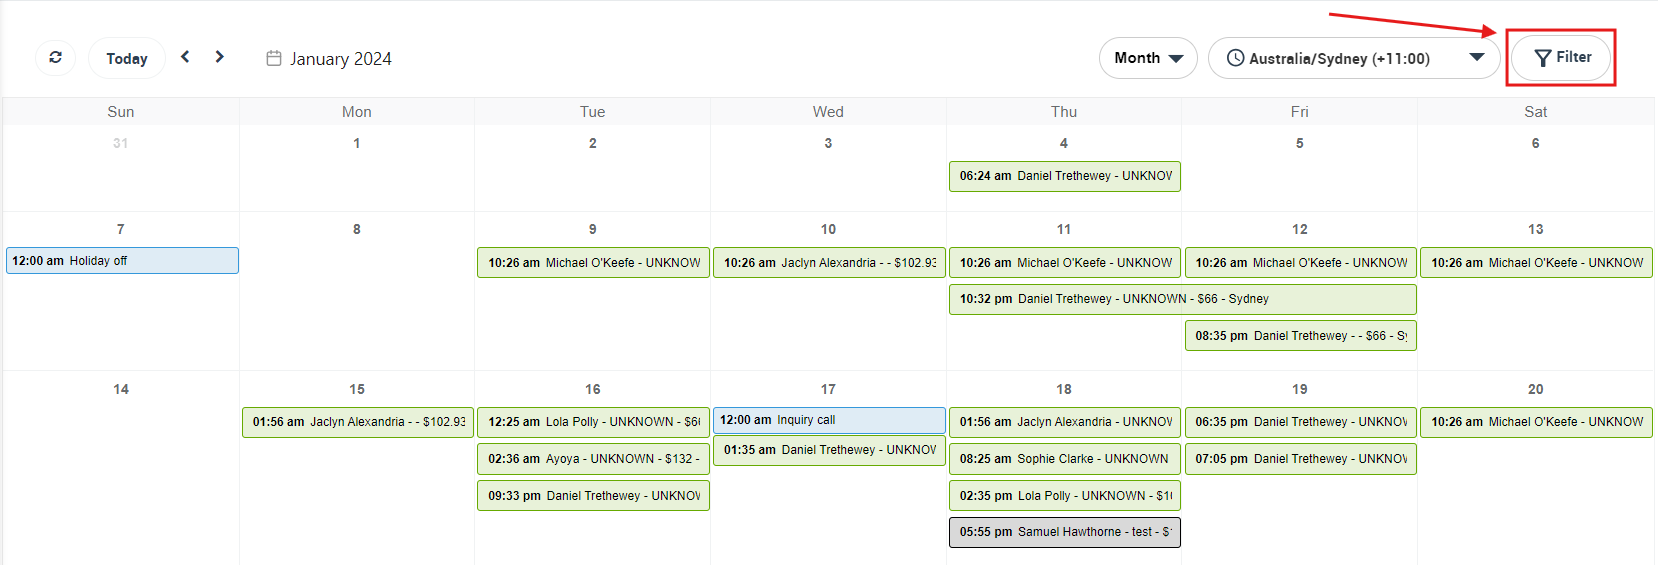
- from your calendar overview, on the top right side of the page click on “Filters”.
- A popup window will appear, select the service from the dropdown list. For example, if you want to display on your calendar only bookings with the selected service “General Housekeeping”, select the service General Housekeeping. Then click “Filter”.
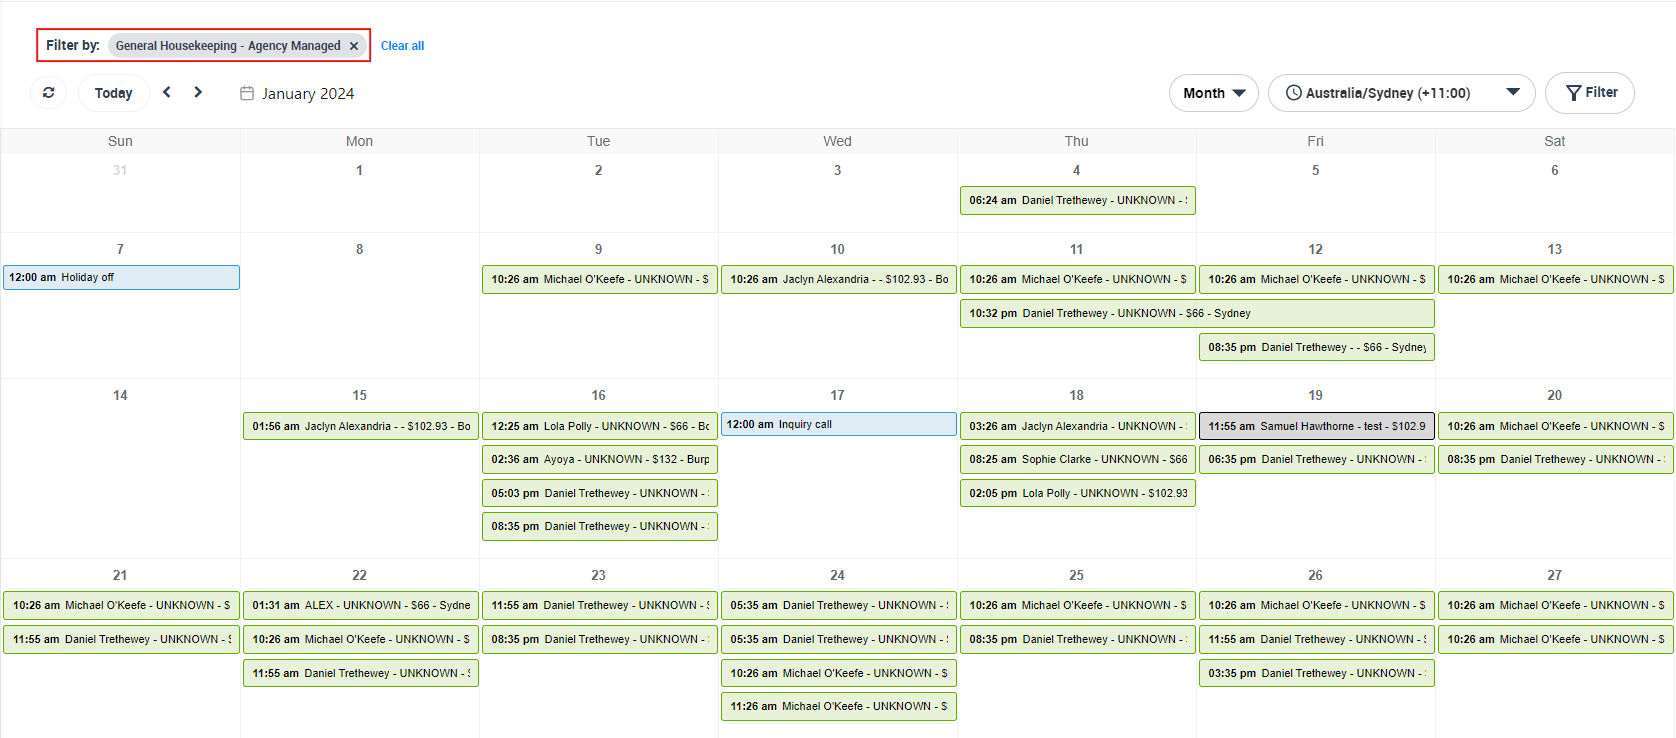
- Your calendar will only display bookings this month with selected service “General Housekeeping”
- To view the details of any booking, simply click on it, and a popup window will appear including all the booking details. Click on the ‘Actions’ button and select “Edit booking” to be redirected to the edit booking page, to edit any of the booking details. Or, click on “View booking” to be redirected to the booking view page
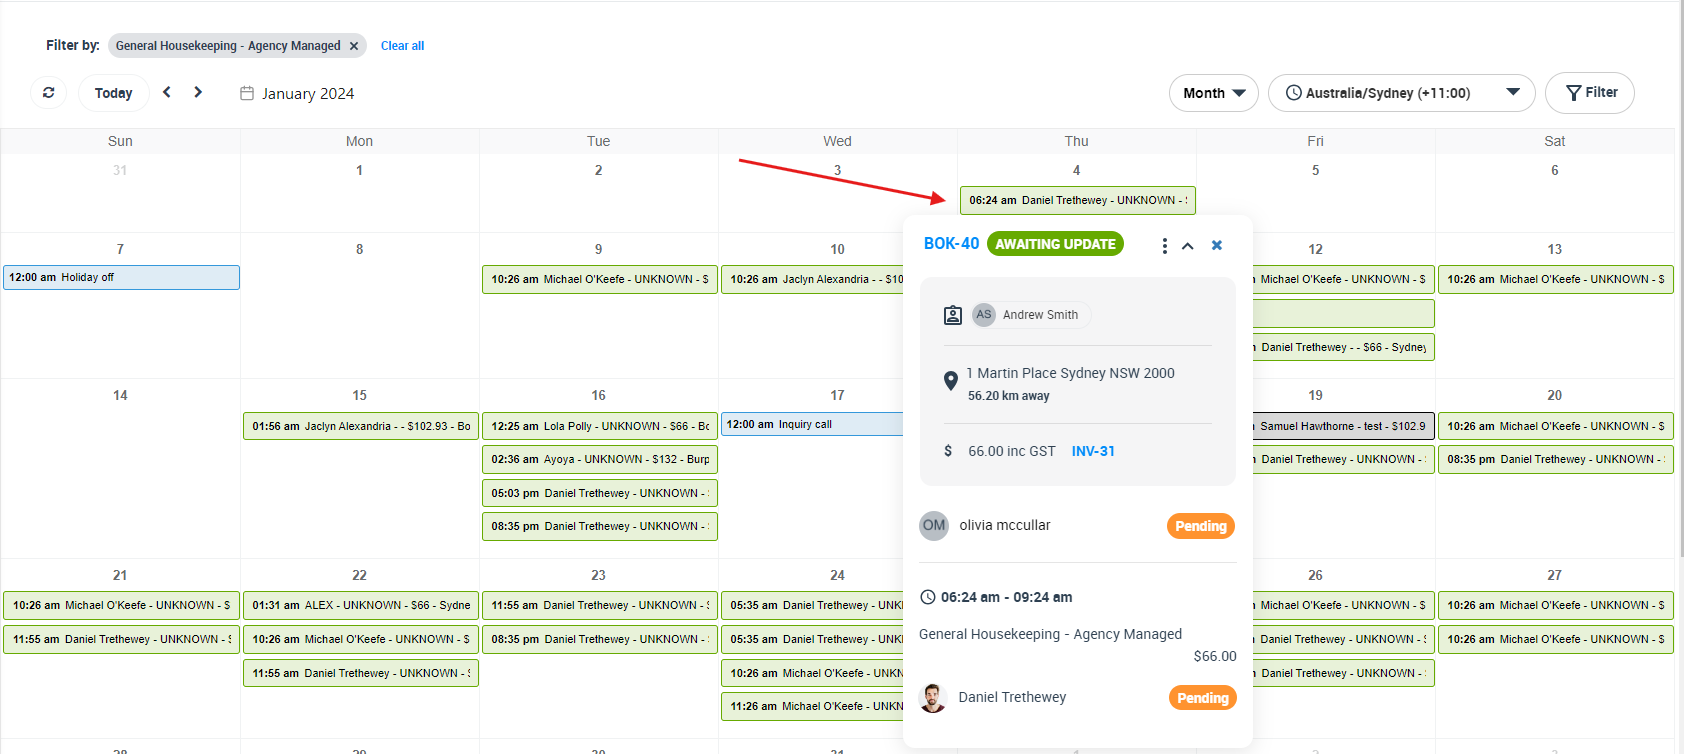
- You can also select to filter by one service or more. After clicking on “Filter”.
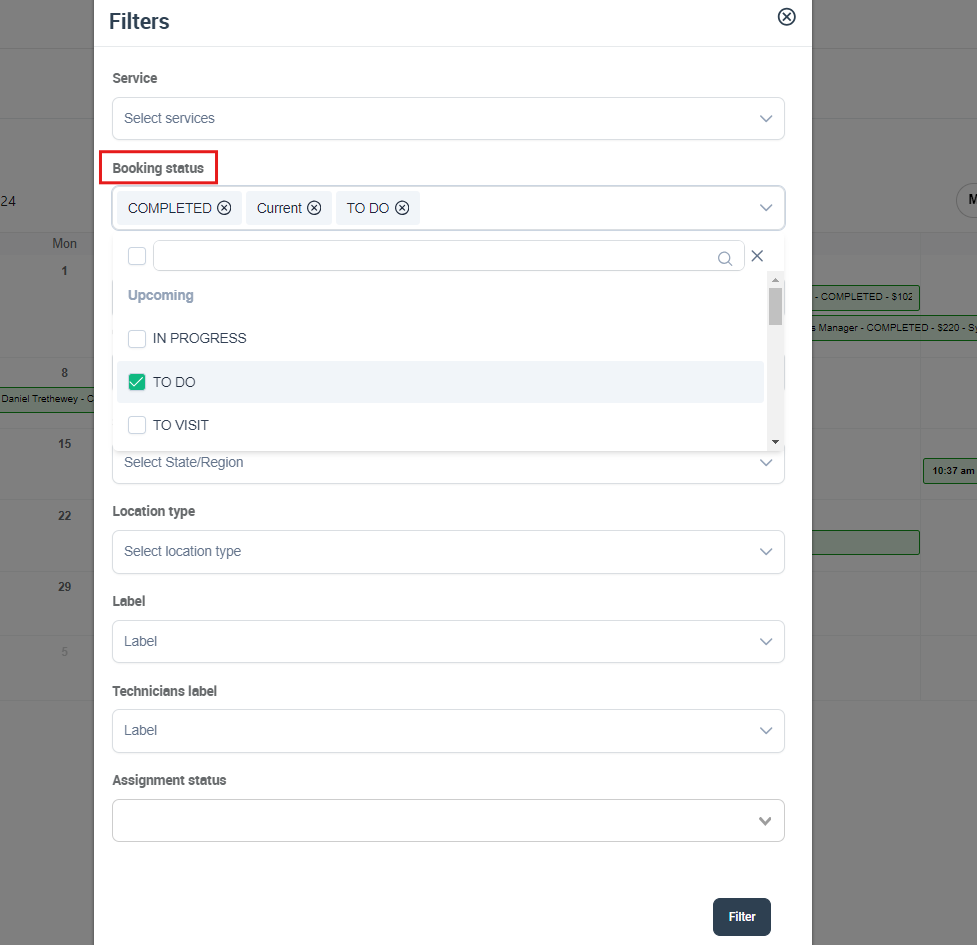
How to filter bookings on your calendar by booking status?
On your calendar, you can filter the displayed bookings by status. To do that:
- From your calendar overview, on the top right side of the page click on “Filters”.
- A popup window will appear, select the booking status from the dropdown list. For example, if you want to display on your calendar only bookings that are completed, select the booking status COMPLETED. Then click ‘Filter’.
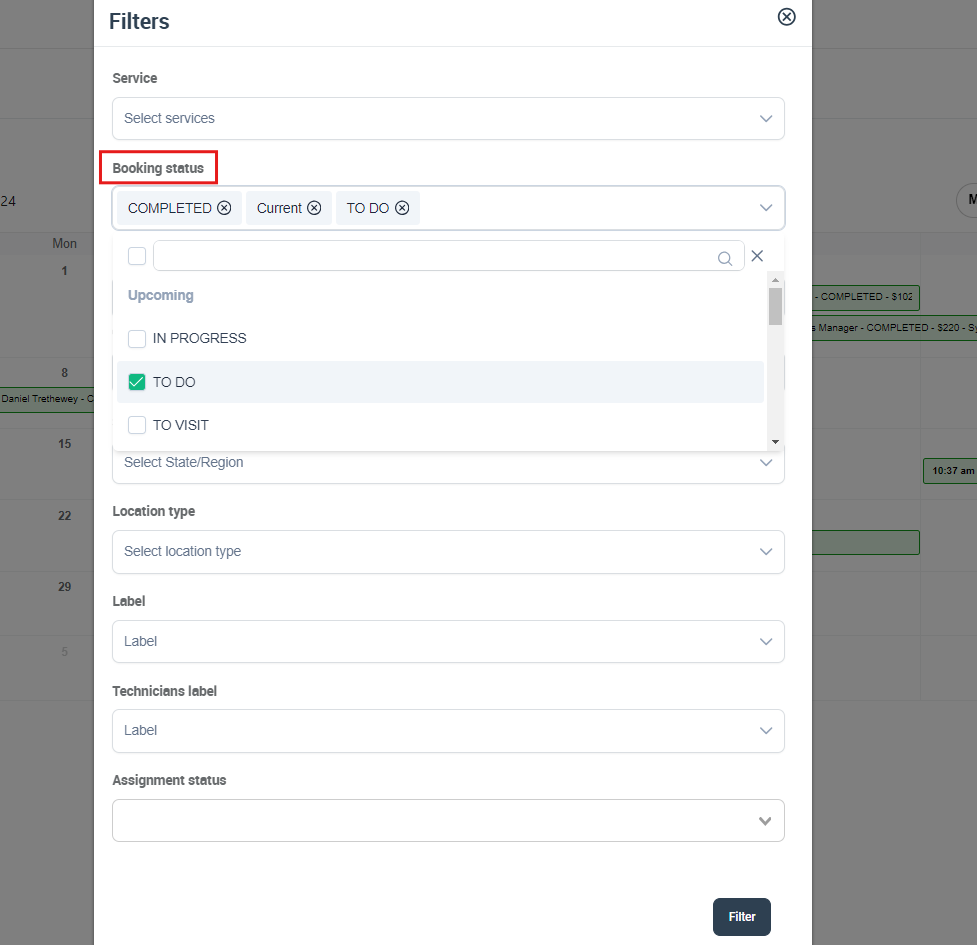
- Your calendar will only display bookings with the booking status: COMPLETED.
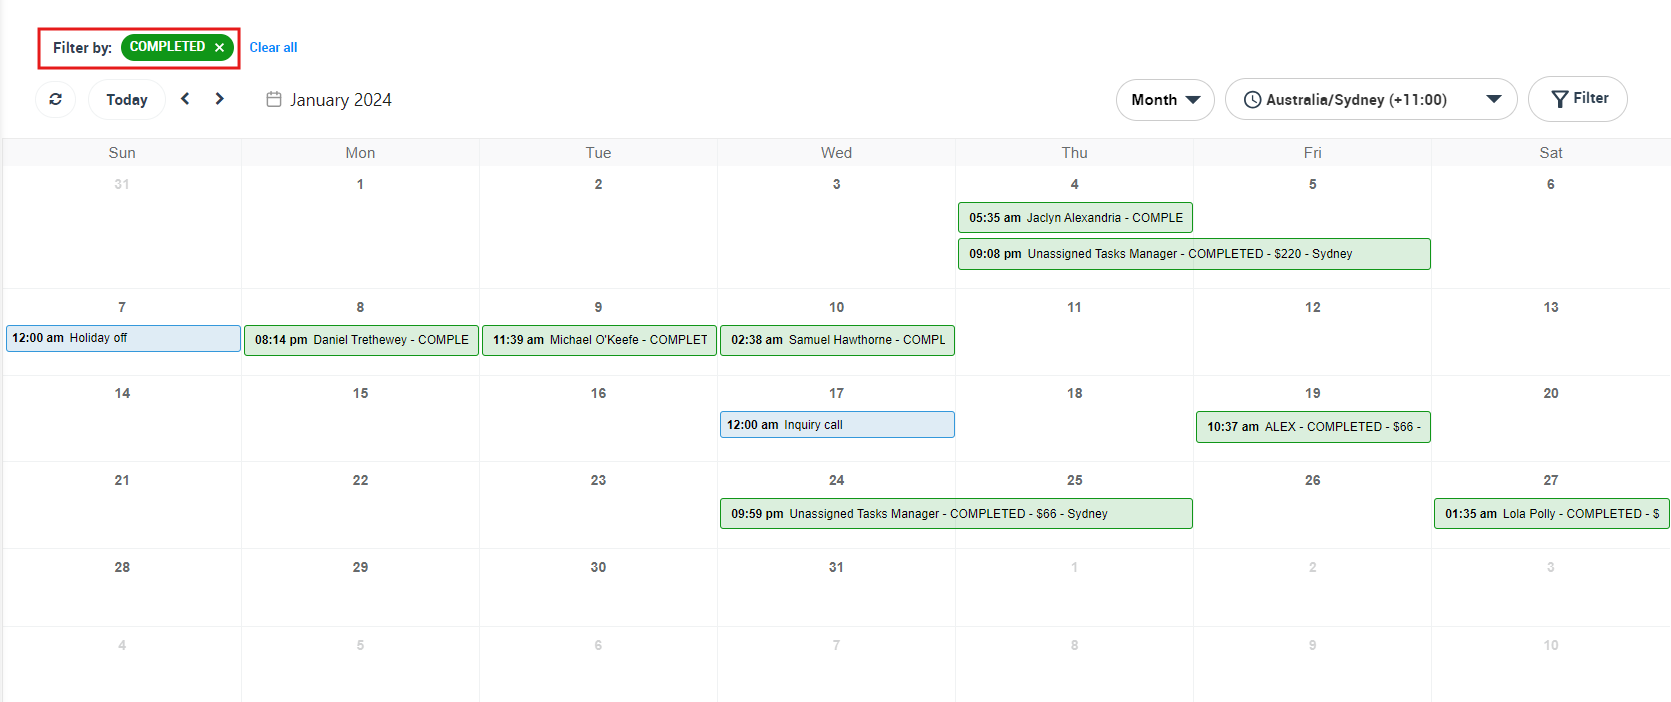
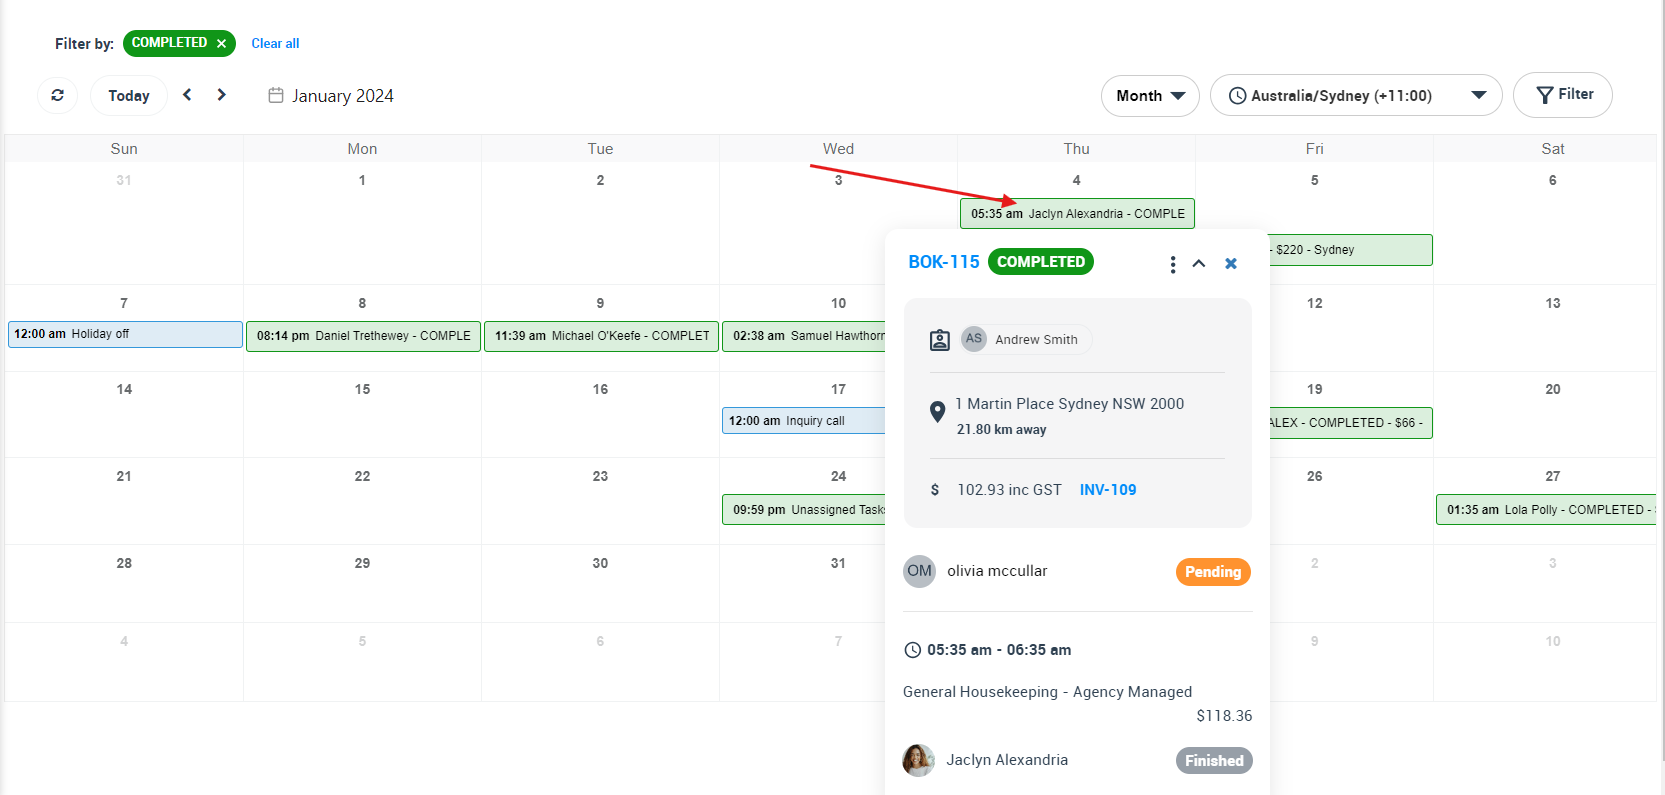
- To view the details of any booking, simply click on it, and a popup window will appear including all the booking details. Click on ‘Actions’ button and select “Edit booking” to be redirected to the edit booking page, to edit any of the booking details. Or, click on “View booking” to be redirected to the booking view page.
- You can also pick more than one booking status. So your calendar will filter all the displayed bookings with the statuses you have selected.
How to filter bookings on your calendar by location?
- On your calendar, you can filter the displayed bookings by location. To do that, from your calendar overview, on the top right side of the page click on “Filters”.
- A popup window will appear, select the ‘State/Region’ and ‘Location type’, to filter the displayed bookings on your calendar to bookings that only take place at the selected location.
- So for example, if you want to limit the displayed bookings with locations set in Sydney, select it from the drop-down list. You can pick more than one state or more than one city. Then click “Filter”.
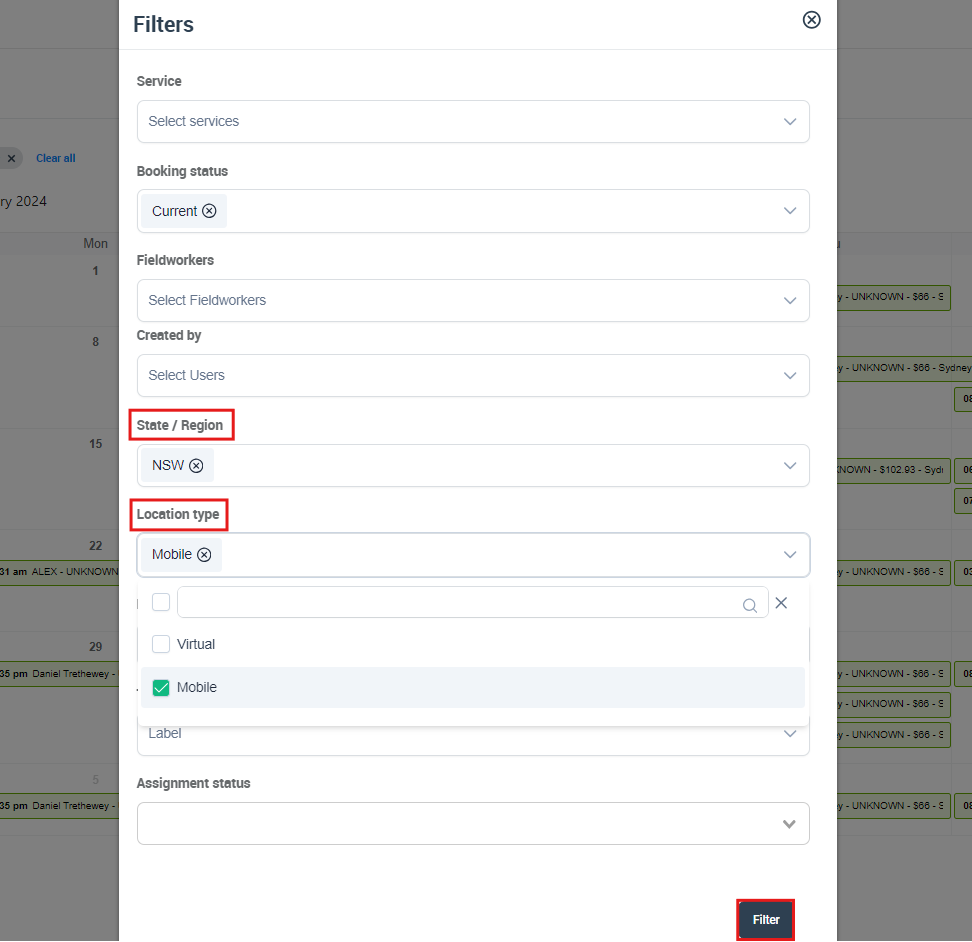
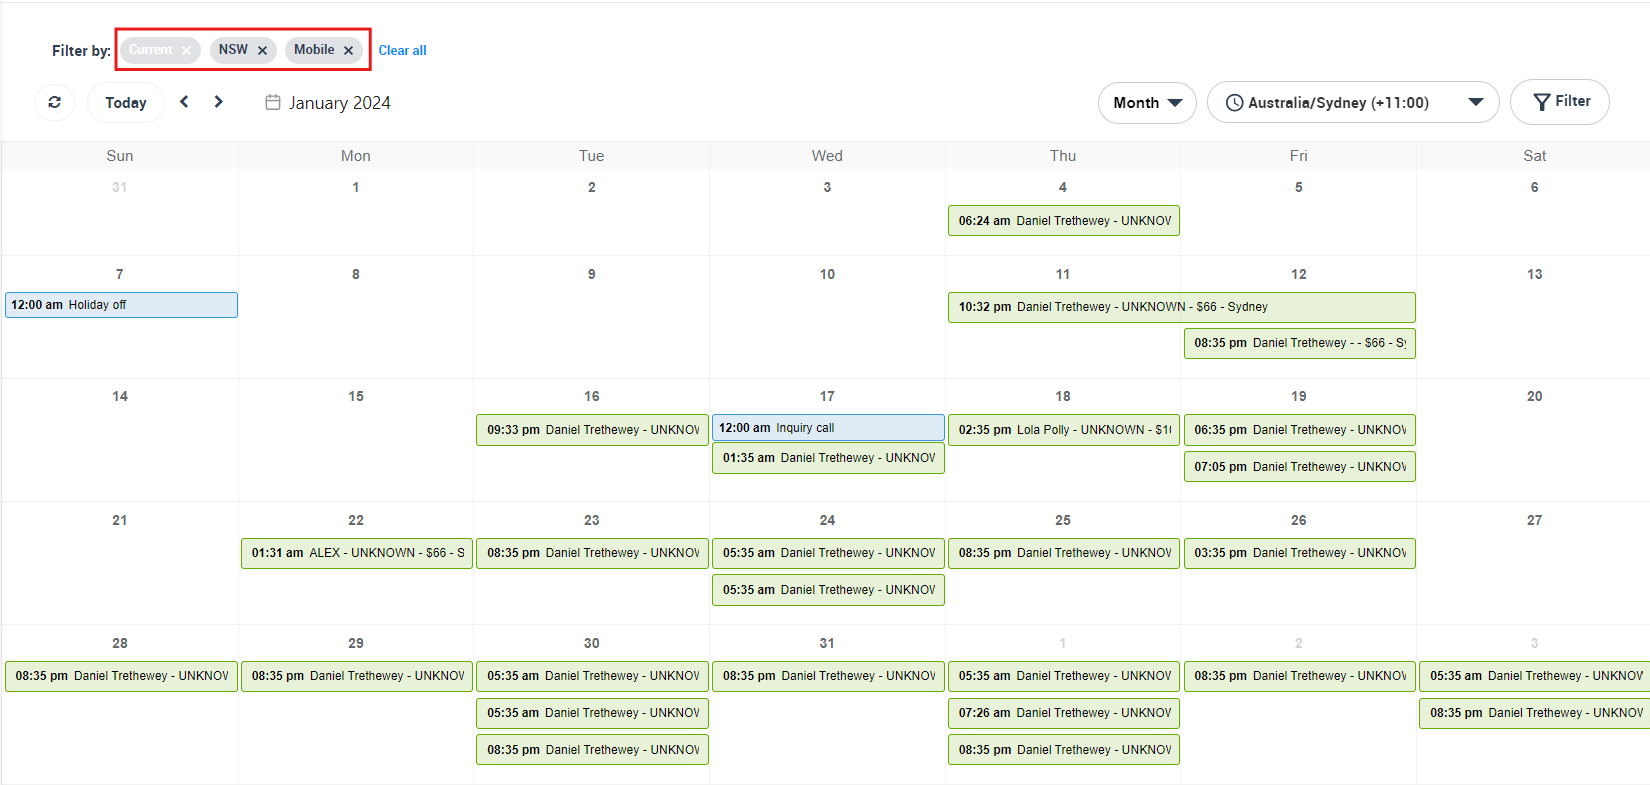
- So, the calendar will only display bookings taking place or bookings that have taken place in NSW, Mobile.
How to filter bookings on your calendar by a fieldworker’s status?
- On your calendar, you can filter the displayed bookings by your fieldworkers’ status. To do that, from your calendar overview, on the top right side of the page click on “Filters”.
- A popup window will appear, from the dropdown menu, select the fieldworker status. So for example, if you want to display on your calendar bookings assigned to all active fieldworkers, select Active from the dropdown list. Then click on “Filter”.
- Your calendar will only display bookings assigned to all active fieldworkers.
How to filter bookings on your calendar by fieldworker?
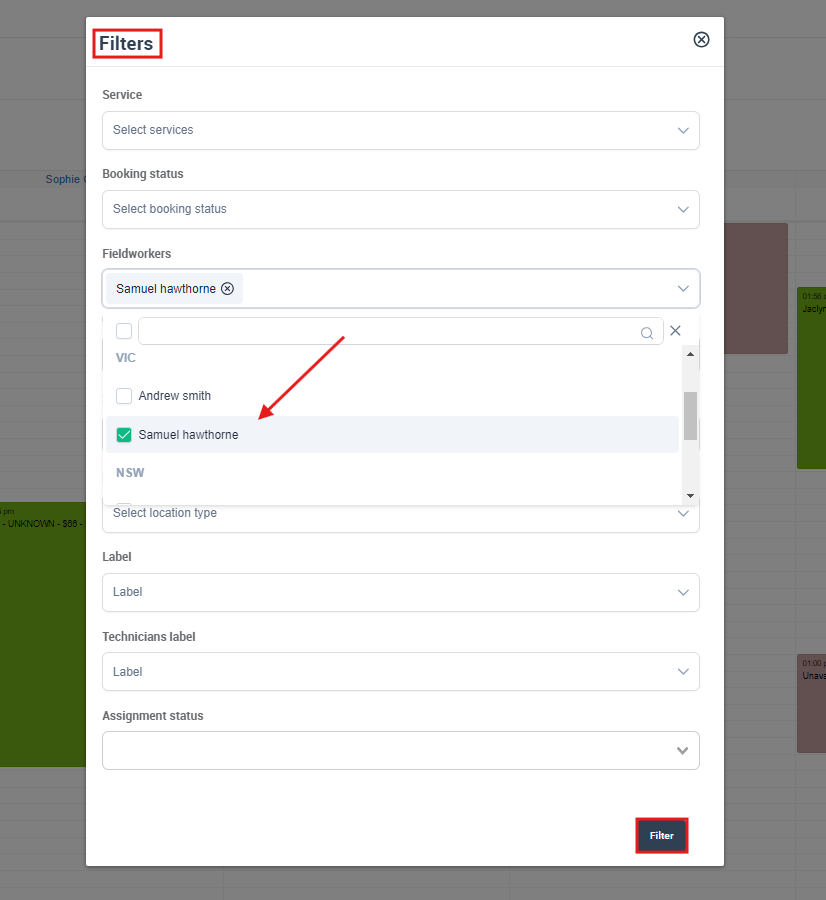
- On your calendar, you can filter the displayed bookings by one or more fieldworkers. To do that, from your calendar overview, on the top right side of the page click on “Filters”.
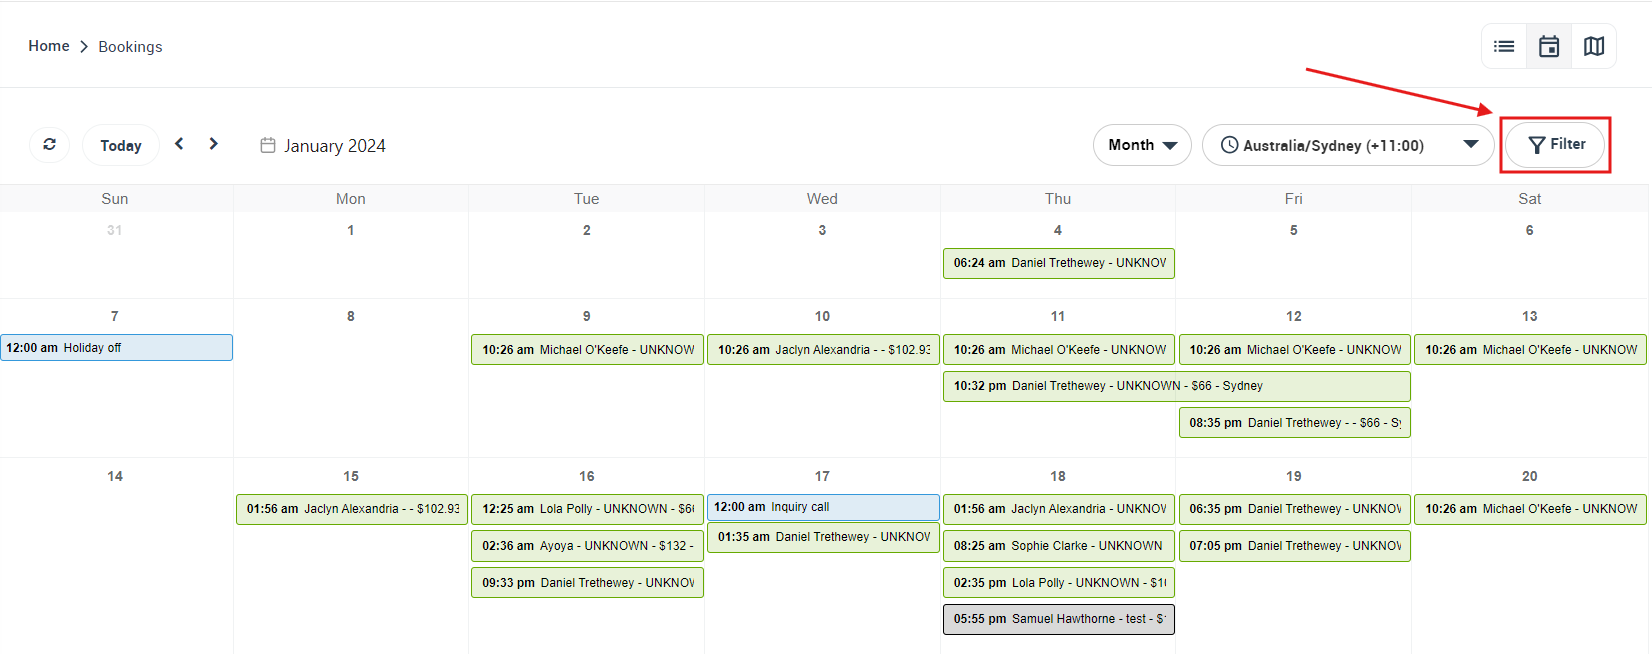
- A popup window will appear, you can select one or more fieldworkers from the dropdown list. The calendar will only display upcoming bookings that are assigned to the fieldworker/fieldworkers you have selected. Then, click on “Filter”.
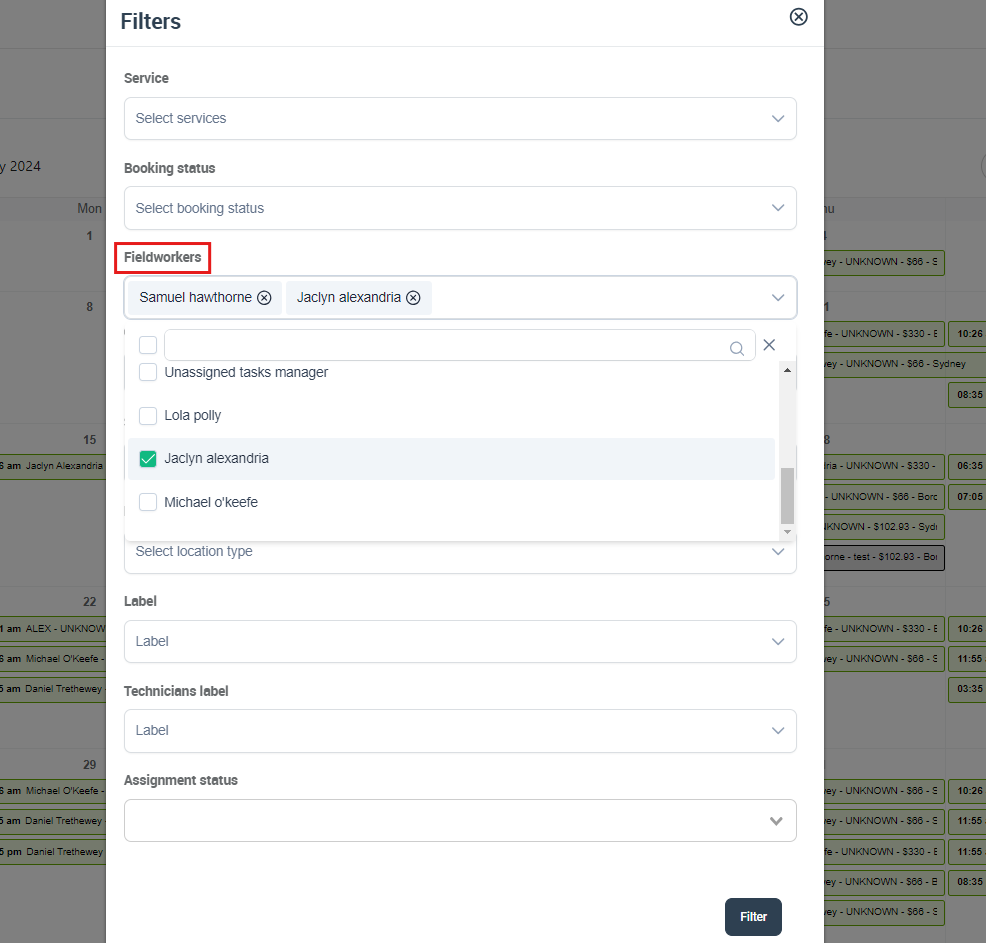
- Upon clicking on a filter, the calendar will only display scheduled bookings that are assigned by the fieldworkers that you have selected.

How to filter bookings on your calendar by customer label?
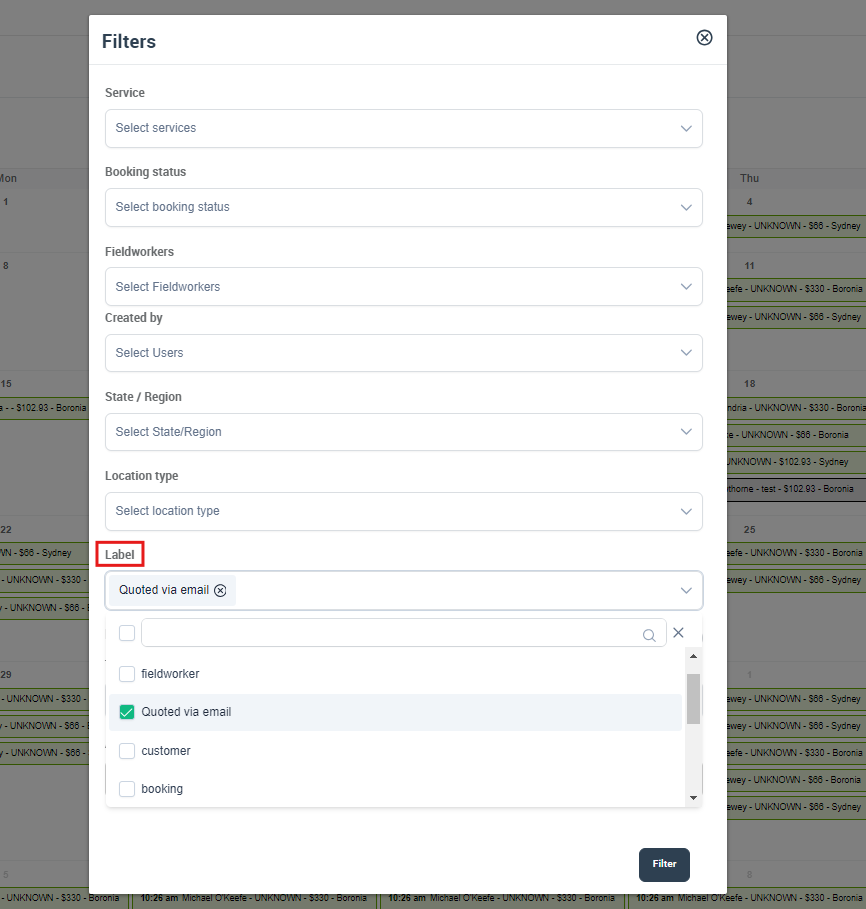
- You can filter the displayed bookings on your calendar by the customer labels you have set. To do that, from your calendar overview, on the top right side of the page click on “Filters”.
- A popup window will appear, from the dropdown menu, select the customer label. You can select more than one label. So for example, if you want to display on your calendar bookings scheduled for customers labeled “Quoted via email” click on it and then click “Filter”.
- Your calendar will only display bookings scheduled to customers with the label “Quoted via email”
How to filter bookings on your calendar by fieldworker label?
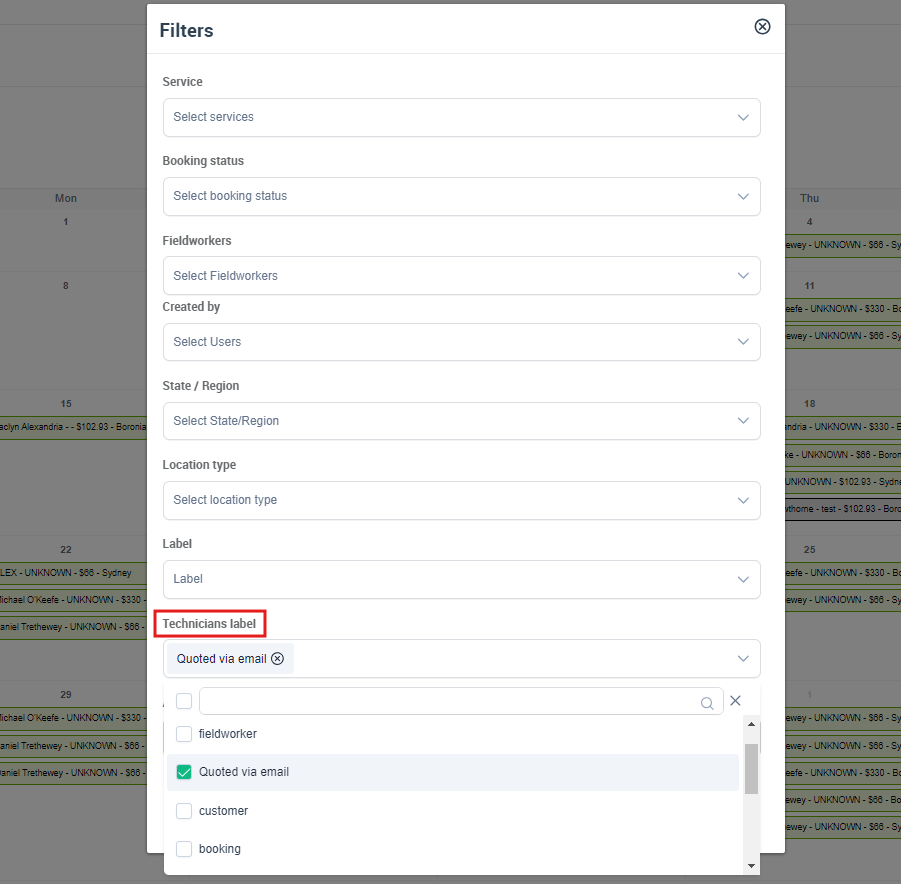
- You can filter the displayed bookings on your calendar by the fieldworker labels you have set. To do that, from your calendar overview, on the top right side of the page click on “Filters”.
- A popup window will appear, from the dropdown menu, select the fieldworker label. You can select more than one label. So for example, if you want to display on your calendar bookings assigned to fieldworkers labeled “Quoted via Email” click on it and then click “Filter”.
- Your calendar will only display bookings assigned to fieldworkers with label “Quoted via Email”
How to filter bookings on your calendar by assignment status?
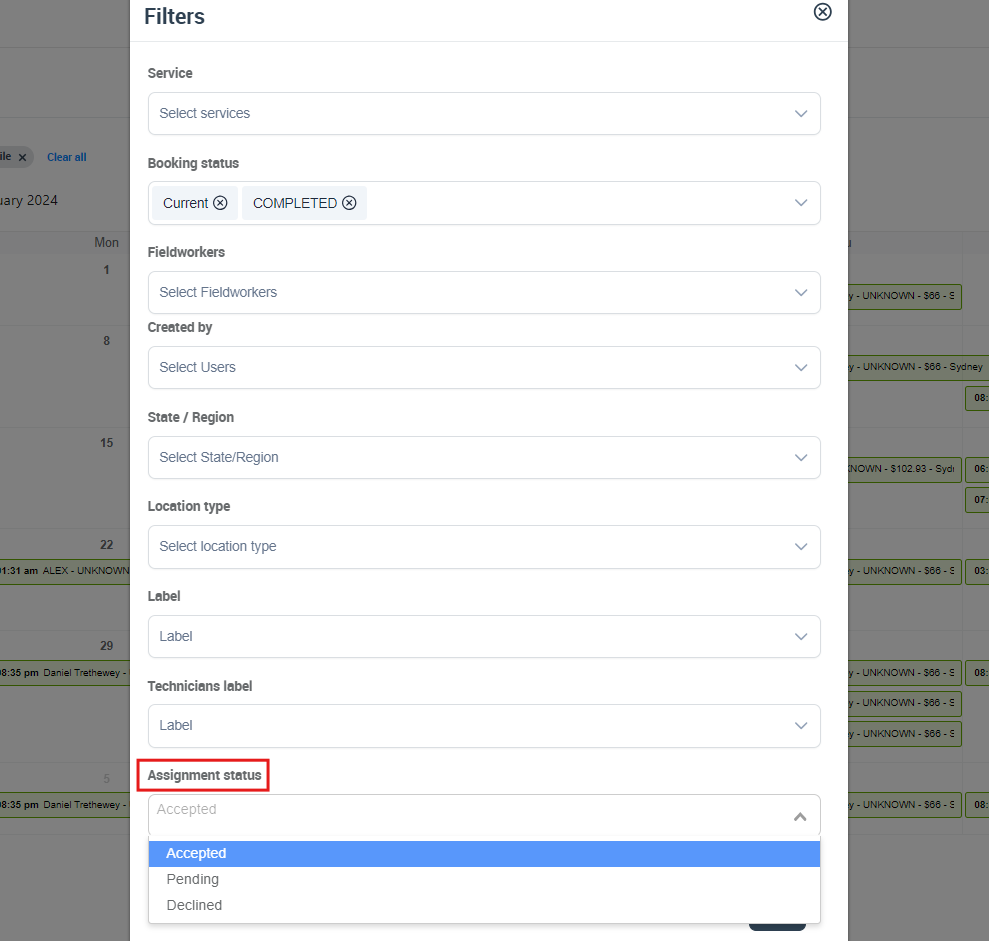
- You can filter the displayed bookings on your calendar by assignment status. To do that, from your calendar overview, on the top right side of the page click on “Filters”.
- A popup window will appear, from the dropdown menu, select the assignment status.
You will have three options to select from:
- Accepted: When a booking job request is sent to a fieldworker, and they accept the booking request, the booking will be added to their calendar and the assignment status will be: Accepted.
- Pending: When a booking is assigned to a fieldworker, and the fieldworker has received the booking request but hasn’t accepted or declined it, the assignment status will be: Pending.
- Declined: The fieldworker has received the job request and has declined it, the assignment status will be: Declined.
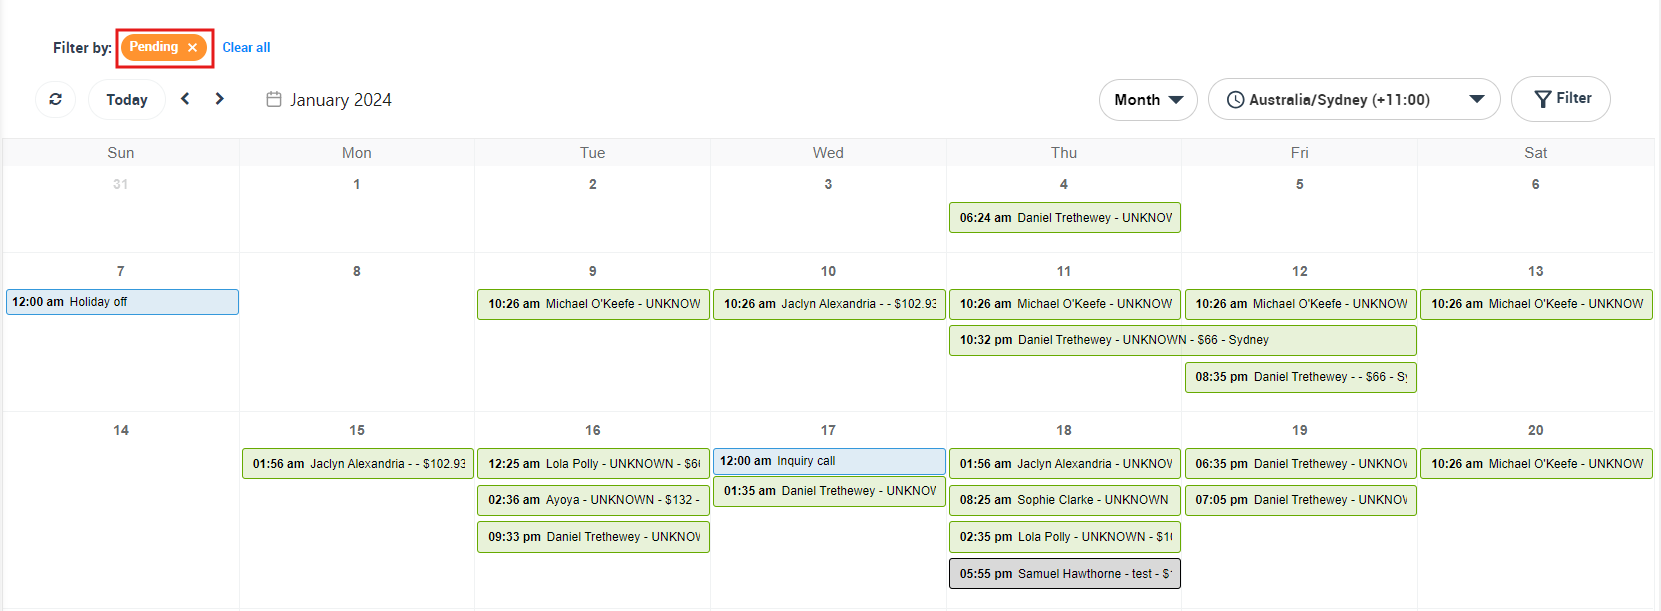
So for example, if you want your calendar to only view bookings with assignment status Pending, select Pending from the dropdown list and click “Filter”.
- Your calendar will only display bookings with assignment status: Pending.
How to filter bookings on your calendar by payment status?
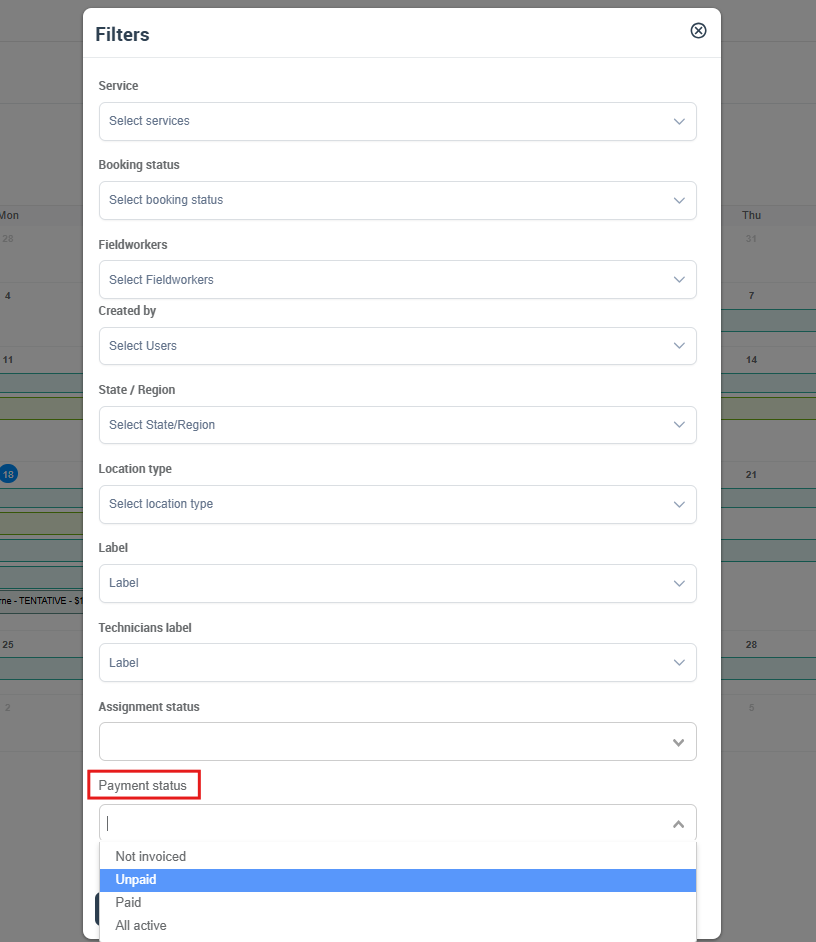
- You can filter the displayed bookings on your calendar by booking payment status. To do that, from your calendar overview, on the top right side of the page click on “Filters”.
- A popup window will appear, from the dropdown menu, select the payment status.
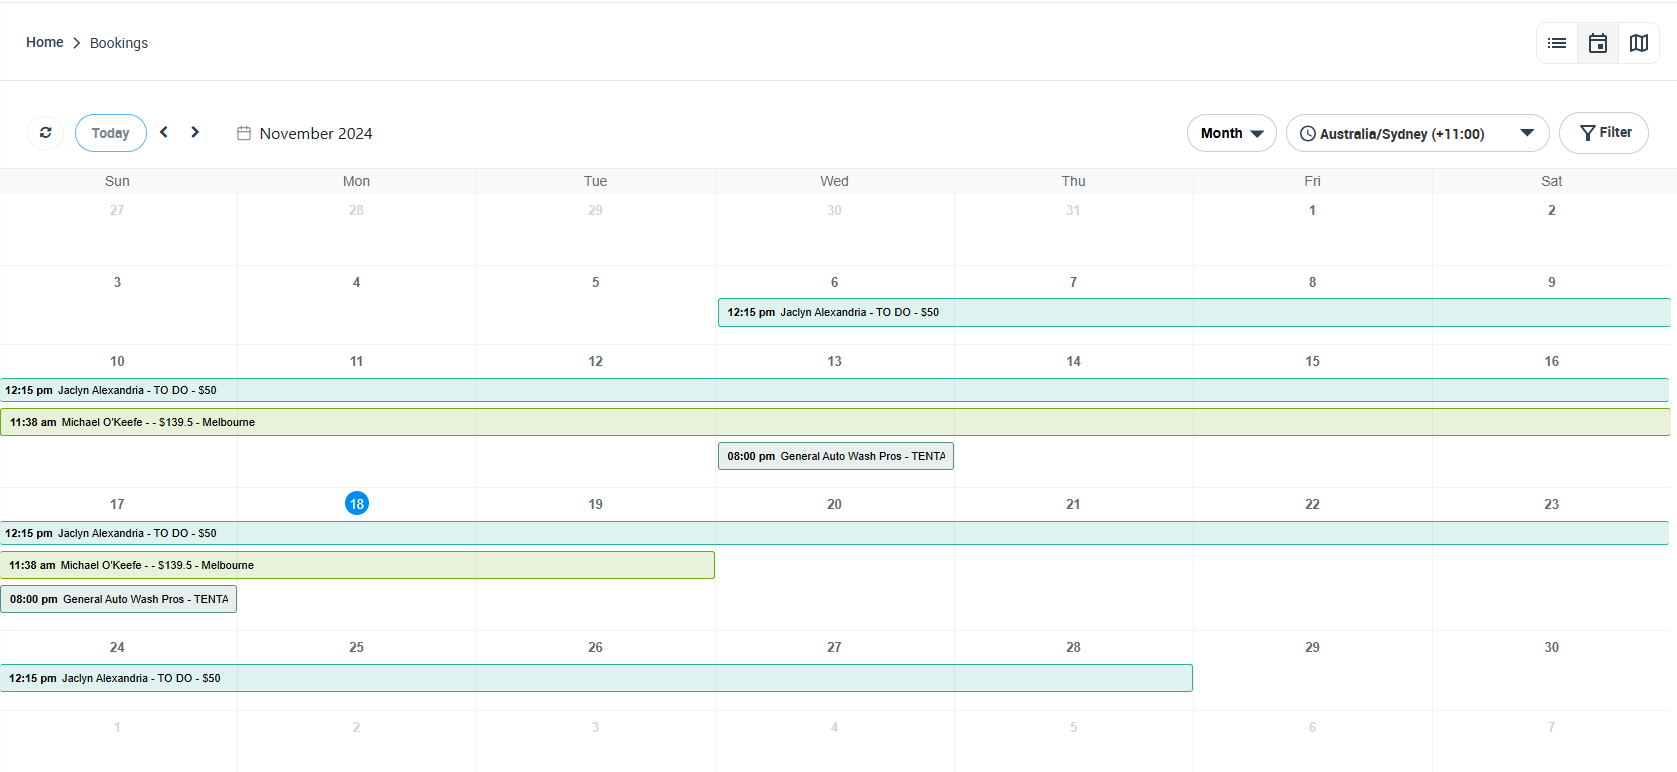
- So for example, if you want your calendar to only view bookings with payment status: Unpaid, click on it and click “Filter”.
- Your calendar will only display bookings with payment status: Unpaid.
How to sync OctopusPro calendar with Google Calendar?
If your business uses Google Calendar which you would like to sync with your OctopusPro calendar, you can sync them by connecting your business Google Calendar with your general fieldworker profile, which acts as the default calendar for your business. Once connected, you can manage both calendars together with ease and schedule events without having to jump between different calendars.
- From the calendar overview page, select the general fieldworker from the list of fieldworkers in the filters popup.
- Then click “Filter”.
- Press Send invitation to connect Google Calendar to OctopusPro which appears at the top of the calendar.

- An email form will appear as a popup, which will be sent to the email related to the general fieldworker to grant permission to add reminders to their Google Calendar.
- Click “Send”.
- After the email is received, upon pressing on Grant Permission, your OctopusPro calendar will sync with your Google calendar. Any events or new bookings added will be seen through both calendars.

Related Articles
To make the most out of our calendar management tools, we recommend exploring the following resources. These articles provide further insights on how to use each feature effectively:
- Understand how to organize your schedule with Scheduling and Dispatching.
- Learn about viewing your schedule from different perspectives:
- Explore how to integrate with other platforms through View Google Calendar.
- Discover how to expand your scheduling capabilities with:
- Customize your view by applying filters:
We’ve designed these guides to help you take full advantage of our tools and streamline your operations. Happy scheduling!
To stay updated, please subscribe to our YouTube channel.
