
Creating a New Service – Configure Your Service Settings
Crafting Your Perfect Service
With OctopusPro, service creation becomes a seamless task, designed to streamline your business operations. Whether it’s for bookings through the customer portal or those managed by your team, services can be personalized with the desired pricing, descriptions, and payrates. Our intuitive categorization system within the settings ensures your services are neatly arranged for ease of use and enhanced customer experience.
This user guide provides a comprehensive overview of service creation and customization. It covers an array of aspects from populating service details, managing multimedia resources, embedding interactive buttons on your website, to defining cost and payrate structures. Moreover, the guide offers assistance on how to create service-specific custom fields, manage your service offerings, and facilitate service interaction via the customer portal or fieldworker app. For ease of data management, instructions on importing and exporting services are also included. This guide, interspersed with practical examples, will empower you to fully leverage OctopusPro’s service creation capabilities.
Table of contents
- Creating and Adding New Services to your Offerings
- Filling Out Service Details
- Multi-Language Flexibility
- Selecting Service Category
- Service Package Creation
- Configuring Service Settings for Customer Interactions
- Customizing Service Description Display Settings
- Service Media Settings
- Customizing and Embedding Service Buttons on Your Website
- Designating Service to Fieldworkers
- Adjusting Cost and Payrate
- Setting the Type of Service
- Setting Payment Requirements for Online Bookings
- Setting Pricing for Your Services
- Configuring Service Fieldworker Payrates
- Incorporating Custom Fields into Your Service
- Managing Your Services: Viewing, Editing, or Deleting
- Adding Services During Booking, Quotes, or Inquiries Creation
- Adding Services While Creating a Booking via the Fieldworker App
- How Customers View Services on the Customer Portal
- Importing and Exporting Services
Creating and Adding New Services to your Offerings
Adding a new service to your offerings is simple and can be done either from your main service settings, directly while generating new quotes or bookings, by importing a CSV file, or by syncing with your accounting software. Here’s how you can do each:
1. From the Service Settings:
- Navigate to ‘Settings’ in the main menu.
- Select ‘Services Settings’ from the dropdown options.
- From the subsequent options, click on ‘Services’.
- On the ‘Services’ page, click on the ‘Create new’ button.

2. From New Quotes or Bookings:
If you’re in the process of creating a new quote or booking and find that the service you need isn’t available, you can quickly create a new service directly from the form. Simply click on the ‘Create New Service’ button instead of selecting an existing service.
3. Importing from a CSV File:
You can also import a bulk list of services using a CSV file. Navigate to ‘Services’ under ‘Services Settings’, then look for the ‘Import’ option. Choose your file and click ‘Import’. This will upload the list of services onto your platform. Please ensure your CSV file is formatted correctly to ensure a successful import.
4. Syncing from Accounting Software:
If you are using an accounting software like Quickbooks or Xero, you can sync your services from there. Navigate to the ‘Services’ settings and look for the ‘Sync’ option. Connect your accounting software and follow the instructions to synchronize your services. However, please note that while this can bring in basic service information, more advanced features such as custom fields and specific pricing models may not be imported and would need to be set up individually for each service within the platform.
These diverse options for service creation ensure flexibility and convenience, allowing for streamlined service management tailored to your business’s needs.
Filling Out Service Details
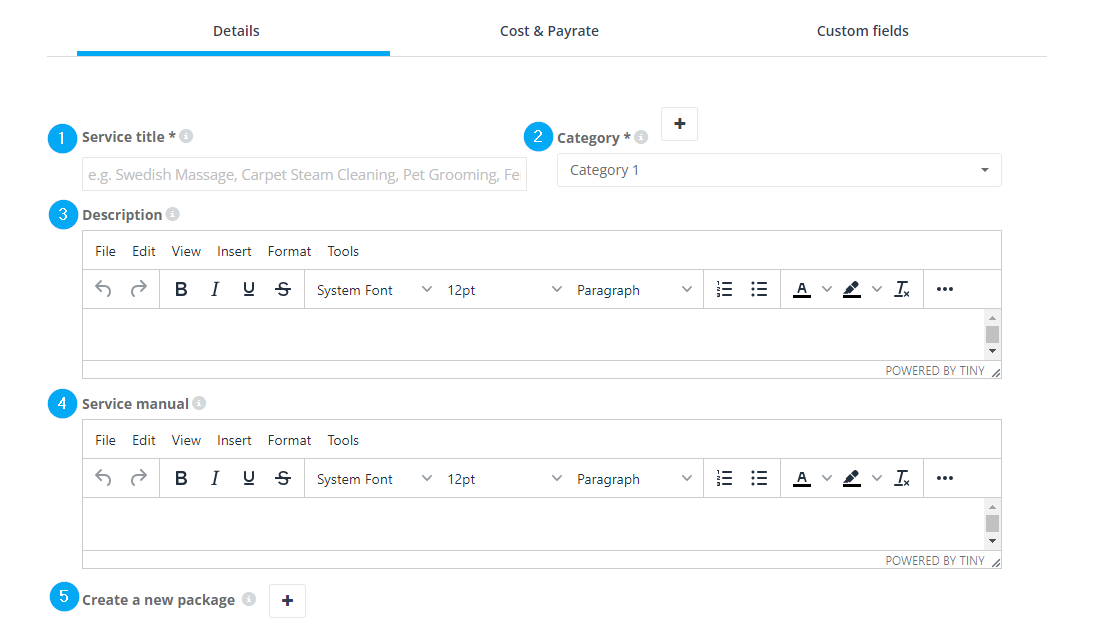
When manually creating a new service, the process begins with the ‘New Service’ page. In the ‘Details’ tab, you have the chance to add extensive information about your service. This information is crucial as it not only informs your customers about what you offer but also guides your team members in service delivery.
- Service Title: This is where you specify the name of your service. Choose a name that easily resonates with your customers, enhancing recognition and understanding.
- Description: This is your opportunity to describe in detail what your service entails. A well-detailed description promotes better comprehension of your service among your customers. The description is visible to customers on your customer portal and branded app, and can be referred to by admins and fieldworkers when they are creating bookings, inquiries, or estimates.
- Service Manual: This feature is particularly useful for internal use. You can input specific guidelines or instructions related to the service, accessible only by your admins and fieldworkers. This internal reference helps ensure consistency and high quality in service delivery.
Remember, the more comprehensive and clear your service details are, the easier it is for your customers to make informed decisions, building trust and confidence in your offerings.
Multi-Language Flexibility
The power of multi-language support lies in your hands. Increase your customer reach by offering your services and customer portal in multiple languages, this enables you to cater to a broader, more diverse audience by offering multiple languages simultaneously. This can be especially beneficial for businesses that operate in multilingual regions or have an international customer base.
This multi-language capability extends to all customer-facing elements such as quotes, invoices, and booking PDFs. You have the autonomy to enter and customize service information for each language separately, ensuring a tailored, comprehensive, and seamless experience for your diverse customer base.
Offering a multilingual customer portal can give your business a competitive edge over businesses that only cater to customers in one language. It shows that your business is inclusive and cares about its customers’ needs, which can be a strong selling point for many customers.
Enhancing the customer experience with multi-language support is achieved with ease and flexibility in OctopusPro. This is done by meticulously incorporating text for all relevant labels in multiple languages.
Firstly, you need to navigate to the “Manage Service Settings” page. At the top of this page, you can select the language you would like to enter text for. It’s important to note that only the languages enabled in your company’s customer portal settings will be available for selection (you can manage these in Settings > Customer Portal > General Settings).
Once you have chosen a language, you can then add or edit the text for various labels associated with your services. These labels include:
-
Service Information: This includes the service name, short description, and full description. This information is critical in clearly communicating what each service involves and its benefits.
-
Custom Field Information: This includes the names and descriptions of any custom fields you have for your services, allowing you to capture additional information that is specific to your business or industry.
-
Custom Field Description: This involves details about any additional specific attributes or features of your services, which can be crucial in aiding the customer decision-making process.
-
Booking Confirmation Messages: Messages sent to the customer after a booking has been made.
-
Quote and Invoice Details: These include any line items, terms and conditions, or additional notes that appear on quotes and invoices.
-
Booking PDFs: The booking details as they appear on PDF documents, which customers can download or receive by email.
-
Email and SMS Notifications: This is the text that appears in automated notifications sent to customers, such as booking confirmations, reminders, and follow-ups.
By translating and customizing all of these elements, you can provide a comprehensive, personalized, and seamless experience for your diverse customer base, regardless of their preferred language. This can result in enhanced user experience, customer satisfaction, and business performance.
Selecting Service Category
Grouping services under specific categories enhances the ease of navigation, particularly if your business offers a broad array of services. By default, services will be assigned to ‘Category 1’ if no specific category is chosen. You can select from pre-existing categories via the drop-down menu or add a new category by clicking on the ‘+’ button. For more information, visit the Adding and Managing Categories user guide page.
Service Packages Creation
Packaging multiple instances of the same service into a bundle can incentivize customers to purchase more. These packages allow clients to purchase and reserve prepaid or post-paid services at their convenience. Customize your package frequency to accommodate daily, weekly, fortnightly, or monthly service offerings. For additional information on creating packages, please follow Creating Service Packages.
Customers can conveniently book packages via the customer portal, while admin users can do the same via the admin portal. Rest assured, the system automatically monitors the remaining service count within each package. However, should you need to review, the package report provides detailed information on the status of each client’s package.
Benefits of Service Packages
For Business:
- Facilitates selling multiple instances of a single service.
- Combines different services and add-ons using custom fields.
- Multiple packages can be showcased on your site for booking.
- Admin users and customers both can book packages.
- Set the validity period for the package.
- Easily track the remaining bookings in each package.
- Offer price discounts for package bookings.
- Access detailed reports and overviews of packages.
For Customers:
- Single payment option for multiple bookings.
- Discount benefits for future service bookings.
- Real-time visibility of remaining bookings.
Kickstart your service package creation by:
- Building packages for recurring service occurrences.
- Offering discounts for booking a suite of services as compared to individual service bookings.
- Providing an option for customers to prepay, allowing hassle-free booking whenever it’s convenient for them.
Configuring Service Settings for Customer Interactions
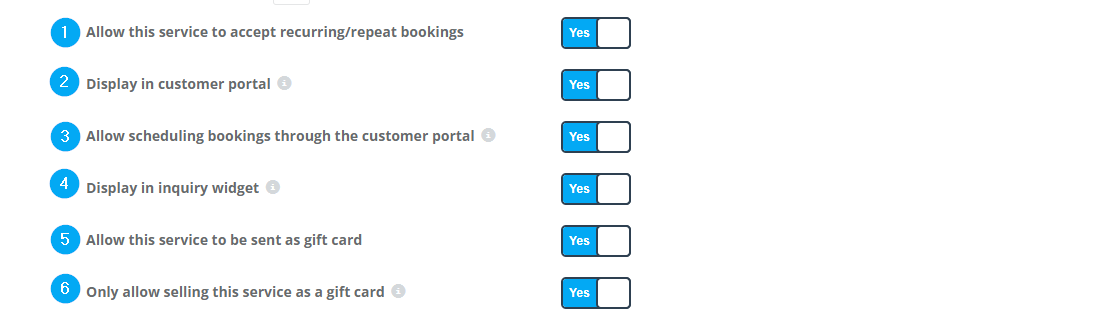
- Visibility in Customer Portal: By enabling this setting, your service will be visible on the customer portal, allowing customers to book it. Conversely, disabling this setting will remove the service from the customer portal’s service list.
- Scheduling Bookings via Customer Portal: This setting determines whether customers can schedule a booking for your service from the customer portal. When enabled, the service will appear on the customer portal and can be booked. If disabled, the service will still appear on the service list but can’t be directly booked; instead, customers can send an inquiry or purchase it as a gift card, provided these options are enabled.
- Request Multiple Addresses For Bookings: If you’re setting up a service that may require operations at multiple addresses, activate this feature. Please remember, this option is dependent on the corresponding setting being enabled within your Customer Portal settings. By choosing not to enable this feature, customers will be restricted to specifying a single address while booking this particular service. Implementing the multiple address option can be crucial for services that naturally span across various locations, thereby improving customer experience and facilitating the efficient execution of such services.
- Recurring/Repeat Bookings: Enable this option if you wish to allow your service to be booked multiple times from the customer portal. This is useful for services that customers might need on a recurring basis. You can learn more about Managing Recurring Bookings.
- Inclusion in Inquiry Widget: Enable this option if you want your customers to be able to select this service when sending an inquiry via the customer portal. If this setting is disabled, the service will not appear in the service list within the inquiry widget. For more information please refer to the inquiry widget guide.
- Gift Card Option: Enabling this setting allows your customers to purchase a gift card for this service or send it as a gift card through the customer portal. Customers can also schedule a booking for this service with this setting enabled.
- Gift Card Exclusivity: If you wish to restrict this service to only be available as a gift card, enable this option. This removes the possibility of scheduling a normal booking on the customer portal, making it a unique gift option for your customers.
Remember, these settings offer valuable customization for your services, helping to shape the way your customers interact with your offerings and enhancing their overall user experience.
Customizing Your Service’s Display and Media Settings
In OctopusPro, you have a variety of settings to control how the details of your service are presented to your fieldworkers and customers.
Service Description Settings:
- To Fieldworkers: If you’d like your fieldworkers to see the service description when they’re creating a new booking, simply enable this setting.
- In Invoice PDFs: To have the service description appear in all customer and fieldworker invoices, enable this setting.
- In Quote and Booking PDFs: Enable this setting to include the service description in quotes or booking overviews. This makes it easy for customers or fieldworkers to understand the service when viewing or sending PDFs.

Service Media Settings
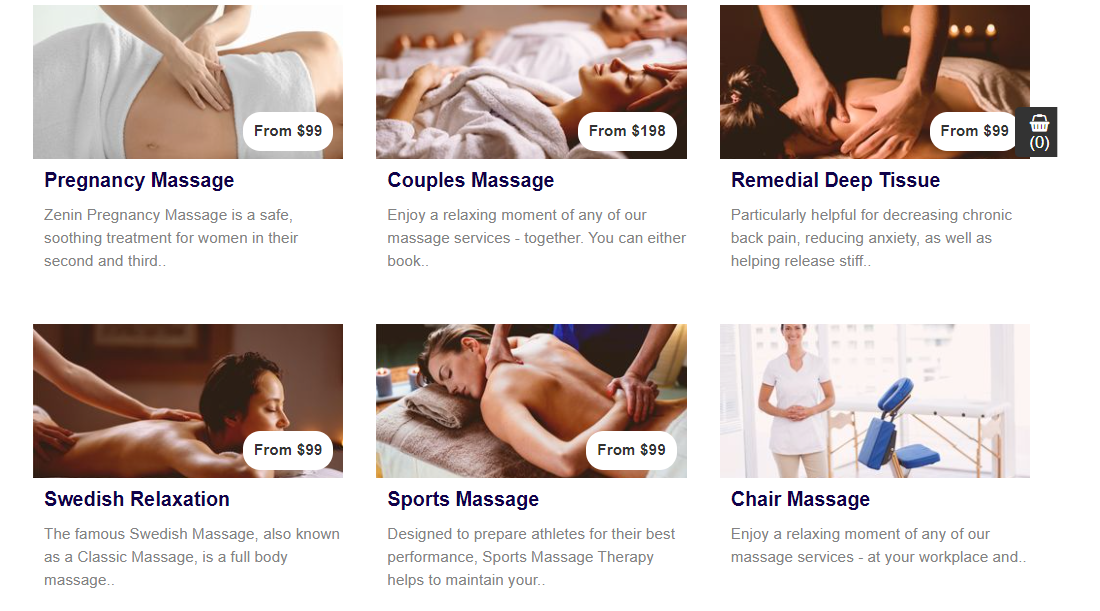
- Service Images: Visual content can greatly enhance the understanding of your services. These visuals will appear on the customer portal and your branded app, and they’ll also be included in quotes and booking confirmations. To add images, click on the ‘+’ button; you can upload multiple images if desired. The first image will be set as the default for the service, while additional images will appear on the service view page on the customer portal.
- Service Image Visibility: If you want the uploaded images to appear on the service view page of the customer portal, enable this setting. If it’s disabled, only the default image will be visible in the services list and booking confirmations.
- Service Videos: For a dynamic representation of your service, consider adding a video. To do this, first upload your video to YouTube. After uploading, copy the video URL, paste it into the designated field in the service settings, and click ‘Save’. This video will be accessible to customers on the service view page within your customer portal, providing them with a more engaging overview of the service.
- Service Attachments: To further supplement the information about your service, you have the option of adding attachments. These could take the form of images, PDFs, or other relevant documents that elaborate on your service’s features or benefits. These files are not just decorative but functional as well – they can be appended to quotes and booking details when these are sent to customers, ensuring your clients have all the necessary information at their fingertips.
Remember, a well-curated display of your service not only helps your fieldworkers understand the scope of their tasks but also provides your customers with a clear understanding of what they’re booking, thereby enhancing their experience.

Customizing and Embedding Service Buttons on Your Website
In OctopusPro, you have the option to seamlessly incorporate certain functionalities into your website with the help of customizable buttons. These buttons, once clicked, provide a direct access to specific services, all from within your website. Below are two such features you can embed on your website:
1. Booking Button:
The ‘Book Now’ button is a versatile tool that can be tailored to align with your website’s aesthetic and your brand’s visual identity. When a customer clicks on this button, it triggers the booking process in a separate pop-up window, providing a seamless and uninterrupted experience for your website visitors. To incorporate this button, you’ll need to edit the HTML code of your website and integrate the button on the desired page.
2. Gift Voucher Button:
Similarly, you can also include a ‘Gift Voucher’ button on your website. This button can be designed and stylized to match your website and brand. When clicked, it allows your customers to conveniently purchase gift vouchers without leaving your website. As with the ‘Book Now’ button, embedding the ‘Gift Voucher’ button will require you to edit the HTML code of your website and place the button on the appropriate page.
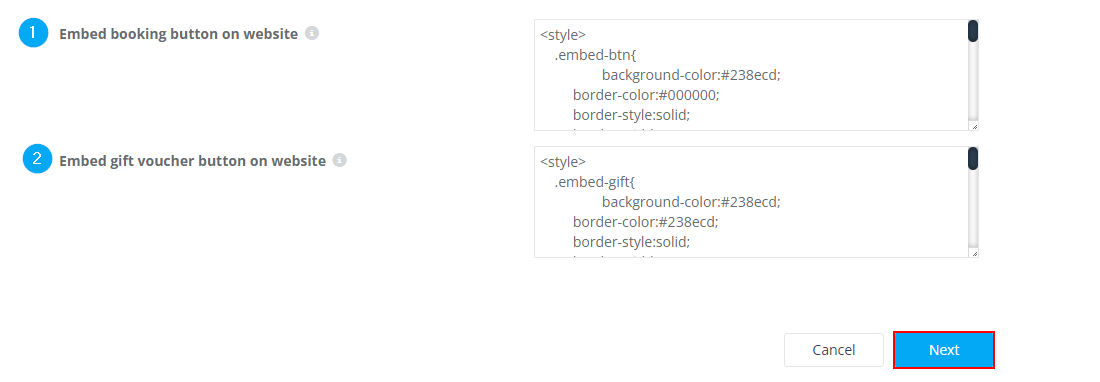
By integrating these buttons, you not only enhance the user experience but also provide an efficient and accessible way for customers to directly interact with your services. Remember, providing a smooth customer journey can significantly improve your conversion rates and overall business success.
Assigning Service to Fieldworkers
One of the final, yet most crucial steps after defining the details of your new service, is the assignment of this service to your team of fieldworkers. This strategic decision not only contributes to efficient and high-quality service delivery but also serves as a prerequisite for enabling bookings. By assigning services to fieldworkers, you open up the availability for customers to schedule bookings.
Once you’ve completed the service details, click ‘Next’ to proceed to service assignment. Here, a dialog box presents two main assignment options:

1. Designating to All Fieldworkers:
This option automatically designates the new service to all your fieldworkers. This is an efficient choice if the service is universally applicable and doesn’t require specialized skills or qualifications. For instance, if you’re running a child care service and have introduced a new basic service, this option ensures that every member of your team is aware and prepared to deliver it.
2. Designating to Specific Fieldworkers:
There are times when a service may require particular skills, training, or qualifications that only certain fieldworkers possess. For instance, if you’re in the business of home repair and have introduced a specific service like plumbing or electrical work, it would be more appropriate to assign it to fieldworkers with the requisite skills. This option lets you selectively assign the service to these specialized team members, ensuring the job is done proficiently.
The importance of thoughtfully assigning services can’t be overstated. This process directly impacts the quality of service your customers receive, influencing their overall satisfaction. By choosing the most suitable fieldworkers for each service, you ensure that the tasks are performed competently, raising the standards of your services and, in turn, enhancing your business’s reputation.
Adjusting Cost and Payrate
The ‘Cost and Payrate’ section provides options for defining your service as paid or free, setting payment requirements, and establishing service payrates. Let’s walk you through how to use these settings.
Setting the Type of Service
After you have entered your service details, you can determine how you want to charge for your service. This involves selecting whether the service is free or paid, and setting up payment requirements and tax rates.
- If you’re charging for your service, select ‘Paid service’.
- If you’re offering a service free of charge to your customers, and no invoice will be generated for related bookings, select ‘Free service (no invoice)’. You still have the option to set service payrates for your fieldworkers in this case.

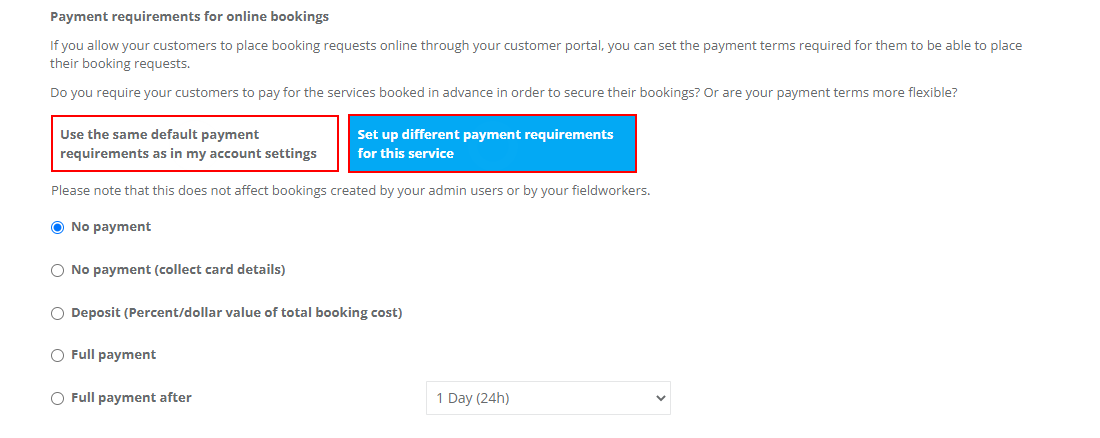
Setting Payment Requirements for Online Bookings
If you allow customers to place booking requests online via your customer portal, you can define the payment terms necessary for them to make their booking requests.
You can click here to learn more about setting payment requirements for online bookings.
Furthermore, you have two options when it comes to setting payment requirements for your service:
- ‘Use default payment requirements’: Choose this option if you want to apply the default payment settings, previously established in your account settings, to all your services.
- ‘Set up different payment requirements for this service’: Select this option if you wish to have different payment settings for this particular service. The default payment settings will not apply to this service.
Setting Pricing for Your Services
OctopusPro provides flexibility in setting your service pricing. You can opt to charge by time, per job, or per unit.
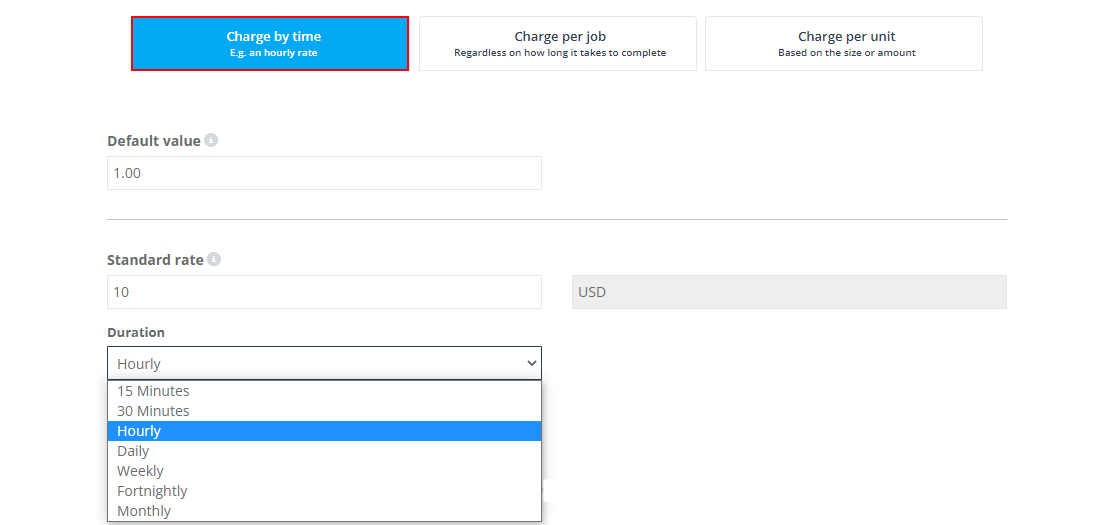
Setting ‘Charge by Time’
If you charge based on duration, you can set a standard rate for each time unit, e.g., $15 per hour.
- In the ‘Default Value‘ field, set the typical duration value for a booking, you can leave it empty or enter a number. For example, if you set the duration field to be hourly then the value “1” in the default value will mean that the default value showing is 1 hour.
- For ‘Standard Rate,’ input the regular charge for the chosen duration. e.g., $15 per hour.
- ‘Duration‘ allows you to select the preferred time unit from the drop-down menu.
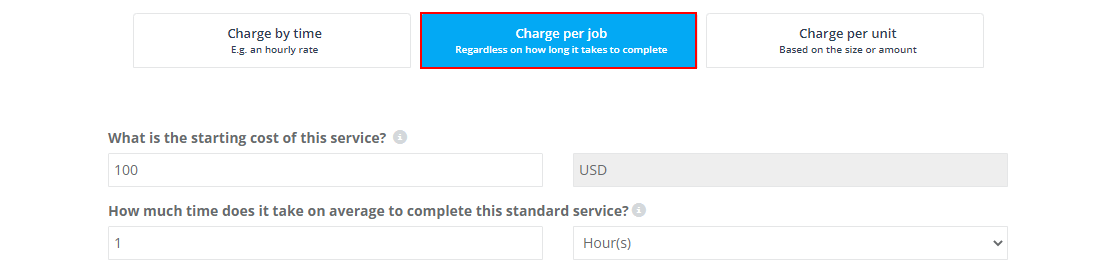
Setting ‘Charge Per Job’
If your pricing is job-based, indicate the starting cost for this service (before additional options or extras) and provide an average time for the standard service’s completion. This assists in managing booking calendars and availability.
- What is the starting cost of this service? The starting cost is the minimum cost for this service before any options or extras are added.
- How much time does it take on average to complete this standard service? Enter how much time the service will take to be completed to manage booking calendars and availability.
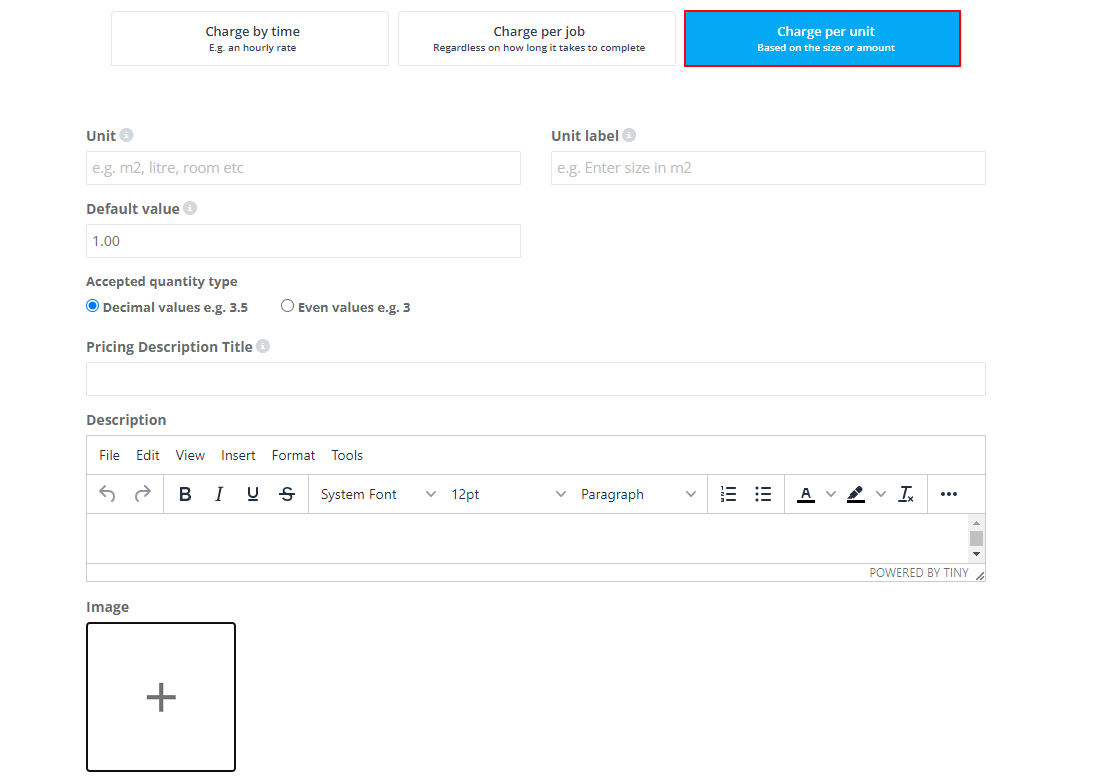
Setting ‘Charge Per Unit’
If your services are billed based on size or quantity, it’s essential to specify the unit type (e.g., m2, rooms, liters). Here’s a breakdown of how to do this:
- Unit The unit field is where you specify the measurement used for the quantity. This could be m2, liters, rooms, steps, boxes, pets, children, etc. For instance, if you offer a tile cleaning service and you charge by the square meter, your unit field should be “m2.” This way, customers can input the area size to be cleaned in square meters.
- Unit Label: The unit label serves as descriptive text to guide the user on what to enter in the unit field. Examples might include “Please enter the area size in meters,” “Number of rooms,” or “Number of children,” etc.
- Default Value: This is the initial value that appears in the unit field. You can either leave it blank or enter a number. Additionally, select whether you accept quantities with decimals or not.
- Pricing Description Title: If your unit pricing is complex, or you wish to provide instructions for your customers, use the Pricing Description Title and Description fields. You can also upload an image for added clarification.
This detailed ‘Charge Per Unit’ setup ensures customers understand what they are being charged for, ultimately leading to a more transparent and satisfactory customer experience.
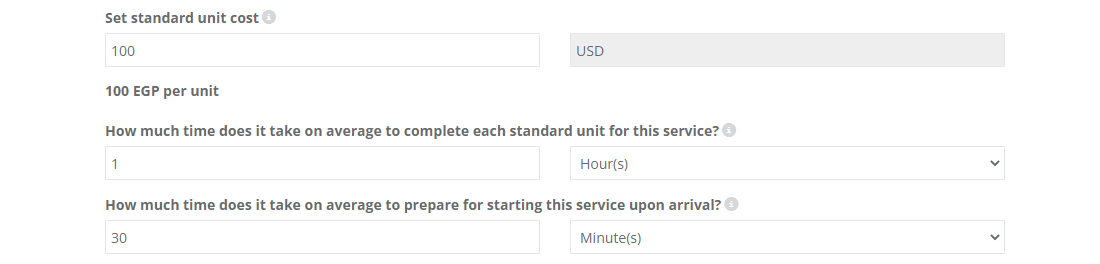
Configuring Standard Unit Cost and Service Time Estimates
For efficient planning and accurate costing, it’s crucial to set the standard unit cost and average time required for each service. Here’s how you can do this:
- Standard Unit Cost: Establish the standard cost per unit for this service. This refers to the typical cost charged for each unit of the service provided.
- Average Time to Complete Each Unit: Enter the average duration required to complete each standard unit of this service. This information is vital as it aids in managing booking calendars and ensuring optimal resource allocation and scheduling.
- Preparation Time Upon Arrival: Specify the typical duration required for a fieldworker to prepare for the service upon arrival at the job site. Including this preparation time allows for a more accurate estimation of the total time required to complete a service, contributing to more efficient planning and scheduling.
By accurately setting these parameters, you ensure smooth operations, proper cost estimation, and ultimately improved customer satisfaction.
To manage your service pricing more dynamically, you can use the features ‘Create a new rate’ and ‘Set minimum booking price’. These tools help you adjust your pricing structure based on the duration of service and ensure a certain profitability level for each booking.
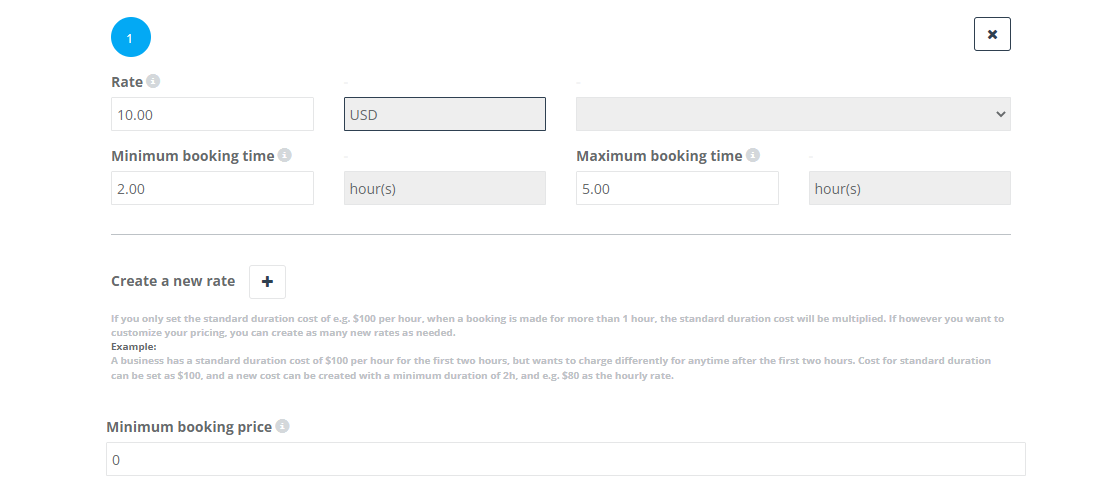
Setting Up Rates for Adaptive Unit Pricing
Establishing fixed rates for your services is a common practice – you might have a base price per unit of time, such as $100 per hour. With this straightforward pricing strategy, the total cost for any booking is simply a multiplication of this base rate by the duration of the service. However, a one-size-fits-all pricing model may not always serve the diverse needs of your customers, or adequately reflect the nature of your services.
To cater to a range of service durations and more precisely tailor your pricing, you have the option to create additional, custom rates. These rates can provide more flexibility and accuracy in pricing, and a better fit for your business model.
For instance, let’s say you’re running a business where you’ve set a standard duration cost of $100 for the first two hours of service. But, if you need to offer a different rate for any duration exceeding the initial two hours, you can implement this using custom rates.
You can retain the standard duration cost at $100 for the first two hours. Next, you create a new rate with a minimum duration of 2 hours and an adjusted hourly rate – let’s say $80. This results in a tiered pricing structure, which allows you to better accommodate and price different service durations.
Here’s a practical example to illustrate this point. If a client books a service for 3 hours, the first 2 hours will be priced at $100 per hour, and the third hour will be priced at $80. So, the total cost for the client would be $280, offering a fair price for the extended service duration.
The ‘Dynamic Unit Pricing’ functionality gives you the flexibility to structure your pricing model in a way that best suits your business and customers, promoting satisfaction and profitability.
Setting a Minimum Booking Price
Every service you offer brings with it certain fixed costs and labor efforts, making it essential to assure a certain level of profit for each booking to sustain your business effectively. This is where the concept of setting a minimum booking price comes in.
Implementing a minimum booking price ensures a base profit level, and safeguards your business by preventing bookings from being placed at a total cost that falls below this threshold. It’s an important mechanism to protect your bottom line, while still offering competitive pricing to your customers.
Let’s say you’re running a coaching service, where each session involves considerable preparation and follow-up. Setting a minimum booking price can ensure that you’re adequately compensated for your time and expertise, regardless of the number of sessions a client books. For instance, if you set a minimum price of $50, even a single coaching session can’t be booked for less than that amount, preserving the value of your service.
Moreover, you might operate a cleaning business where you offer tailored rates for different types of spaces. For a small apartment, you might set a base price of $80, while larger homes might start at $120. However, by establishing a minimum booking price, say $60, you ensure a guaranteed minimum income for each job, even if the client only requires minimal cleaning services.
Such strategic use of the minimum booking price not only optimizes your pricing structure but also ensures it remains both competitive and profitable. It allows your business to strike a balance between attracting customers with affordable rates and ensuring adequate compensation for your services.
Configuring the Tax Rate
In this section, you can establish the tax rate for your service. This tax will either be added to or included in the standard rate. You have the option to input a new tax rate via the drop-down menu. For further guidance on setting tax rates for your company, please visit the setting tax rates user guide page.
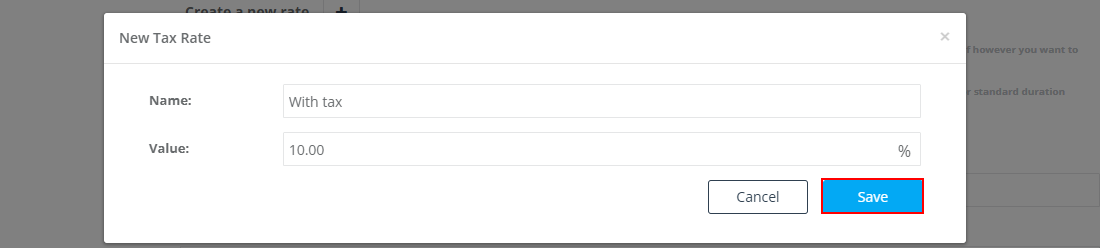
Here’s how you can add a new tax rate:
- Click on ‘Add new tax rate‘. This will prompt a pop-up window to appear.
- Within this window, enter the name and value of your tax.
- After entering these details, click ‘Save‘. Your newly added tax rate will then appear in the drop-down menu.

Location-Based Price Zones: Customizing Service Cost by Location
With OctopusPro, you can streamline your pricing strategy by applying price zones to services. This feature enables your service prices to automatically adjust based on the customer’s location. Different zones can be created with unique prices for each service, delivering a location-tailored and competitive pricing model to your customers.
You can easily apply a price zone to an existing service or when adding a new service. The process is simple and intuitive, requiring you to just select the locations included in a zone and input the unit price for that zone.
Furthermore, OctopusPro also allows the application of price zones to Custom Field values. This means if you have assigned Custom Fields to a service, you can create zones that automatically update the price when a location and a custom field are selected.
Implementing price zones in your services not only optimizes your pricing policy but also enhances customer satisfaction, aligns your prices with local market conditions, and ultimately, improves your profitability. This location-based pricing approach can be a crucial tool for your business to gain an edge in today’s competitive market.
To create and manage Location-Based price zones for a service, click ‘Manage Zones’. For more detailed information, visit our user guide on setting up location-based price zones.

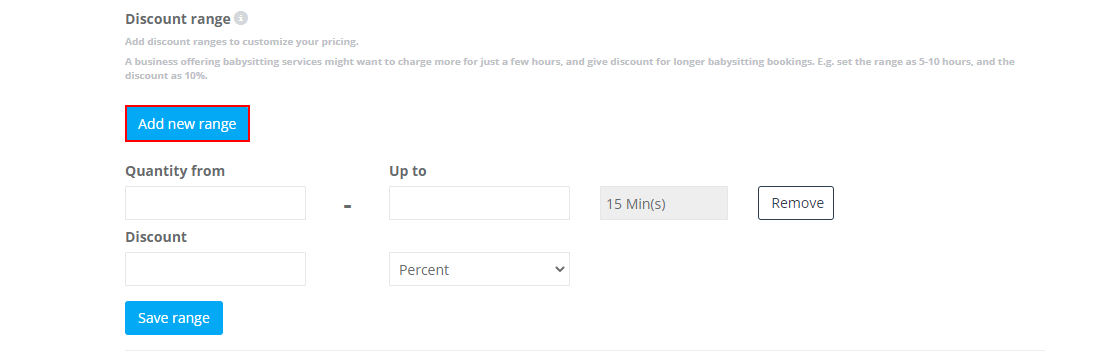
Implementing Bulk Discount Ranges
OctopusPro offers a comprehensive suite of features for automating cost and pricing for your services, among these features is the innovative Service Quantity Discount Range. This unique tool allows you to adopt volume pricing or bulk discounting strategies, incentivizing your customers to book more of your services at once. The outcome is an increase in the overall transaction value and the cultivation of customer loyalty.
Designed for services that are charged per unit or by time, this feature provides automatic discounts when a booking falls within a specified service quantity range. However, please note that it’s not applicable for services that are charged a flat amount per job as there’s no unit quantity field involved to discount.
You can introduce multiple discount ranges by clicking on ‘Add New Range‘. For more detailed information, visit our user guide page on adding discount ranges to a service.
While administrative users and fieldworkers have the flexibility to override the automatically suggested discount based on unique circumstances, customers booking through the portal will not have this option. This maintains consistency in applying your pricing strategy across all customer-initiated bookings.
By incorporating the bulk discounting feature from OctopusPro into your pricing strategy, you can enhance your business performance, promote larger bookings, and drive your business success.
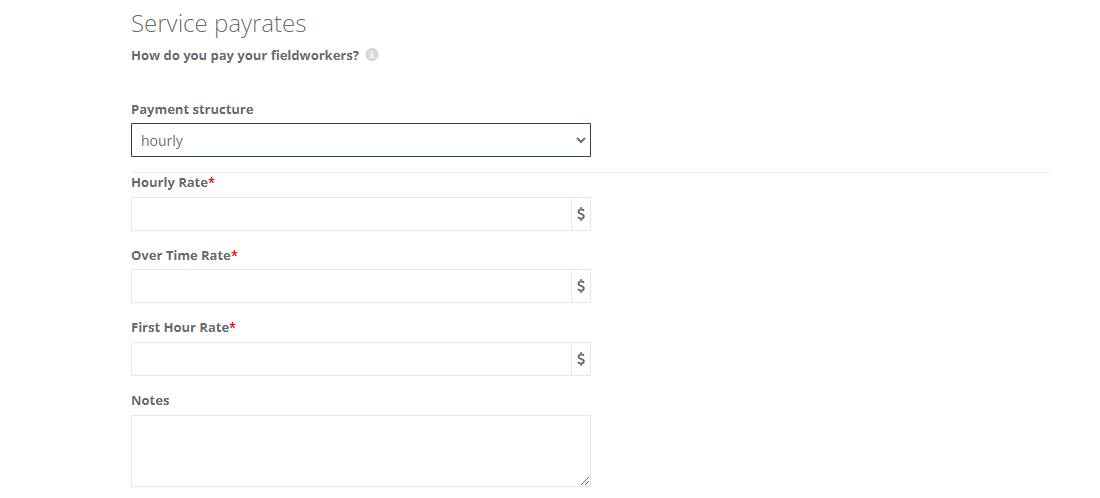
Configuring Service Fieldworker Payrates
Admin users have the ability to define the service payrates or payments for fieldworkers based on one of the following structures:
To deepen your understanding on this, please visit our service payrates and fieldworker share guide.
Hourly Payrate
Admin users may opt for an hourly payment structure. This structure allows fieldworkers to receive varying rates based on the working hours scheme as shown below:
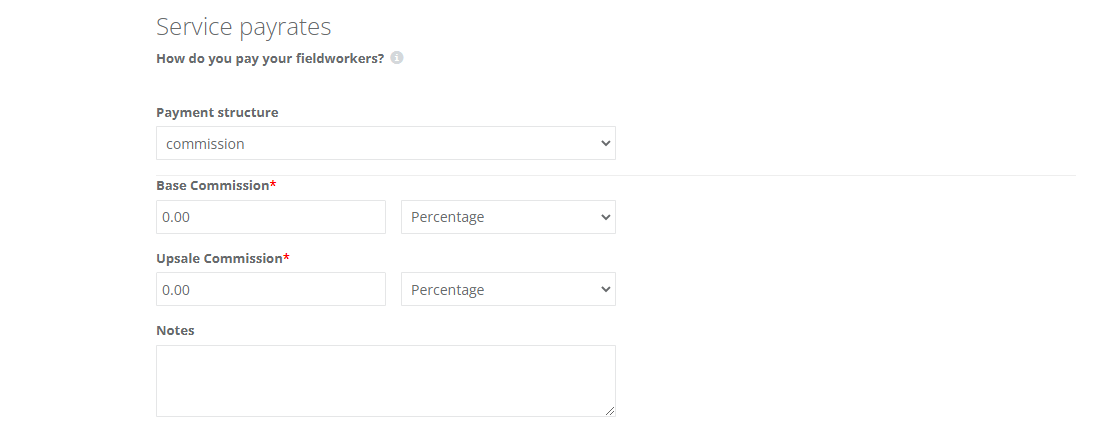
Commission-Based Payrate
If you prefer to apply a commission-based payment structure, admin users will need to establish both the Base Commission Rate and the Upsale Commission Rate. These rates can be set as a percentage of the Service Subtotal (excluding tax), or as a flat rate. It’s important to note that only one type of commission – either “Base commission” or “Upsale commission” – can be applied for the same fieldworker.
This payrate configuration feature ensures flexibility in compensation, enabling you to choose the structure that best aligns with your business model and the nature of the service provided.
Incorporating Custom Fields into Your Service
Custom fields in your services cater to specific needs and preferences of your customers during the booking or inquiry process. They provide a personalized touch to your service offerings, allowing you to gather information or provide options that are unique to each customer’s needs.
Custom fields are instrumental in fostering relationships between your services and the customer’s specific requirements. For instance, if you’re in the childcare industry, using custom fields allows you to ask essential questions such as the total number of children or if any have special abilities. This way, you can tailor your service to the unique needs of the customer and allocate the right teacher to the task.
The same principle applies to other service industries. For instance, in a car detailing service, custom fields can be used to specify car type and extras required, with each type having a distinct price and completion time. This level of customization enhances service provision and efficiency.
The utility of custom fields extends to collecting specific information related to the service during the booking or inquiry stage. You can assign these fields to fieldworkers, allowing you to determine which fieldworkers can provide the custom field options available and which ones cannot, directly influencing their availability based on the selected custom field options.
These custom fields can also impact pricing based on customer selection, and they are tied to the service being booked. For instance, if a service with custom fields is added multiple times in a booking, those fields will appear for each instance of the service.
However, it’s essential to distinguish between custom fields and forms & checklists. The latter are tools used to collect additional information or carry out assessments during or after a job is completed, without affecting the fieldworker availability or pricing.
For a comprehensive guide on creating and managing custom fields, please refer to the Creating Custom Fields Guide.
Benefits of Adding Custom Fields to your Services
-
Streamlining Information Collection: They ensure that all necessary details are gathered upfront, eliminating excessive communication between customers, admin staff, and fieldworkers.
-
Enhancing Fieldworker Management: By tying custom fields to fieldworkers, it becomes possible to specify which fieldworkers can provide certain options, directly impacting their availability based on selected options.
-
Facilitating Accurate Pricing: By influencing pricing based on customer selection, they provide clear, accurate quotes, reducing the risk of price disputes or adjustments later.
-
Improving Customer Experience: Offering custom options through these fields allows customers to tailor services to their specific needs and preferences, improving their satisfaction and encouraging repeat business.
-
Promoting Automation: Custom fields can automate various aspects of the booking process, reducing manual intervention and freeing admin staff to focus on other tasks.
-
Enabling Detailed Reporting and Data Analysis: They provide granular data about customer preferences and service variations, enabling identification of trends, service optimization, and data-driven business decisions.
Types of Custom Fields
- Short Text Input (Text Field) – A compact field that allows users to enter a small amount of text. Ideal for inputs like names, email addresses, or brief responses.
- Long Text Input (Text Box) – A larger text field that facilitates the input of more detailed information or comments. It can accommodate lengthy descriptions, instructions, or comprehensive feedback.
- Date Selection Input – A field that presents users with a calendar from which they can select a specific date. Useful for collecting dates.
- Time Selection Input – Similar to date selection, this field lets users select a specific time from an integrated clock. It’s typically used to determine appointment times or specify a preferred time for service delivery.
- Increment/Decrement Button (+/-) – A numeric input field that allows users to increase or decrease a number value. It’s ideal for quantities, such as the number of items or participants.
- On/Off Selector (Toggle) – A binary switch that lets users activate or deactivate an option. This can be used to indicate preferences or opt in/out of certain features or services.
- Single Choice Button Display (Button Group) – This field presents multiple options in a button format, of which only one can be selected. It’s used when users need to make a single choice among several options.
- Single Choice Selector (Radio button) – Similar to a button group, this field presents options with radio buttons, and users can select only one. It’s beneficial when asking for preferences or options where only one response is valid.
- Single Choice Selector (Dropdown) – A drop-down menu that allows users to choose one option only from a list. Ideal for selecting service options, or preferences.
- Single Selection List Option Field – A simple list from which users can select a single option. It’s useful when the options are too many to fit into a button group or radio button display.
- Multi-Option Selector (Checkbox) – This field allows users to select multiple options by checking boxes. This is beneficial when users can have multiple valid responses, like selecting multiple services or preferences.
- Multi-Option Checkbox Button (Checkbox) – A field that presents multiple options in a button format, where more than one can be selected. It’s used when users need to select multiple options from a list.
- Signature – A field where users can input their digital signature, often used for legal purposes, to indicate agreement to terms and conditions, or to verify the identity of the user.
Custom fields are instrumental in creating accurate quotes, as they provide detailed, specific information about the customer’s service requirements and preferences. They ensure a smooth quoting process, a consistent pricing structure, and valuable data for decision-making. Ultimately, they’re integral for streamlining operations, improving service delivery, and enhancing customer satisfaction.
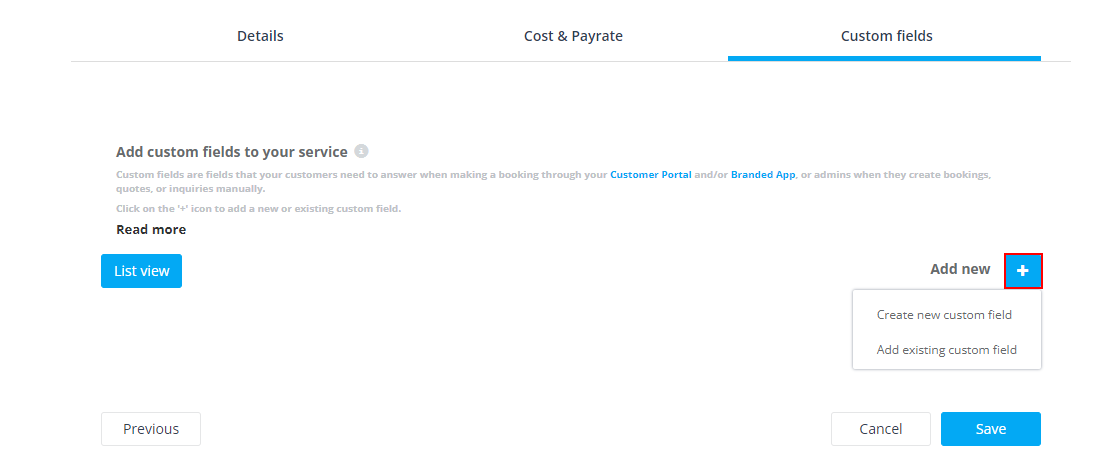
Adding Existing or Creating New Custom Fields
- Click on the ‘+’ icon to begin the process of adding a custom field.
- If you want to utilize an existing custom field, select ‘Add existing custom field’. This will prompt a list of your previously created custom fields. Simply choose the ones you wish to incorporate into this service.
- Alternatively, if you need to create a new custom field, select ‘Create a new custom field’. This will open a pop-up form where you can create and configure a brand-new custom field that suits the specifics of your service.
- You can easily change the order of custom fields added to a service by using the drag-and-drop feature.
In summary, custom fields offer an advanced level of service customization, allowing you to meet customers’ specific needs during the booking or inquiry stage. These fields can collect information, affect pricing and fieldworker availability, streamline communication, and enhance the overall customer experience. By offering various field types, custom fields present customers with personalized options during booking, ensuring all necessary details are captured for service provision. Besides, custom fields facilitate automation, improve fieldworker management, and provide data for analysis and decision-making. Thus, effectively incorporating custom fields into your services improves efficiency, customer satisfaction, and business success.
To deepen your understanding about custom fields, please refer to the Creating Custom Fields Guide.
Finishing Your Service Configuration
Once you’ve finished setting up your service and custom fields, click on the ‘Save’ button. A pop-up window will then ask if you wish to create another service. If you choose ‘Yes’, your current service will be saved and you’ll be redirected to a new service form to begin the process again.

This feature helps in streamlining the process, especially when you’re adding multiple services at a time.
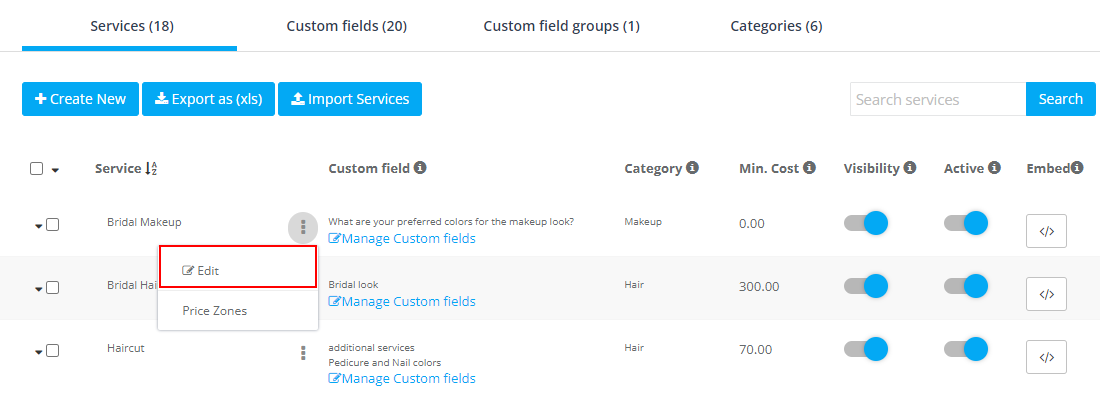
Managing Your Services: Viewing, Editing, or Deleting
After creating your services, you might find it necessary to view, update, or delete them. To access these options, navigate through your settings by following this path: Settings > Service Settings > Services. This will redirect you to the comprehensive ‘All Services’ page. Here you can:
- Edit: To make changes to a service, locate the service in question and click on the ‘Action’ button situated next to it. From the ensuing options, select ‘Edit’. This allows you to modify the service details as necessary.
- Delete: In case you need to remove a service, simply check the box next to the service in question, then select ‘Delete’ from the drop-down menu. Please remember, this action is irreversible.
Adding Services During Booking, Quotes, or Inquiries Creation
While initiating a new booking, quote, or inquiry, you may find it necessary to include a service. Follow these steps:
- First, navigate to ‘Bookings’, ‘Quotes’, or ‘Inquiries’ from the left sidebar menu, then click on ‘Create New’.
- A form will be displayed. Scroll down to the ‘Services’ section and click on ‘Add Service’ or simply click on the services search bar.
- A pop-up window will appear presenting you with a list of existing services to choose from, or an option to create a new service. Make your choice accordingly.
By following these simple steps, you can manage your service offerings seamlessly, ensuring your business offerings are always up-to-date and relevant to your customers’ needs.
Adding Services While Creating a Booking via the Fieldworker App
Fieldworkers have the capability to view and select services while creating a booking through the Fieldworker App. Here’s how:
- Select ‘Create a new booking‘ from the sidebar menu located on the left side of the screen.
- Proceed with the booking process by selecting a customer from your customer list.
- A list of available services will be presented. Select the service relevant to the booking.
- Continue with the usual booking process, filling out necessary details and confirming the booking.
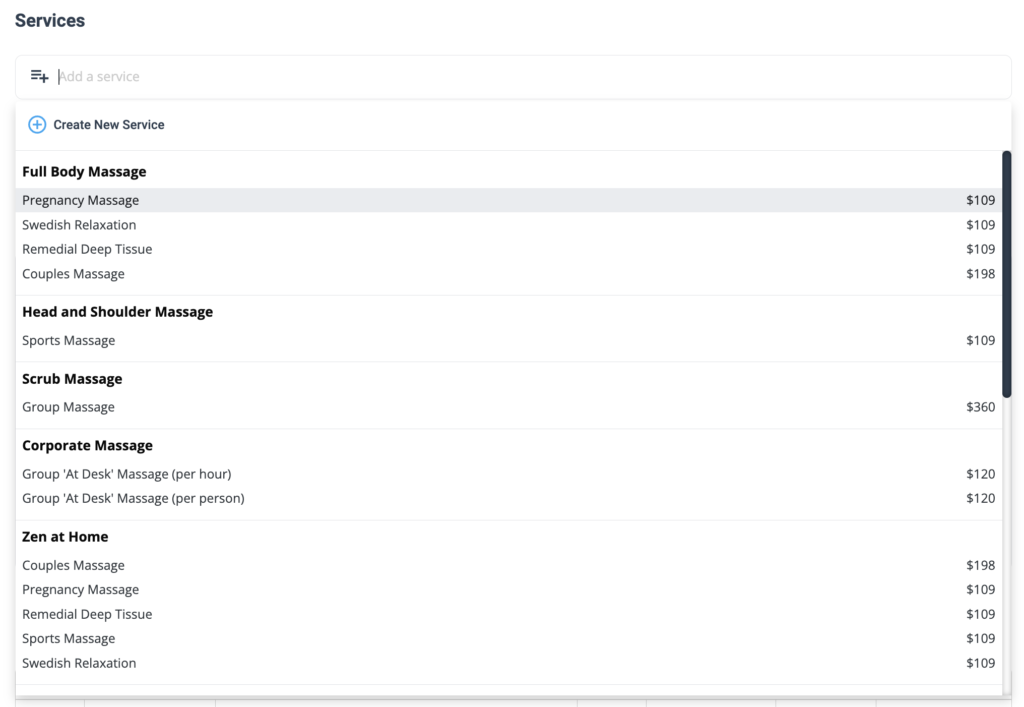
How Customers View Services on the Customer Portal
Customers can browse and book services directly from the customer portal. Here’s how you can access the link to your customer portal:
- Go to ‘Settings’.
- Select ‘Customer portal’.
- Click on ‘General settings’ to obtain the link to your customer portal.
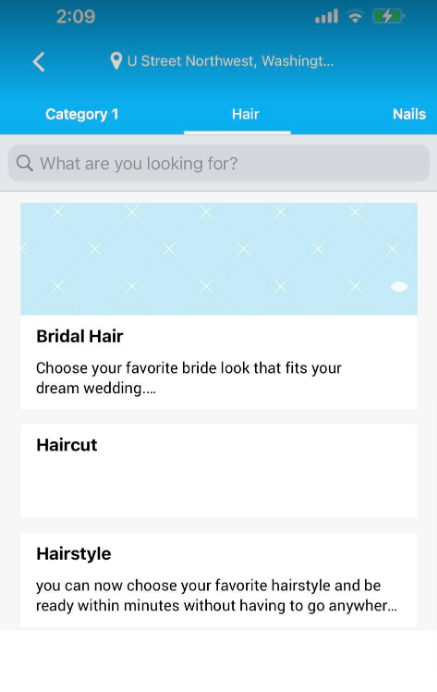
Once inside the customer portal, services are intuitively presented on the homepage, making it straightforward for customers to browse and select services. To streamline the user experience and provide a personalized journey, the portal offers advanced features, including:
- Category-Based Navigation: If your services are organized into categories, customers can quickly drill down to find what they’re looking for. By selecting a specific category, customers are shown a curated list of related services, simplifying their search and potentially boosting your conversion rate.
- Location Filters: Depending on the geographical scope of your services, customers may filter offerings based on location. This ensures they’re viewing services relevant to their area, minimizing frustration and enhancing user satisfaction.
- Search Functionality: For customers who know exactly what they’re after, a robust search feature can save valuable time. By entering keywords or phrases into the search bar, customers can instantly pull up matching services.
With these features, your customer portal isn’t just a list of services—it’s a dynamic, user-friendly platform that caters to the diverse needs and preferences of your clientele.

Customers view services on the customer portal homepage.
Importing and Exporting Services
For enhanced accessibility and organization, OctopusPro allows you to import and export your service list effortlessly.
To do this, navigate to Settings > Service Settings > Services
Here, you’ll find options to both import and export services:

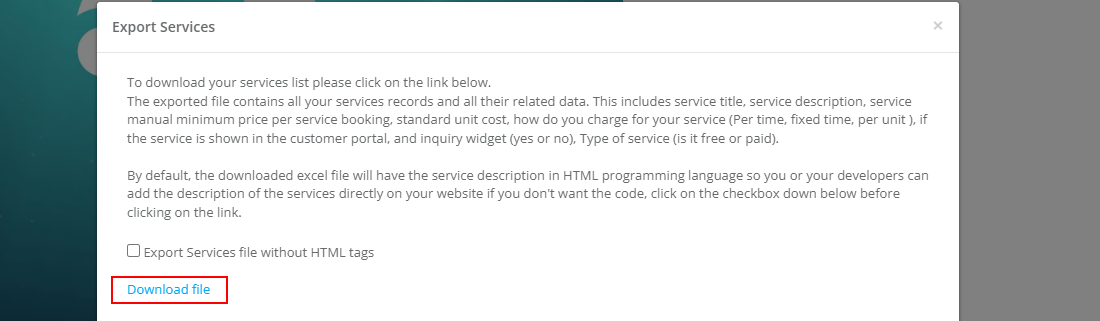
Exporting Services: To create a downloadable list of services already in your system, select ‘Export as (Xls)‘ A pop-up window will appear. Simply click ‘Download file‘ and choose your preferred save location on your computer.
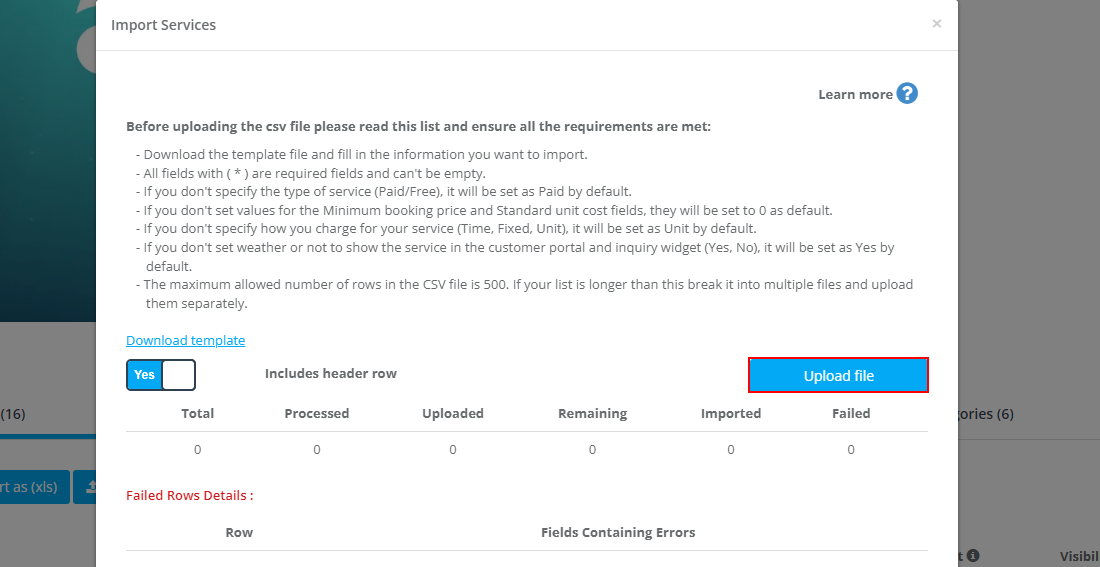
Importing Services: OctopusPro makes adding services from your computer a breeze, saving you from manual entry. Click ‘Import Service‘ and a pop-up window will emerge. Here, you can upload your Excel file containing the service list. If you’re uncertain about the required format, you can download a template for reference. Once you’re ready, click ‘Upload File‘ Your newly imported services will then display in the list below.
To stay updated, please subscribe to our YouTube channel.