
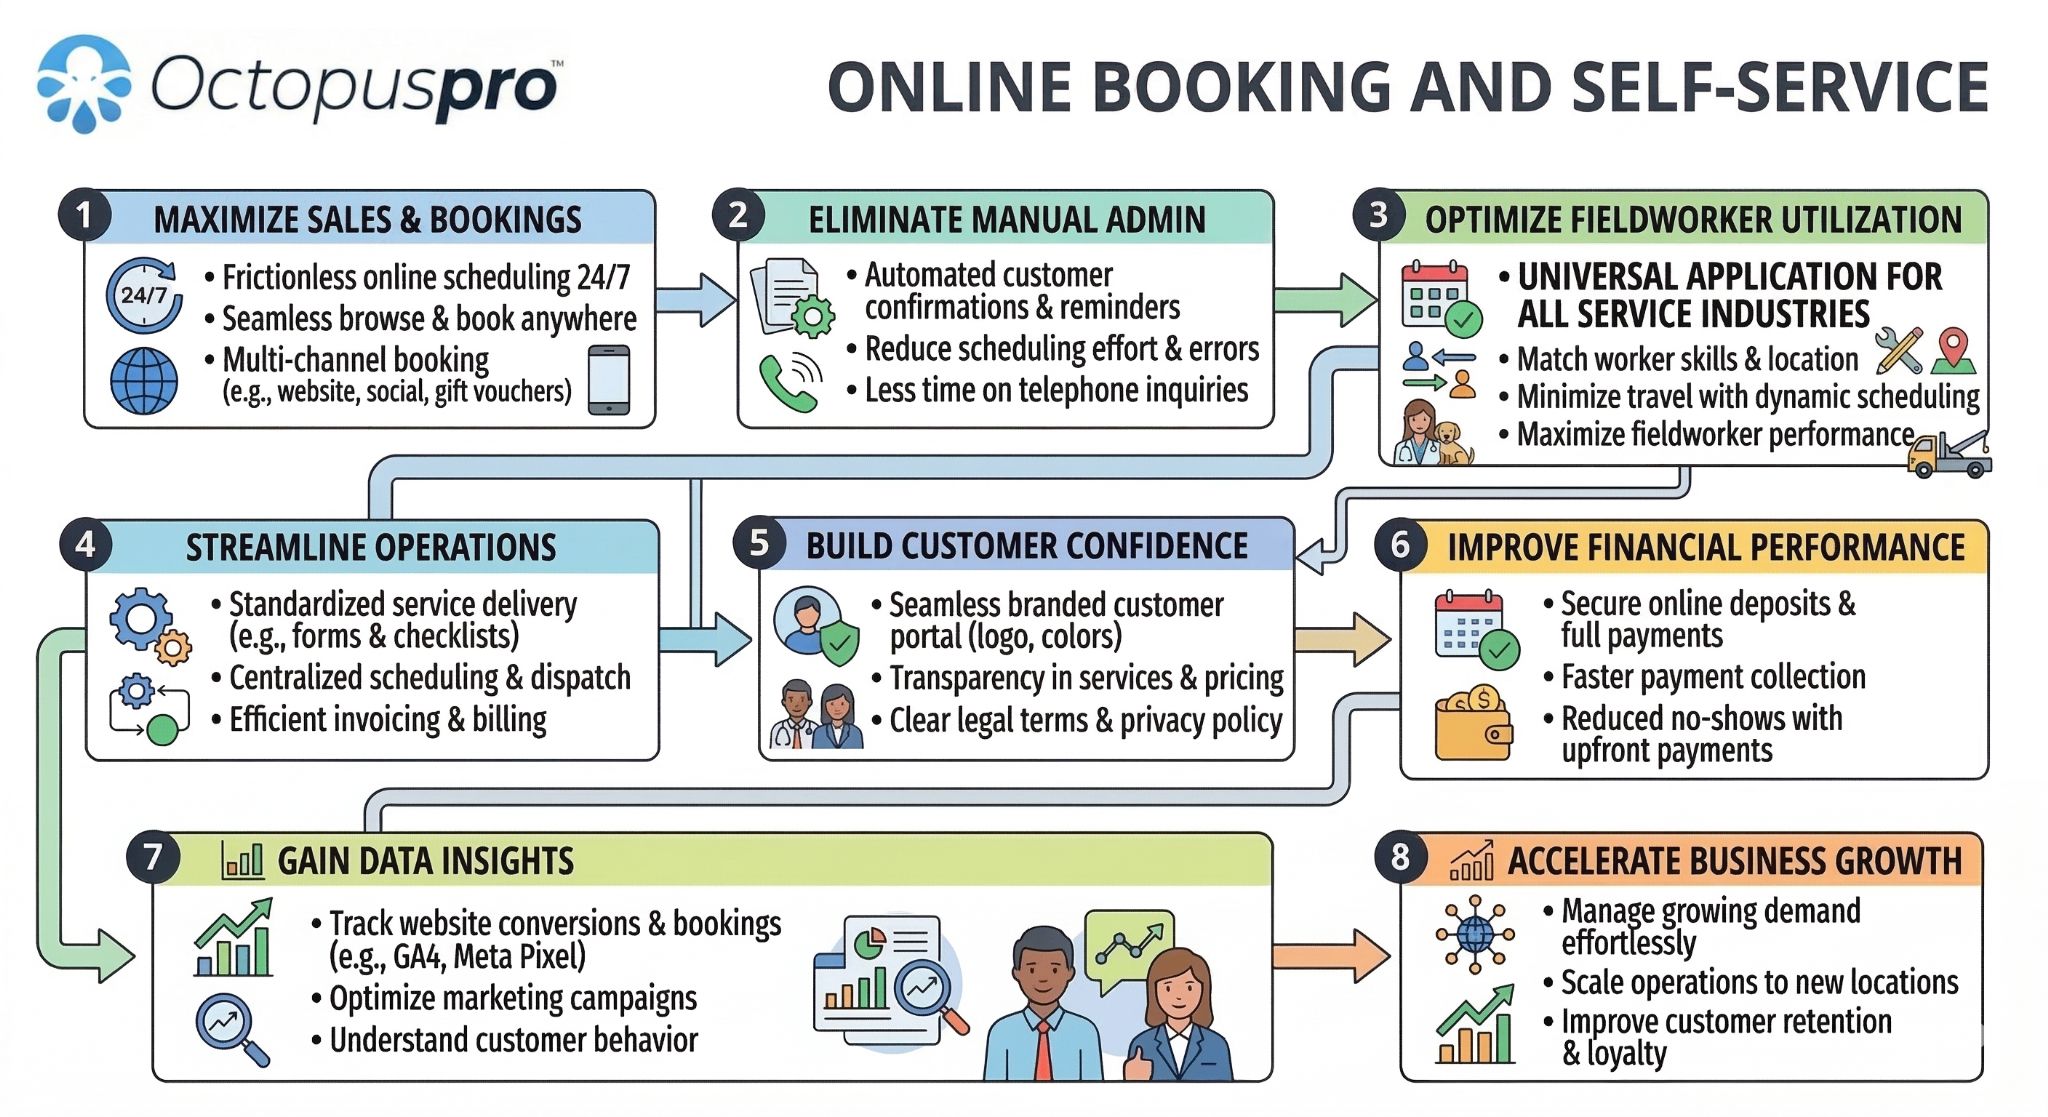
Accept Online Bookings Through Your Website
OctopusPro lets you accept online bookings directly through your website using the Customer Portal (your online booking page) and/or a Lead Capture form (inquiry widget). Once configured, customers can browse services, choose a date/time, select options, pay deposits (if enabled), and receive automated confirmations—without you doing any manual admin work.
Best for instant online bookings: Customer Portal (customers book a confirmed appointment based on your availability).
Best for quote-first businesses: Lead Capture (customers submit details and you respond with a quote/booking).
Table of contents
- What customers can do online
- 1) Enable the Customer Portal & set your portal URL
- 2) Add legal text (terms, privacy, disclaimers)
- 3) Brand your portal (logo, favicon, colors, background)
- 4) Add promotions, social links, and menu/header links
- 5) Configure services, categories, custom fields, and availability
- 6) Add “Book Online” to your website (button/link)
- 7) Embed a Lead Capture form (inquiry widget)
- 8) Configure portal flags & permissions (controls what customers see/do)
- 9) Set up payment integration (online payments & checkout)
- 10) Configure job dispatch & assignment
- 11) Set up forms & checklists
- 12) Show payments & invoices online
- 13) SEO & tracking (Meta tags, GA4, Google Ads, Meta Pixel)
- 14) Reviews and social proof
- 15) Test & launch checklist
What customers can do online
Once your portal is enabled, customers can self-serve online—reducing calls, admin work, and back-and-forth messaging.
- Browse your services and pricing (and service descriptions if enabled).
- Select options and answer booking questions (custom fields).
- Choose a date/time based on real availability (if enabled).
- Pay deposits or full amounts (if online payments are enabled).
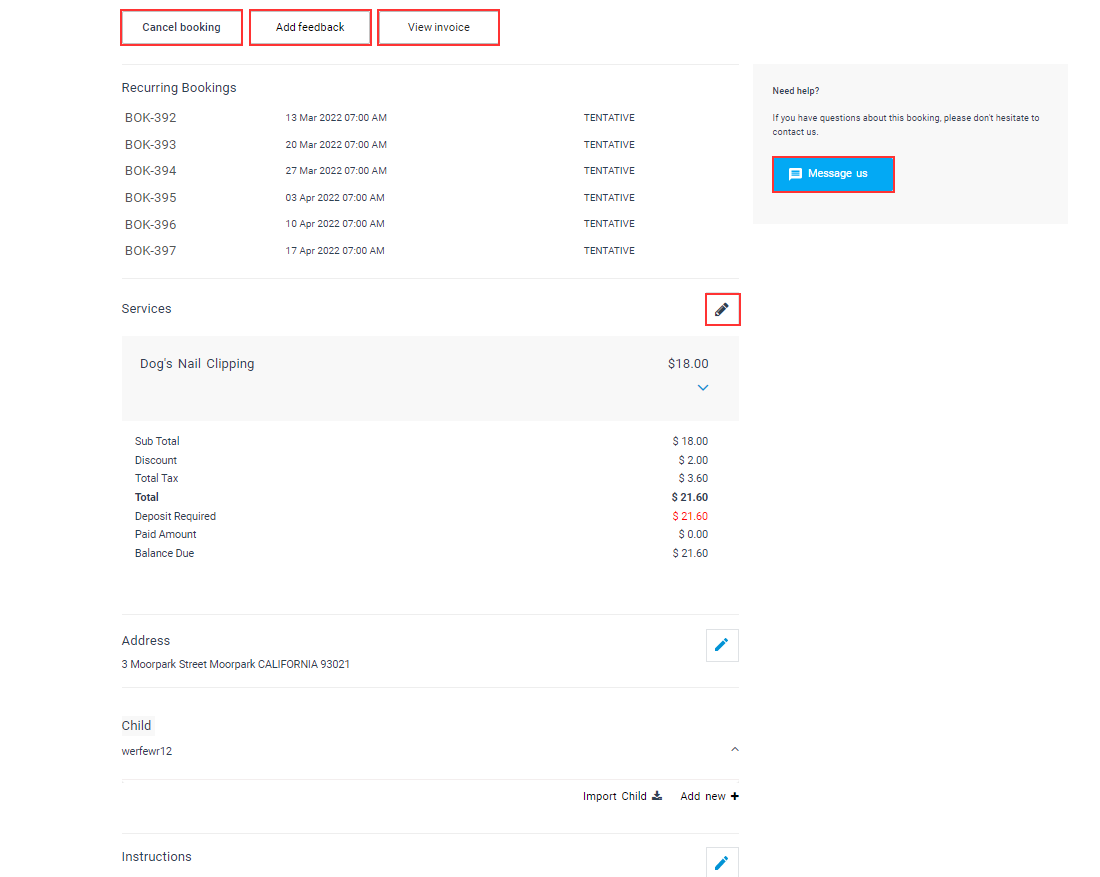
- View booking details, invoices, and history.
- Reschedule/cancel (if allowed) and leave feedback (if enabled).

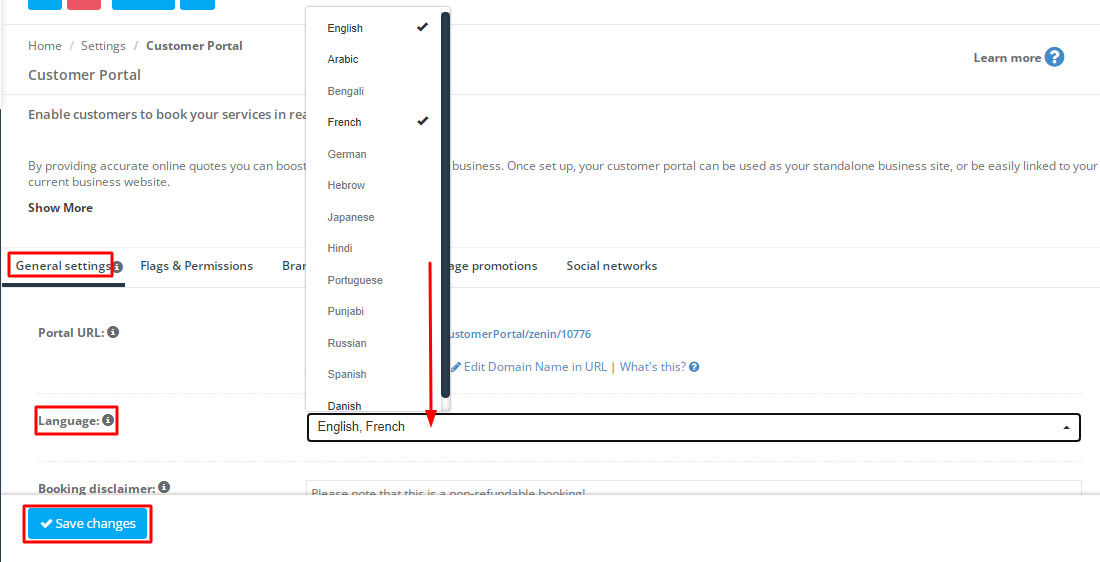
1) Enable the Customer Portal & set your portal URL
Go to Settings > Customer Portal. Turn the portal on, then confirm your Portal URL (the web address customers will use to book online). You can share this link on your website, social pages, Google Business Profile, email signatures, and SMS templates.

Optional: Use a shorter, branded portal URL (portal username)
If you want a cleaner booking link, set your portal username (example highlighted below).

Optional: Support multiple languages
If you serve multi-language customers, select your portal language(s) from the portal settings.
For deeper portal configuration, see:

2) Add legal text (terms, privacy, disclaimers)
Clear policies reduce disputes and chargebacks. In your portal settings, you can display legal content and customer acknowledgments such as:
- Booking disclaimer (e.g., deposits are non-refundable, travel fees may apply).

- Terms & Conditions link/checkbox.
- Privacy Policy content.
- Cancellation / reschedule policy and minimum notice windows.

Tip: If you’re pasting formatted policy text, use the editor’s code view when needed.

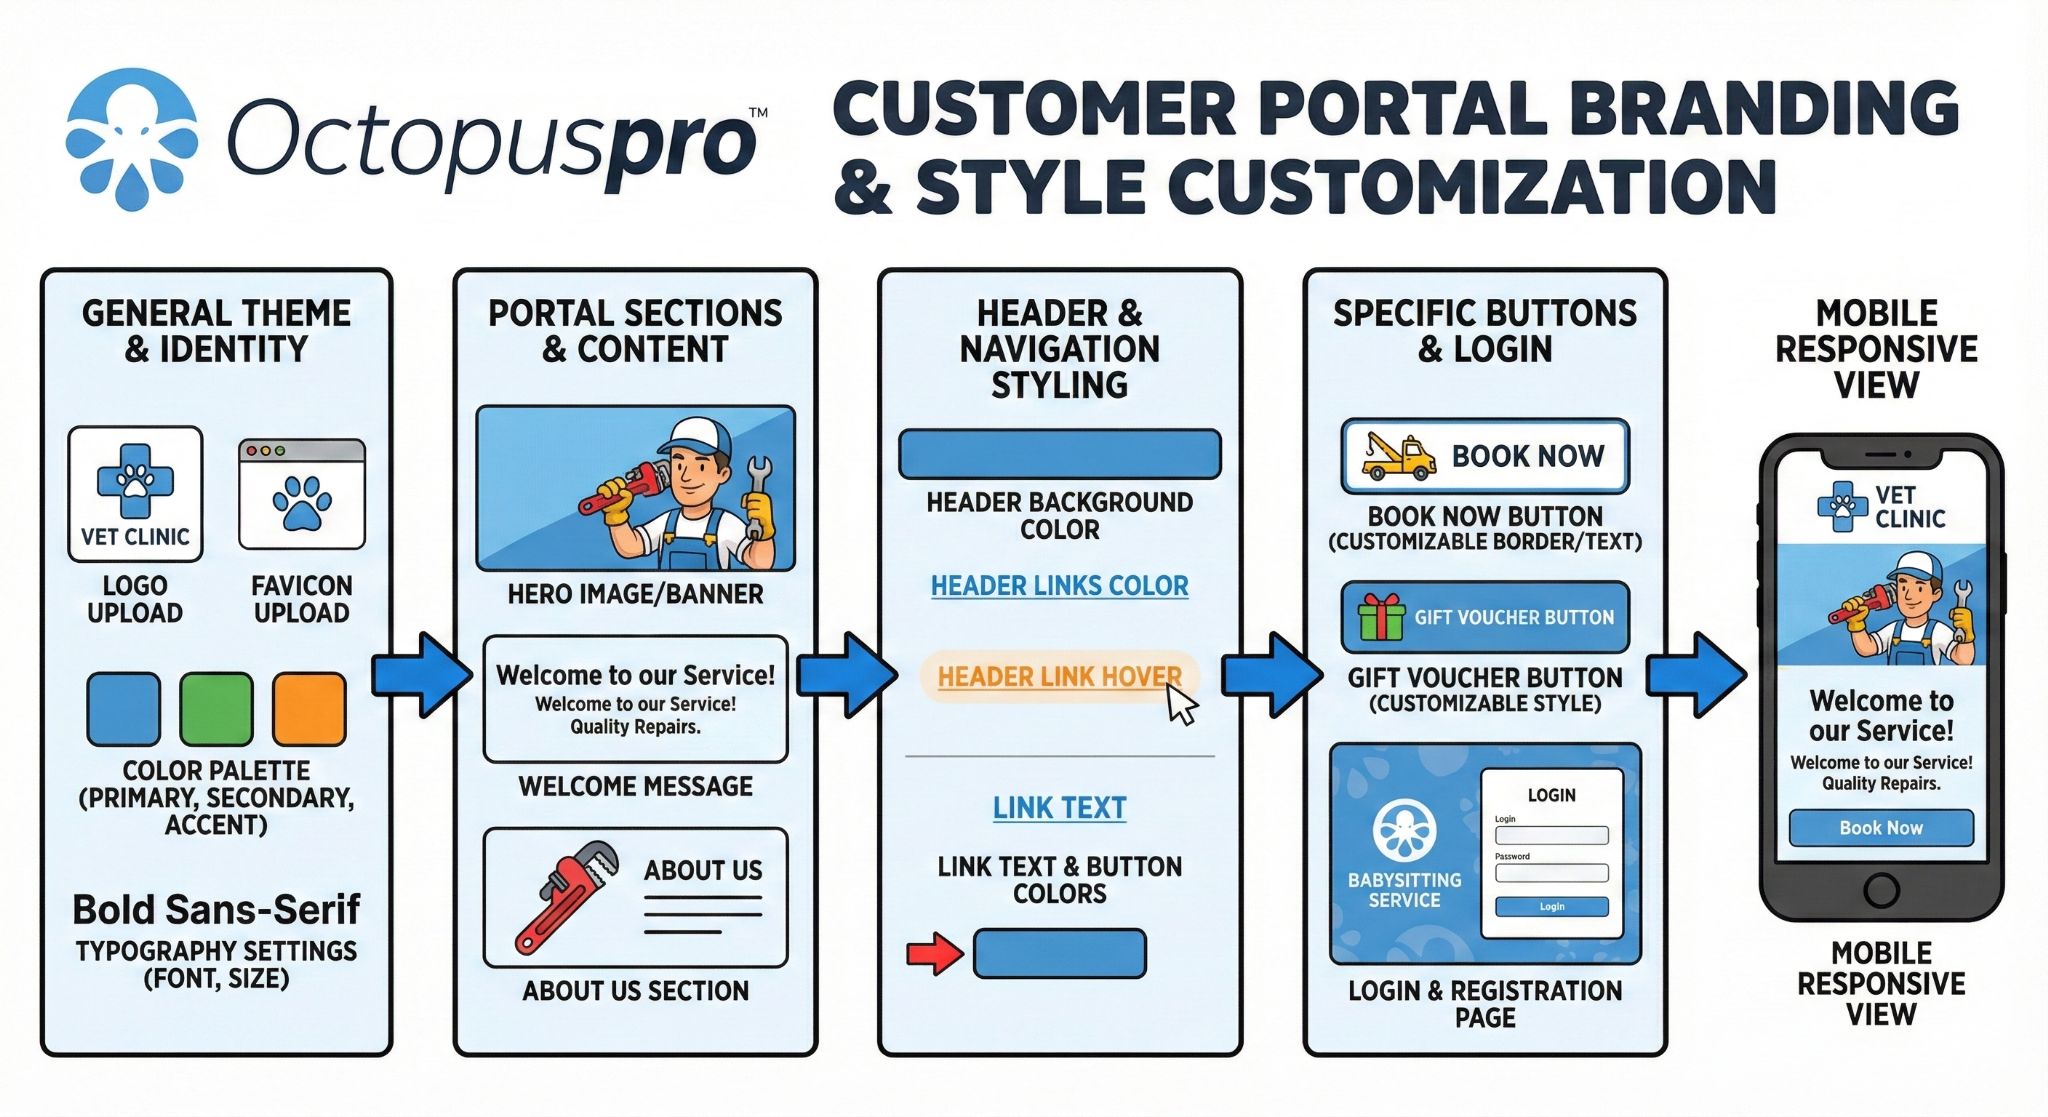
3) Brand your portal (logo, favicon, colors, background)
A branded booking experience builds trust and improves conversion. Configure portal branding in Settings > Customer Portal > Branding & Style.

Also ensure your core company branding (logo/invoice logo/signature logo) is set under company branding settings in Settings > Company Settings > Branding.
Learn more: Customer Portal Branding & Style
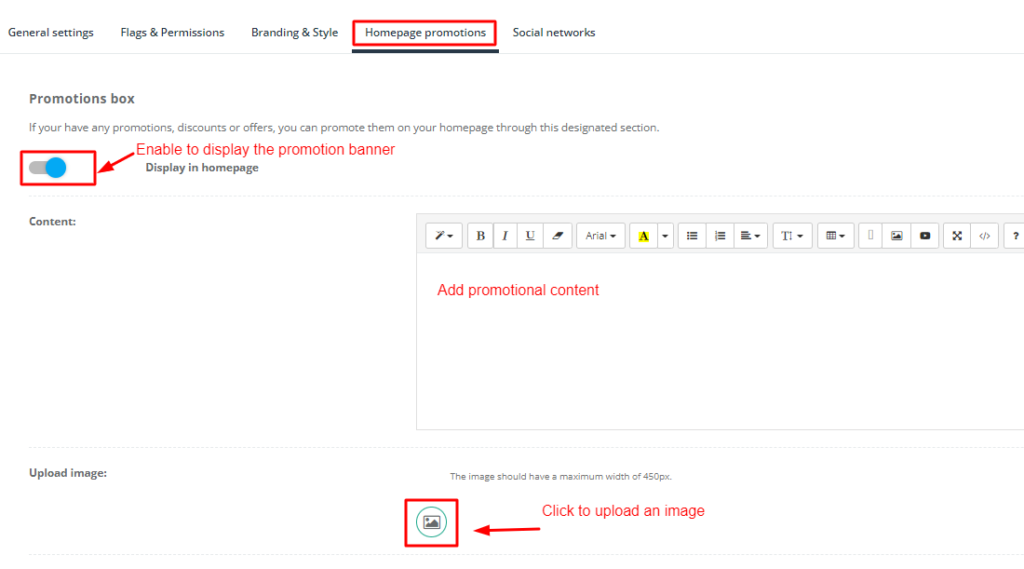
4) Add promotions, social links, and menu/header links
Homepage promotions
Highlight seasonal offers, coupons, or announcements. Promotions can appear on your portal homepage.
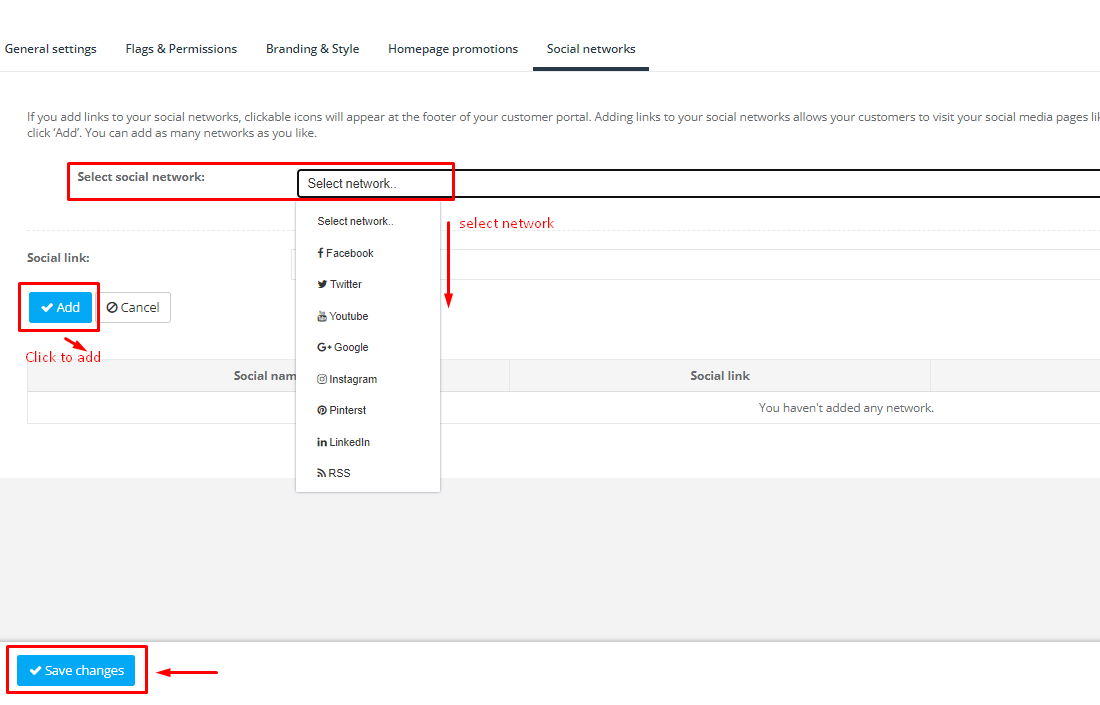
Social networks
Add your social links so customers can trust your brand and follow you.
Header links (Therapists/Team, Contact Us, FAQs, etc.)
You can show helpful navigation items in your portal header to reduce support requests.

Learn more:
5) Configure services, categories, custom fields, and availability

Create services and organise them into categories
Customers can only book what you publish. Make sure your services are created, categorised, and marked as visible in the portal.
Control visibility and embed options for each service
Use service settings to control whether a service appears in the portal and whether it can be embedded/linked.

Add booking questions and options (custom fields)
Custom fields let customers provide everything you need up front (e.g., property type, access details, add-ons, photos). This reduces back-and-forth and improves job readiness.
Availability and scheduling
If you want customers to book confirmed times, enable real-time availability and make sure your team calendars/availability are configured.

Add fieldworkers and assign services


6) Add “Book Online” to your website (button/link)
To accept online bookings through your existing website, you have two simple options:
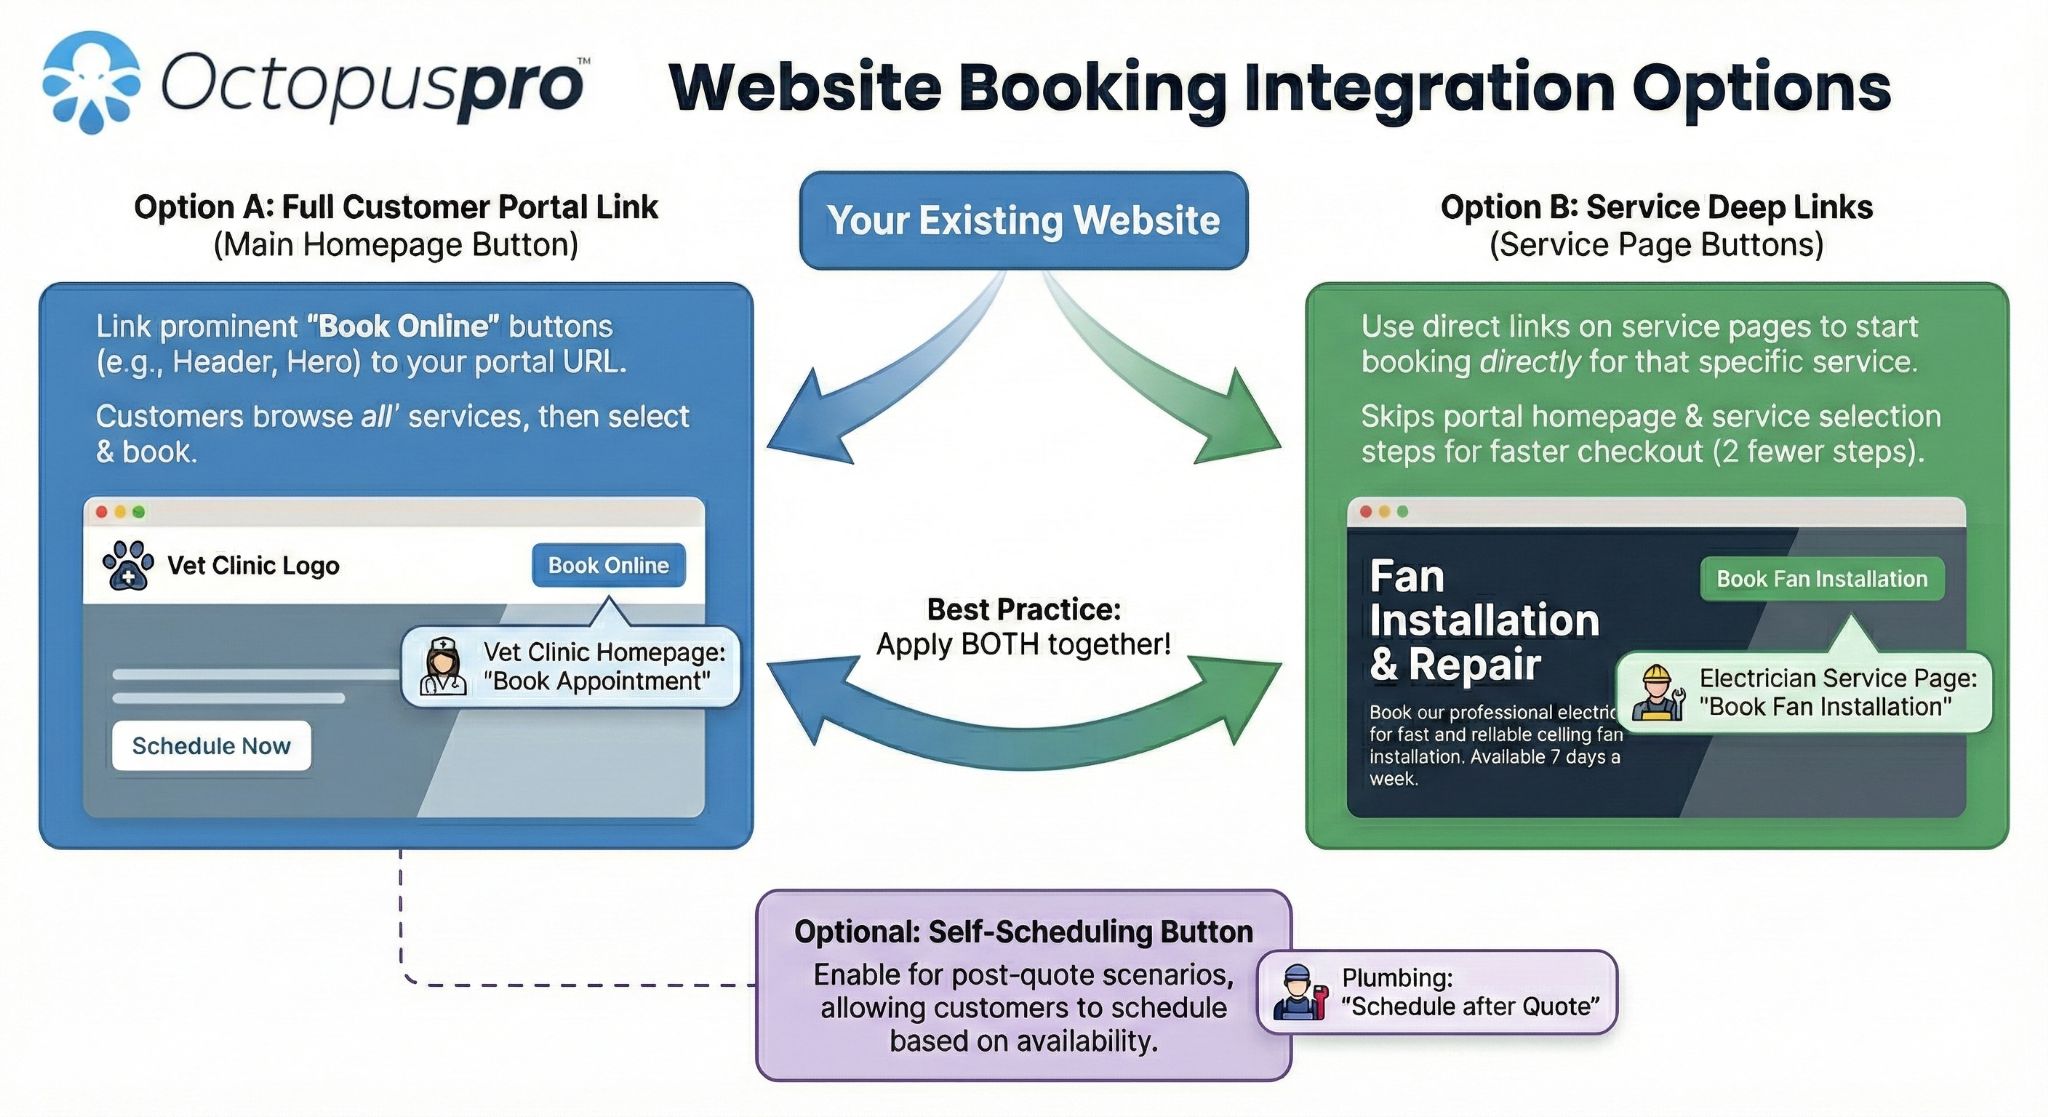
Option A: Link customers to your full Customer Portal (recommended)
Add a prominent Book Online button (or menu link) that takes customers to your Customer Portal URL, where they can browse services and complete a booking.
Best placements (highest conversion):
- Website header navigation (always visible)
- Homepage hero section (top of the page)
- Service pages (next to pricing/benefits)
- Contact page and website footer
- Google Business Profile website link and/or appointment link
- Email signature and SMS templates
Tip: Use clear call-to-action text such as Book Online, Schedule Now, or Get Started. Keep it consistent across your website and marketing channels.
Option B: Use direct links/buttons (deep links) for specific services or gift vouchers
If you want customers to start the checkout flow immediately (without browsing the full portal), you can use direct links/buttons:
- Service-specific booking links (deep links): open the portal straight into the booking flow for a specific service.
- Gift voucher purchase links: open the portal straight into the voucher purchase flow (if gift vouchers are enabled in your account).
Where to get these links:
- Service booking link: open the service in your admin portal and go to its Service Settings to copy the direct booking URL/button.
- Gift voucher link: go to your Gift Vouchers settings/page and copy the voucher purchase URL/button (availability depends on your plan/modules).
When to use direct links:
- On individual service landing pages (best UX)
- On your Gift Voucher page (e.g., “Buy a Gift Voucher” / “Send as a Gift”)
- In Google Ads and campaign landing pages
- In email marketing where the offer is tied to one service or vouchers
- On “Book this service” / “Buy voucher” buttons across your website
Learn more:
- Customer Portal URL (share your main booking link)
- Customer Portal General Settings
- Create & Configure Services (including portal visibility)
- Gift Vouchers (enable, sell online, and manage vouchers)
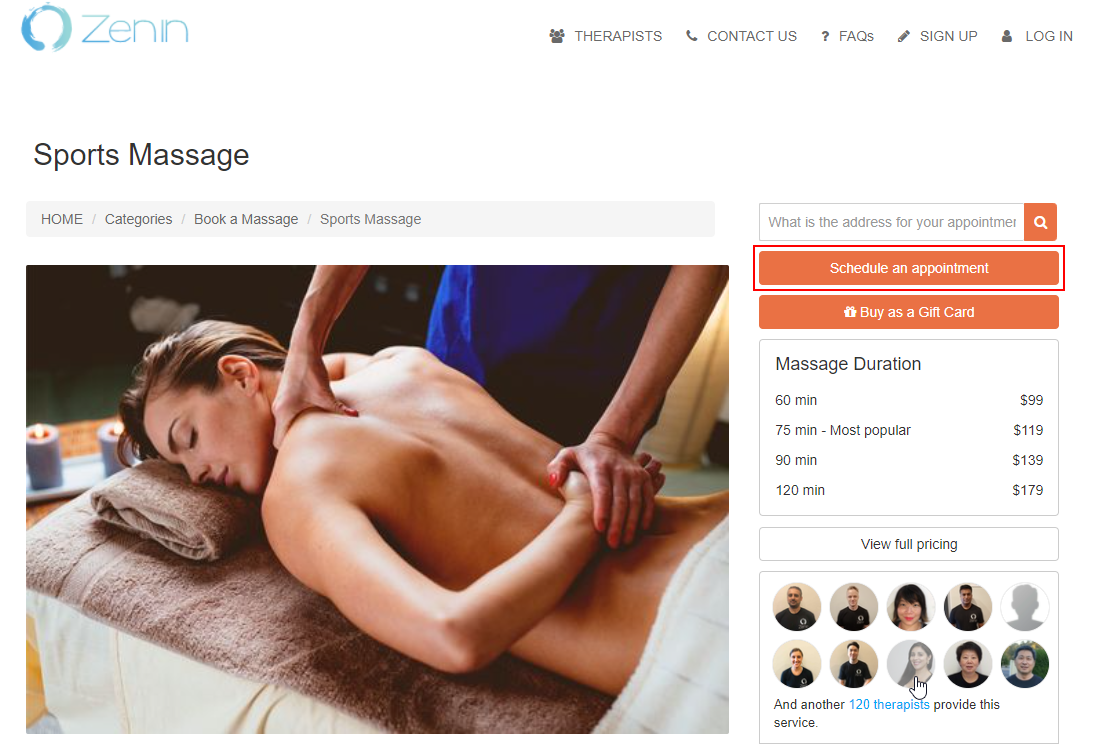
Optional: Enable a “Schedule an appointment” (self-scheduling) button
If you provide quotes first (or want customers to choose a time after approval), you can enable a dedicated self-scheduling button that lets customers schedule the appointment themselves from the portal and/or email links—based on your availability rules.

Learn more: Add “Book Online” to Your Website
7) Embed a Lead Capture form (inquiry widget)
If you prefer customers to submit details first (instead of instantly booking), embed a Lead Capture form on your website. Submissions are saved in OctopusPro as inquiries/leads so your team can qualify them and send quotes.

Learn more: Lead Capture (Inquiry Widget)
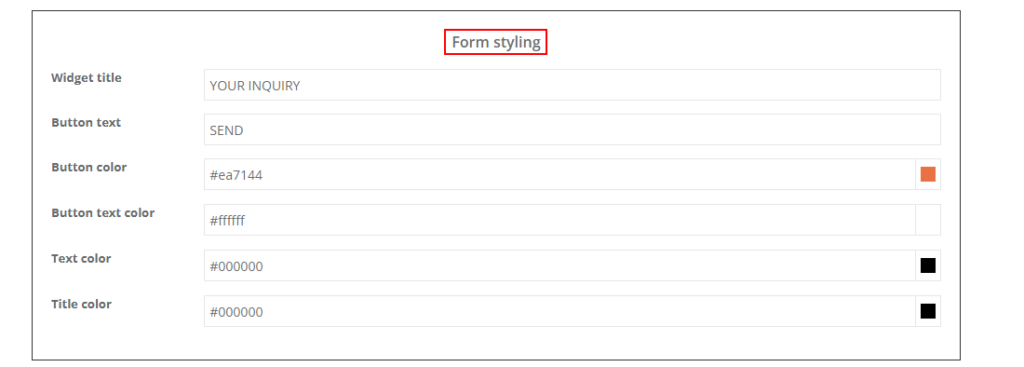
Form styling
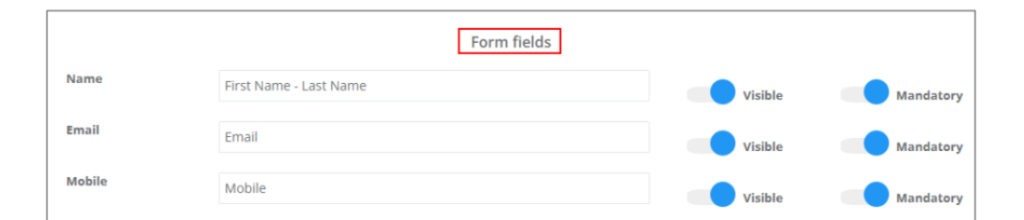
Form fields (visible vs mandatory)
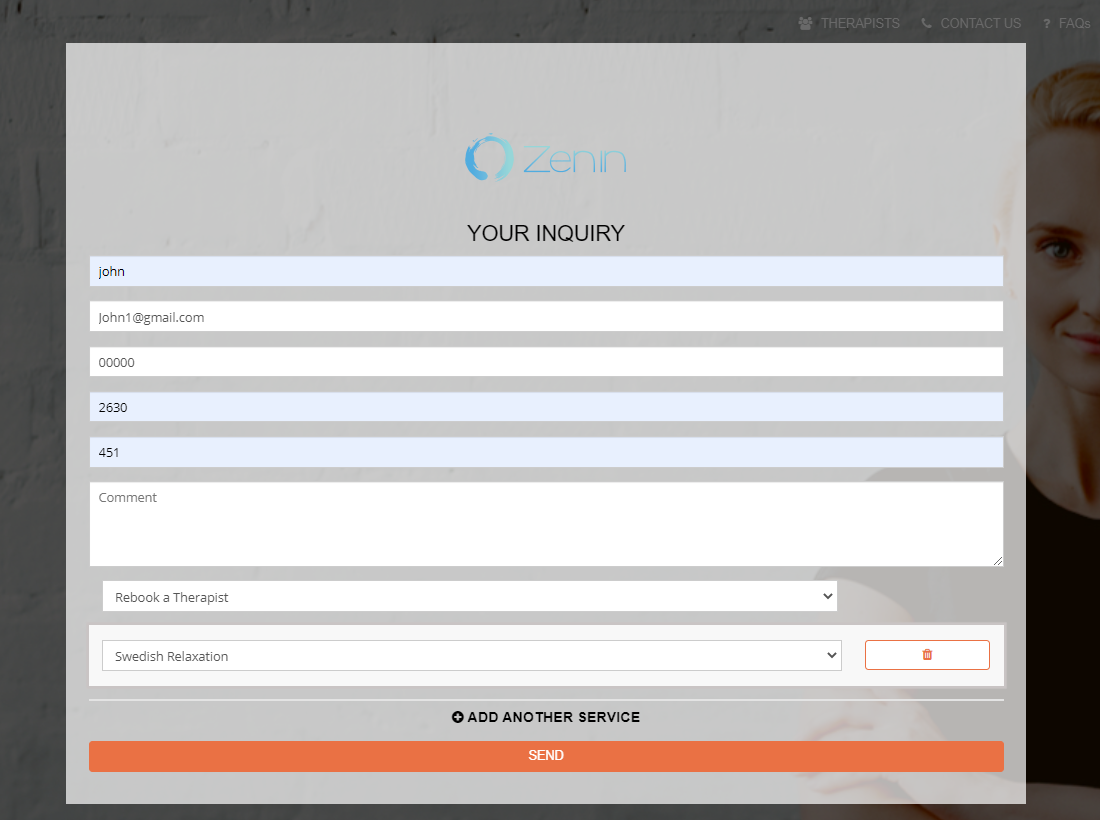
Example: inquiry form on your website

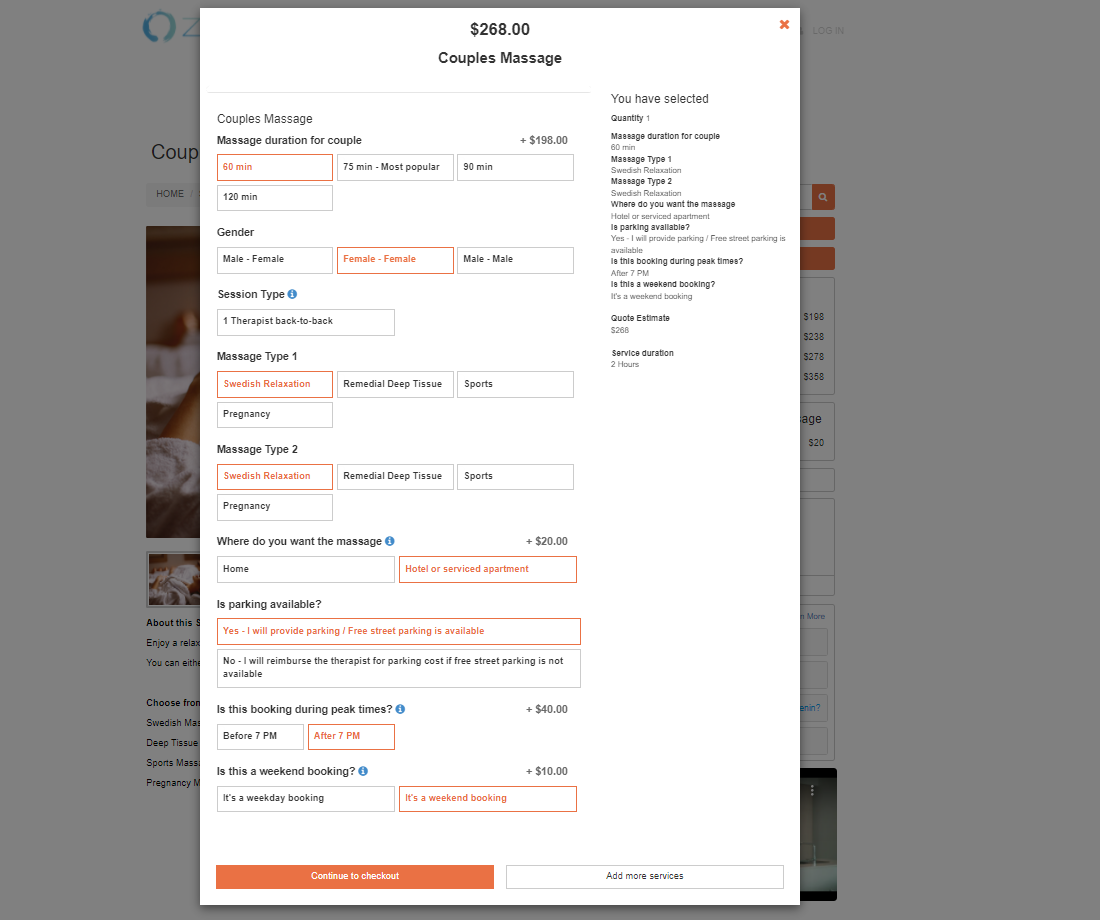
Example: advanced inquiry form (with service selection)
8) Configure portal flags & permissions
Customer Portal flags & permissions are feature toggles that control what customers can see and what actions they can take in your online booking portal—such as booking rules, self-service rescheduling/cancellations, uploads, invoice creation, pricing visibility, and fieldworker (technician) profile access.
Where to configure: go to Settings → Customer Portal → Flags & Permissions (on some accounts it may appear under Settings → Communications → Customer Portal).
Tip: after changing any flags, click Save and test your portal in an incognito/private browser window to avoid cached sessions.
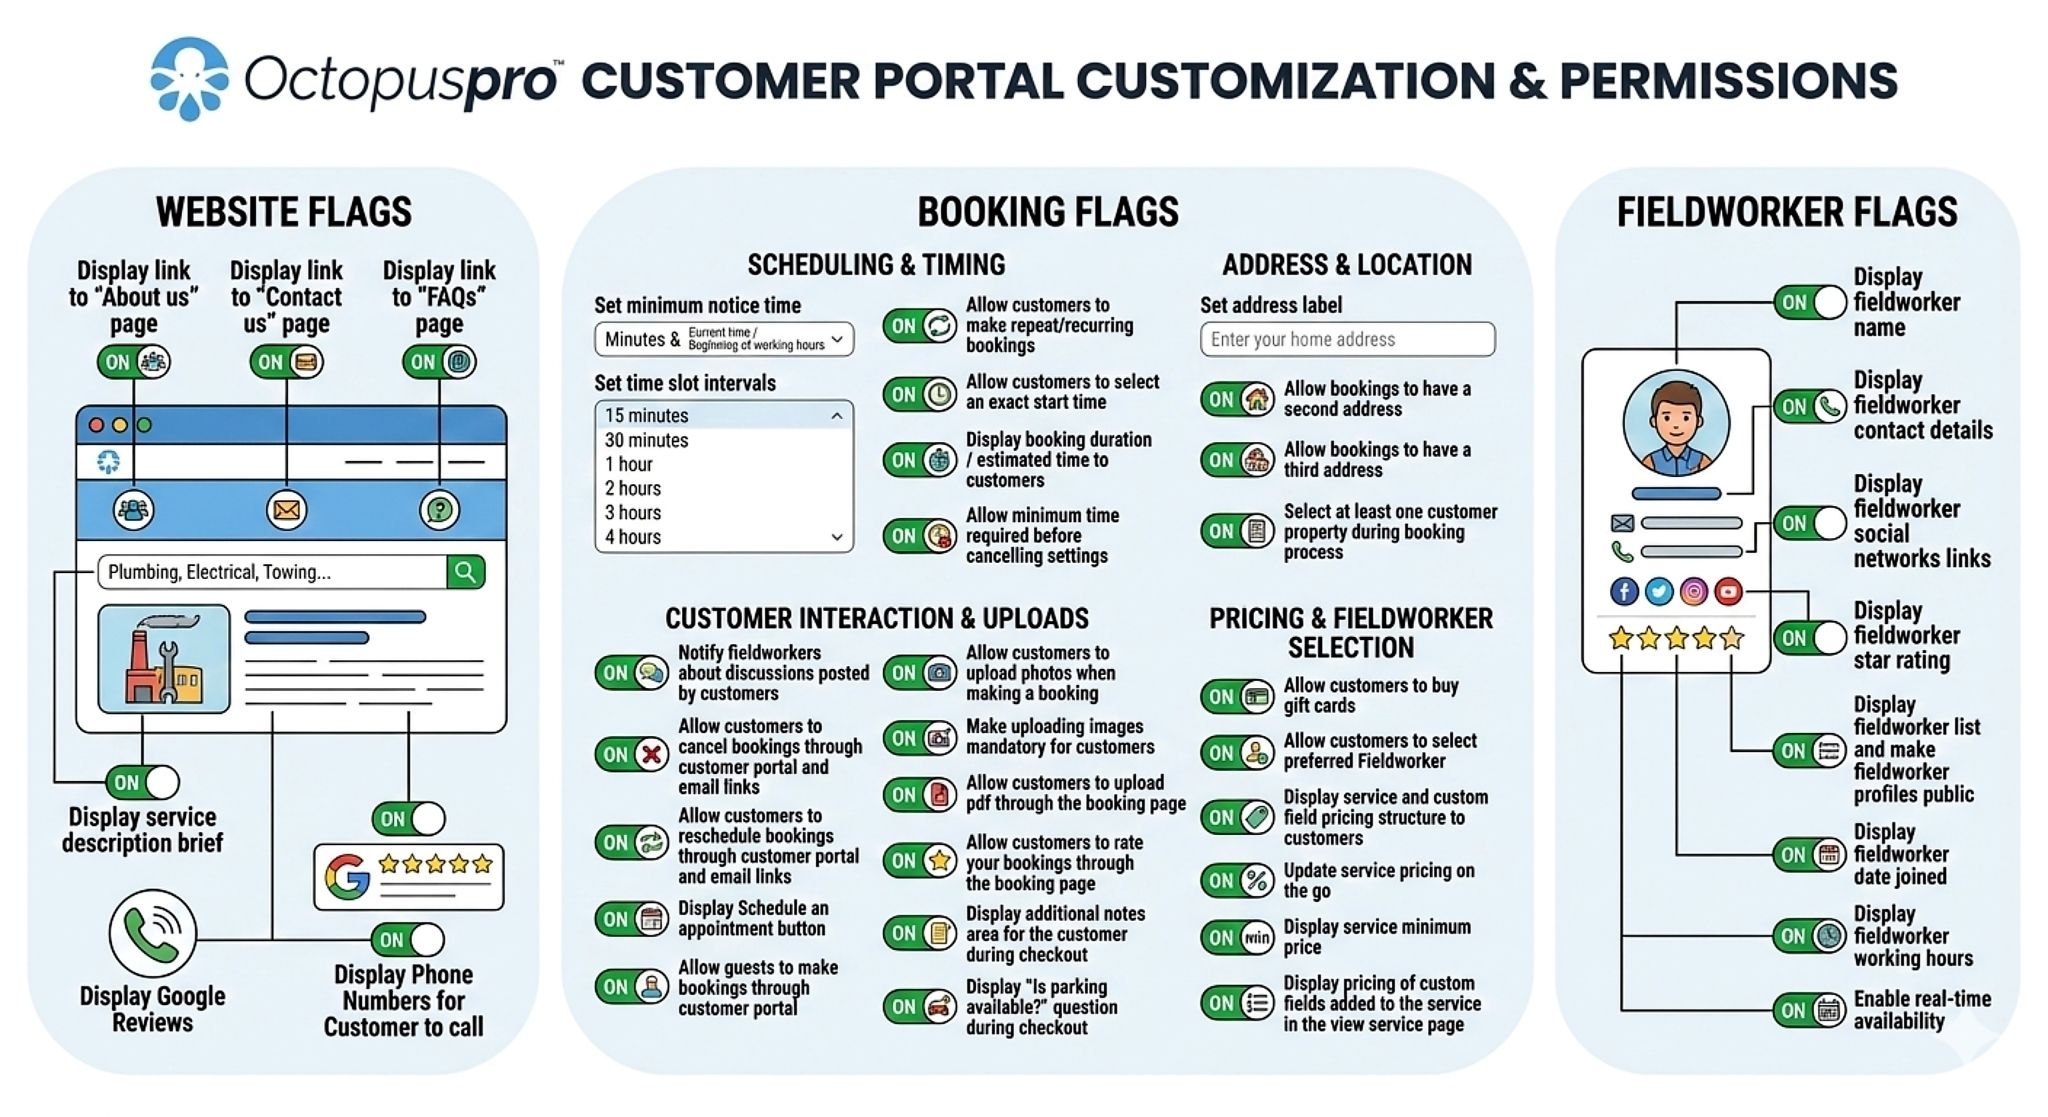
Website flags (portal menu & homepage)
- Display link to “About us” page in menu – adds an About page link to your portal menu.
- Display link to “Contact us” page in menu – adds a Contact Us form/page link for enquiries that shouldn’t become bookings.
- Display link to “FAQs” page in menu – adds an FAQ link to reduce questions and improve conversions.
- Display a search bar for services in the customer portal – helps customers quickly find services (ideal for large service lists).
- Display service description brief in the services list in the customer portal – shows a short summary under each service card/list item.
- Display Google Reviews in customer portal homepage – displays your Google Reviews widget for social proof.
- Display Phone Numbers for Customer to call in the customer portal – shows a click-to-call number (optionally with business hours/availability message).
Booking flags (scheduling rules, customer actions, uploads & pricing)
- What is the minimum notice time required for any new bookings? (X) minutes – sets the minimum lead time before a customer can book.
- Minimum notice time starting from – chooses how the lead-time window is calculated (e.g., current time vs beginning of working hours).
- Time slot intervals – controls the step between available start times (e.g., 15/30/60 minutes).
- Default travel radius – sets the default service radius used for location/coverage logic where applicable.
- Long address label & Short address label – customises the wording customers see when entering the booking address.
- Allow bookings to have a second address – supports multi-address jobs (e.g., pick-up + drop-off, two sites).
- Allow bookings to have a third address (if available in your account) – supports bookings with an additional address step (module/account dependent).
- Notify fieldworkers about discussions posted by customers – alerts fieldworkers when customers post messages on booking discussions.
- Enable customer self-scheduling after quote approval – allows customers to choose a time after a quote is approved (via “Schedule an appointment”).
- Allow customers to make repeat/recurring bookings – enables recurring bookings (repeat appointments) in the portal.
- Generate invoice automatically when the booking is created – auto-creates an invoice as soon as the booking is submitted.
- Allow customers to buy gift cards – enables selling gift cards via the portal (if supported in your account).
- Allow customers to select preferred fieldworker when making a booking – lets customers request a specific fieldworker/technician (best when profiles are public).
- Allow customers to cancel bookings through customer portal and email links – enables self-service cancellation (including email links, if your templates include them).
- Allow customers to reschedule bookings through customer portal and email links – enables self-service rescheduling (including email links, if enabled in templates).
- Allow guests to make bookings through customer portal – allows guest checkout without logging in.
- Allow customers to select an exact start time for their bookings – lets customers choose a precise start time (rather than a time window, depending on setup).
- Allow customers to upload photos when making a booking – enables photo uploads during checkout to improve job scoping.
- Make uploading images mandatory for customers when making a booking – requires at least one photo before submission (depends on photo upload being enabled).
- Allow customers to upload pdf through the booking page – allows PDF uploads after the booking is created (via the booking page).
- Allow customers to rate your bookings through the booking page – enables customers to leave a rating/feedback after job completion (based on your workflow rules).
- Display service and custom field pricing structure to customers – shows how pricing is calculated (service price + custom options).
- Update service pricing on the go – updates totals dynamically as customers select options during checkout.
- Display service minimum price – shows “From $X” pricing for variable-price services.
- Display pricing of custom fields added to the service in the view service page – displays option pricing on the service page for transparency.
- Display booking duration / estimated time to customers – shows estimated duration to set expectations.
- Display “Is parking available?” question during checkout – asks customers about parking access (useful for mobile/on-site services).
- Display additional notes area for the customer during checkout – adds an “Additional notes” field for access details/instructions.
- Select at least one customer property during booking process – requires selecting a customer property/location (useful for multi-site customers).
Fieldworker flags (public profiles & availability)
- Display fieldworker name to customers – shows the assigned fieldworker/technician name in the portal where applicable.
- Display fieldworker contact details like email and phone number to customers – allows customers to contact the assigned fieldworker (policy-dependent).
- Display fieldworker social networks links – shows profile/social links on public fieldworker profiles.
- Display fieldworker star rating to customers – shows star ratings on fieldworker profiles (if ratings are collected/enabled).
- Display fieldworker list and make fieldworker profiles public – publishes your fieldworker list and enables public profiles.
- Display fieldworker date joined to customers – shows “member since” on fieldworker profiles.
- Display fieldworker working hours in fieldworker profile – shows weekly working hours on public profiles.
- Enable real-time availability – only displays time slots where an eligible fieldworker is actually available (reduces double-bookings).
- Enable Service Area Validation – validates booking addresses against your service areas to prevent out-of-coverage bookings.
Example: requested time options (don’t repeat / repeat once / multiple repeat)
If recurring bookings are enabled, customers may see repeat options when selecting a requested time (depending on your service settings and portal configuration).

Learn more: Customer Portal Flags & Permissions
9) Set up payment integration (online payments & checkout)
To accept payments during online booking (or let customers pay invoices later), you’ll configure your payment methods and (optionally) connect an online payment gateway. This reduces no-shows, improves cash flow, and creates a smoother checkout experience.

How it works (recommended setup flow):
- Enable payment methods system-wide: go to Settings → Financial Settings → Payment Integration and enable the payment types you want to offer (e.g., Cash, Bank Transfer, Card). If you’ll take card payments, connect your chosen gateway here.
- Show payment methods on your Customer Portal checkout: go to Settings → Customer Portal → General Settings and enable which payment methods customers can choose during checkout (only methods enabled in Financial Settings can be shown).
- Set payment terms (deposit / partial / full upfront): configure your company-level or service-level payment requirements so the portal automatically calculates what the customer must pay at booking time.
- Test end-to-end: run a test booking (and a test invoice payment link) to confirm the right payment methods appear and the amount due matches your payment terms.
Best practices:
- Offer at least one online method (card) and one offline method (bank transfer/cash) to reduce booking drop-offs.
- If you require deposits, clearly state your policy (deposit amount, balance timing, cancellation rules) in your payment terms.
- Use incognito/private browsing when testing to avoid cached sessions affecting checkout.
Learn more:
- Activate Payment Methods for Customer Portal Checkout (Online Bookings)
- Payment Methods Configuration (Financial Settings & Payment Integration)
- Service Payment Terms (Deposits, Partial Payments & Payment Rules)
- Add Payments to Invoices (Admin workflow)
- Online & Offline Invoice Payments (Full workflow overview)


Popular gateway setup guides:
- Stripe Integration (Direct Payments & Stripe Connect)
- Square Payment Gateway & POS Integration
- PayPal Integration (via Braintree)
- Authorize.Net Integration
- eWAY Integration
- Checkout.com Integration
- WePay Integration
- Tap Integration
10) Configure job dispatch & assignment (manual vs automated)
After a customer books online, you need a reliable way to assign the job to the right fieldworker. In OctopusPro, job assignment is allocating a booking to a specific fieldworker, while dispatch is how the system sends job requests to fieldworkers (push notifications, email, and/or SMS based on your settings).
Choose your dispatch model:
- Manual Dispatch: your office reviews the booking and assigns the most suitable fieldworker.
- Automated Dispatch (Real-Time Job Assignment): the system matches eligible fieldworkers using your rules and automatically assigns the booking to the first eligible fieldworker who accepts.

What drives eligibility (matching rules):
- Service/skill assignment (who can do which services)
- Service areas / territories (where they can work)
- Travel radius (how far they’re willing to travel)
- Availability / working hours (when they’re available)

Operational tips:
- If you’re getting repeated declines, review your eligibility rules (service areas, travel radius, availability) and booking details (time/address).
- Use reassignment/transfer when a fieldworker becomes unavailable or when you need to optimise workload and routing.
- Make sure fieldworkers are trained on responding quickly to job requests (accept/decline) to keep scheduling accurate.
Learn more:
- Job Assignment & Dispatch (Manual vs Automatic)
- Managing New Job Requests (Fieldworker App Guide)
- Scheduling & Dispatch (Field Service Management Overview)
11) Set up forms & checklists (and assign them to services / booking stages)
Forms & Checklists let you capture consistent job data and enforce process compliance—such as pre-start safety checks, arrival questions, site condition photos, quality assurance steps, customer satisfaction surveys, and completion sign-off. They reduce missed steps, improve reporting, and standardise how your team delivers services.

Key concepts:
- Visibility: choose who can view/complete the form (office users, fieldworkers, customers, or combinations).
- When to display: choose where it appears in the workflow (e.g., check-in, check-out, always displayed, customer satisfaction).
- Assignment: assign forms to specific services and/or specific booking statuses/stages so the right checklist appears only when relevant.

Recommended setup flow:
- Create the form: go to Settings → General Settings → Forms & Checklists and click Create new.
- Set Visibility and When to display so it appears at the correct stage of the job.
- Add your questions/fields (e.g., text, checkbox, image upload, signature, date/time, dropdowns).
- Assign it to the relevant services and/or booking statuses.
- Test with a sample booking and verify it appears for the right users at the right time.
Learn more:
- Forms & Checklists Overview
- Forms & Checklists Setup (Create, Edit, Activate/Deactivate)
- Form Field Types (Elements) + Visibility/Display Options
- Using Forms & Checklists (Step-by-step)
- Forms & Checklists Use Cases (Templates & Examples)
12) Show payments & invoices online
OctopusPro can display invoices and accept online payments through your Customer Portal—so customers can pay deposits at checkout, pay outstanding invoices later, and view their billing history without contacting your office. What customers see depends on your Customer Portal settings, payment integration, and invoice visibility rules.
Before you enable online billing in the portal, make sure the following are configured:
- Payment methods are enabled (e.g., card, bank transfer, cash) and the correct methods are set to display to customers.
- A payment gateway is connected if you want to accept card payments online (e.g., Stripe, Square, PayPal).
- Payment terms are set (deposit / partial / full upfront) at a company or service level (so the portal knows what to charge at booking time).
- Invoice settings are configured (invoice layout, numbering, tax rules, what line items to show, and customer-facing display options).
- Invoice automation rules match your workflow (for example, whether an invoice is auto-generated when a booking is created or only after job completion).
Common portal payment experiences:
- Pay at booking: the customer pays a deposit or full amount during checkout (recommended to reduce no-shows).
- Pay later: the booking is submitted and the customer pays the invoice later via the portal or invoice payment link.
- Offline payments: customers can view the invoice and your payment instructions (e.g., bank transfer) if online card payment isn’t enabled.
Learn more:
- Activate Payment Methods for Customer Portal Checkout (Online Bookings)
- Payment Methods Configuration (Financial Settings & Payment Integration)
- Service Payment Terms (Deposits, Partial Payments & Payment Rules)
- Invoice Settings (Layout, Tax, Numbering, Display Options)
- Auto-generate invoices when bookings are created
- Add Payments to Invoices (Admin workflow)
Tip: After enabling payments, place a test booking in an incognito/private window and confirm that (1) the right payment methods appear, (2) the amount due matches your payment terms, and (3) the invoice is visible in the customer portal once generated.
13) SEO & tracking
If your portal is public (customers can find it via search), optimise it like a normal website:
- SEO meta tags (title/description)
- Google Analytics (GA4) to track visitors and conversion
- Google Ads and Meta Pixel for paid campaign tracking
- Customer Portal SEO (Meta Tags)
- Google Analytics Integration
- Google Ads Integration
- Meta Pixel Integration

![]()
![]()

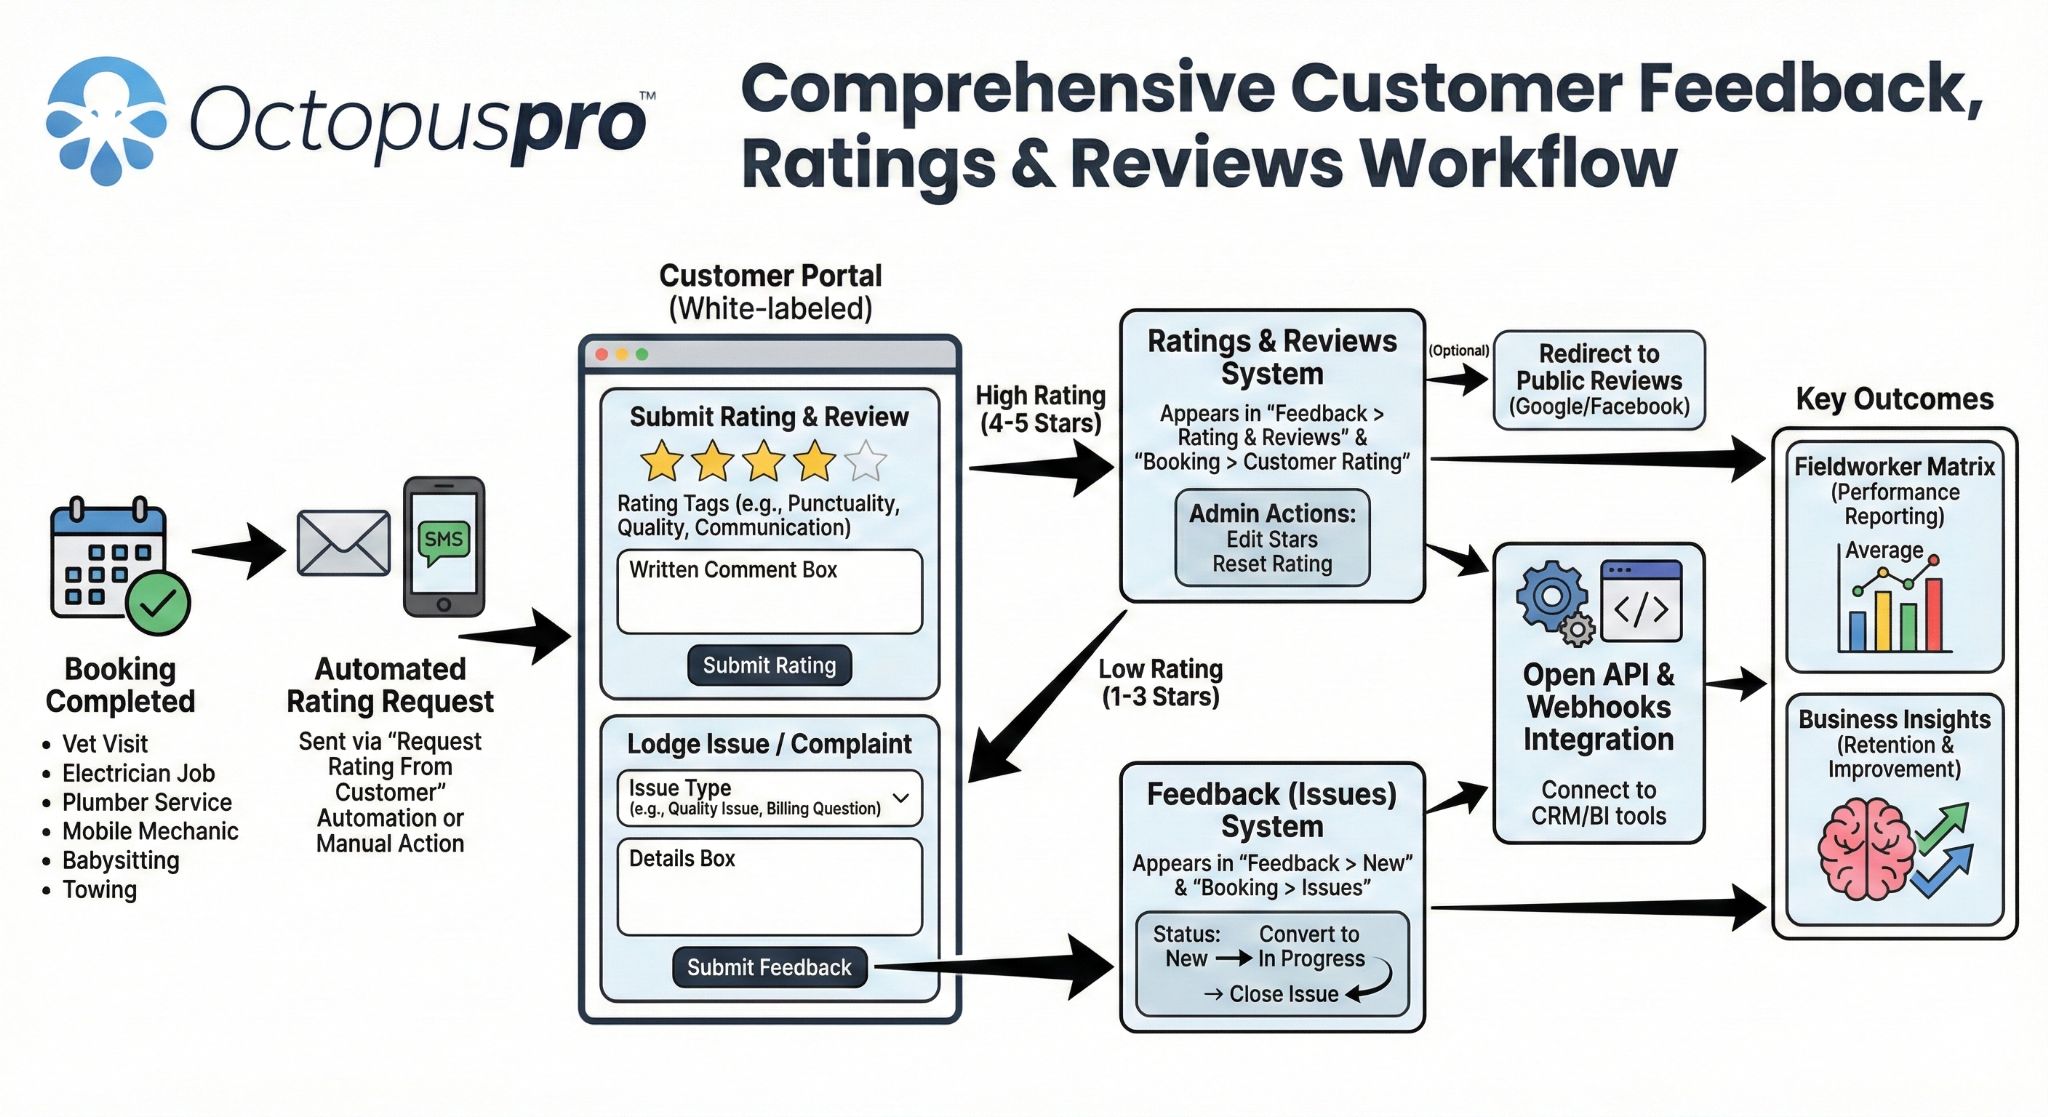
14) Reviews & social proof
OctopusPro helps you build social proof in three layers: (1) collect reviews internally to improve quality and recover unhappy customers, (2) invite satisfied customers to post a public Google review, and (3) display Google Reviews on your Customer Portal to increase trust and conversions.
A) Collect customer reviews internally (ratings & feedback)
Use OctopusPro’s built-in Customer Feedback, Ratings & Reviews system to capture private reviews after each job (star rating + optional written comments + optional rating criteria). This is ideal for performance tracking, service recovery, and improving operations.
- Configure criteria (Rating Tags) + feedback settings (what you measure, how you label issues, and how ratings are collected).
- Automate review requests after bookings are completed (email/SMS automations).
- Review responses in Feedback → Rating & Reviews and inside each completed booking (Customer Rating section).
- Optional: display internal star ratings publicly on fieldworker profiles (Customer Portal), if enabled.

Learn more:
- Customer Feedback, Ratings & Reviews (setup, rating tags, where to view ratings)
- Automated Procedures (Customer Booking Feedback Request / Rate Your Service)
- Issues & Complaints (service recovery workflow)
- Display Fieldworker Star Ratings on the Customer Portal
- Forms & Checklists Overview (customer satisfaction surveys)
B) Ask customers to review you on Google (public reputation)
Once you’re collecting internal feedback, you can also invite customers to leave a public Google review. The simplest approach is to add your Google “Write a review” link to post-job emails/SMS, invoices, and/or your portal experience.
- Add your Google review link to the feedback request email/SMS template (or create a dedicated Google review request template).
- Use automations so requests are sent after job completion.
- Keep the message short and frictionless (single button/link).

Learn more:
- Get your Google “Write a review” link (and Place ID) + full Google Reviews setup
- Email Templates (create/update customer messages)
- Template Placeholders (personalize review request emails/SMS)
C) Display your Google Reviews on the Customer Portal (social proof at checkout)
To build trust during browsing and booking, you can display live Google Reviews directly on your Customer Portal homepage. This is especially effective for customers arriving from Google Search/Ads.
- Connect Google Reviews by adding your Google API key + Place ID in OctopusPro.
- Enable the Display Google Reviews in customer portal homepage flag under Customer Portal → Flags & Permissions.
- Choose how many reviews to show and configure display options (where available).
Learn more:
- Google Reviews Integration (Customer Portal)
- Display Google Reviews on Customer Portal (API key, Place ID, enable flag)
- Customer Portal Flags & Permissions (toggle to show Google Reviews)
15) Test & launch checklist
- Preview the portal on desktop and mobile.
- Place a test booking (including add-ons/custom fields) and confirm emails/SMS.
- Verify availability shows correctly for at least 2–3 services.
- Confirm policies display correctly (terms/privacy/disclaimer).
- Check payment flow (deposit/full payment) if enabled.
- Add your portal URL to your website header as “Book Online”.
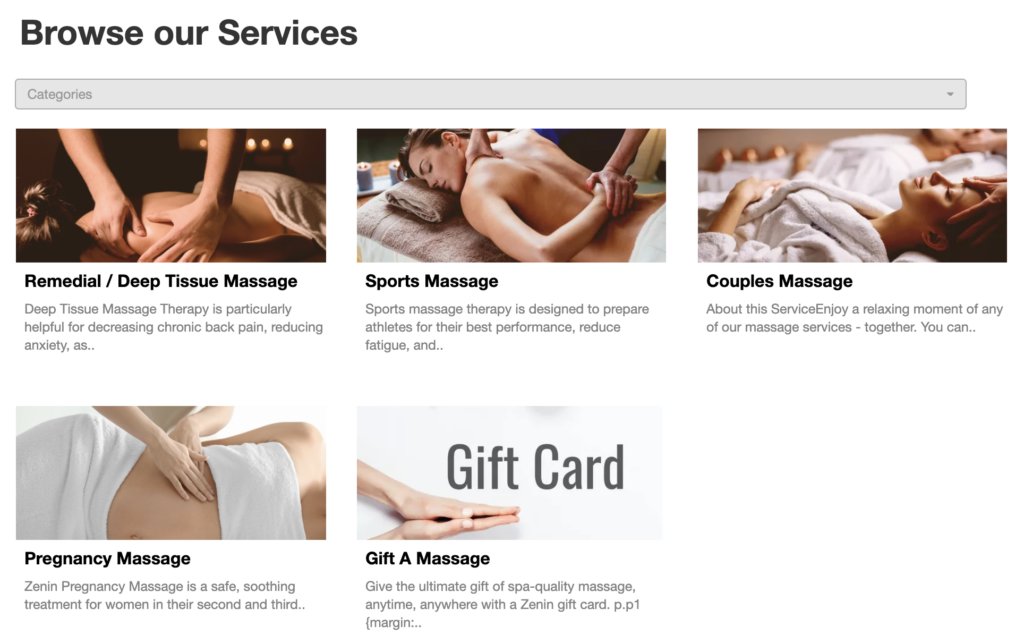
Example: customer portal services page
Example: booking flow date/time selection
To learn more, visit the customer portal / online booking features page.
To stay updated, please subscribe to our YouTube channel.